|
 |
|
|
Important Points in House Building
HE following points in building a house are considered of the greatest importance by a well-known architect: Carefully watch that the foundation walls are substantially laid, and accurately leveled on their upper surfaces, so that the doors shall not strike the floor or carpets in opening, nor the tables, chairs, or other furniture be obliged to stand on three legs.
The framework, when raised, should be plumb, so that all on or in the building can be cut square, and applied without tedious fitting. The siding should be thoroughly seasoned in the open air before using, and carefully applied with close joints, and well nailed. The edges of all water tables, corner boards, and window frames should be painted before setting.
The shingles should be carefully laid, breaking their joints at one-third of their width and double nailed. The flooring should be dry, close laid, and nailed with two nails to each beam. The partitions should be set with studding of selected width, and their angles or corners should be anchored firmly together to prevent the walls from cracking in those parts when finished. The chimneys should be carefully constructed, all points between the brickwork should be well filled with mortar to prevent sparks from passing through to the framework.
All mortar for plastering should be properly mixed, and allowed sufficient time (at least a week) for the thorough slacking of the lime, and a complete permeation of the caustic properties. Thin coats of plastering are better than heavy ones. A mortar that does not crack in setting or drying is sure to be good.
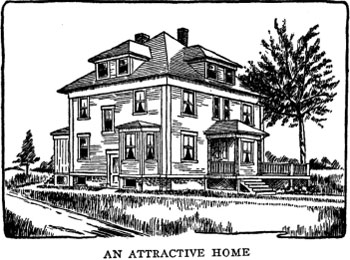
The interior wood finish should not be begun until the plastering is completely dried out, and all loose mortar is removed from the building. All woodwork usually painted should be primed as soon as in position.A Very Convenient House
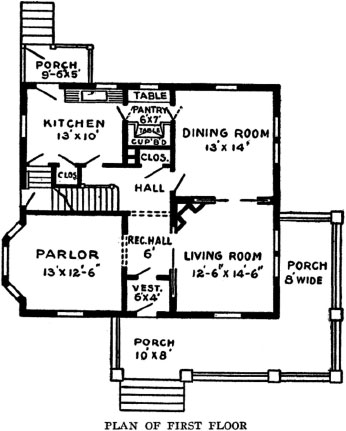
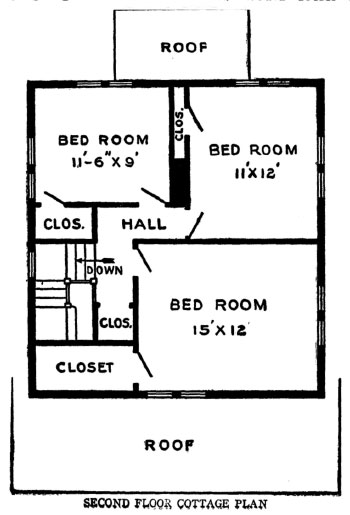
The accompanying picture and plans show the outside and interior arrangements of a very convenient home built the past year by one of our agricultural editors. It is 34 feet wide by 30-1/2 feet deep, with a 7-foot cellar underneath. The house contains 10 rooms, including two in the attic, besides a storeroom in addition to those shown. All the rooms are of good size and have two or more large windows, which make them light and sunny and supply plenty of good air.
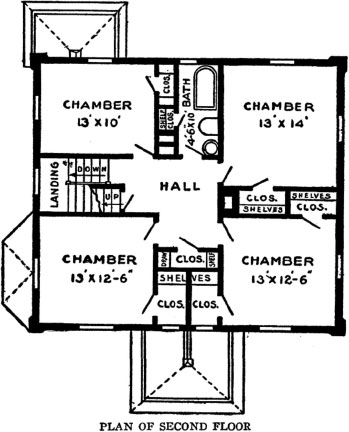
Economy of construction, as well as of doing the work, was kept in mind in the planning. The location of the stairs is somewhat unusual in a house of this sort, but is such that only one light is necessary from first to second floor. There are plenty of large closets on the second floor, which are greatly appreciated.
The porch is not roofed except over the door, but an awning, which is taken down in the fall, makes it cool and shady in summer, and allows the sunshine to reach the living room in winter. The first story is 9 feet from floor to ceiling, the second 8 feet and the third 7 feet 6 inches. The house is piped with gas and wired for electricity, provided with the best quality of sanitary plumbing and heated with hot air furnace. A similar house can be built for about $4,000, more or less, according to finish and locality. Occupancy proves it to be a model of convenience.
If a bigger kitchen is desired, it can be obtained by going back farther. Many would prefer a wider bathroom. A foot taken from the back chamber on the right would greatly improve the bathroom and still leave a large chamber. If desired, a large roofed piazza can be added.
Building a Block House
A Kansas farmer needed a house on his farm, but had very little money. He found that only a little was needed for a cement block house. He ordered a cement block machine and bought 12 boards 10 inches wide and 12 feet long, which were cut in seven pieces of equal length. Two cleats were nailed on each, about 3 inches from the ends. These were for pallets and cost about 7-1/2 cents each. The cement blocks were 8 x 9 x 18. As the block machine had no attachments, some contrivances were made for making half stone, three-quarter and others.
For caps and sills for doors and windows 9-inch boards were taken, using three for each mold, and two holes 2 inches from the edges and 3 or 4 inches from the ends of two of them were bored. Then the farmer made cement blocks for the ends 9 x 8 inches, laid the other board on the ground, placed one of the others on each side of it edgewise, put in the end blocks, and through the holes put long bolts and bolted it tight together. Then it was ready to fill with concrete. These boards were as long as were needed to make the caps or sills. A sprinkler, sand shovel, plasterer's trowel, and a wire sieve of 1/4-inch mesh were obtained.
The sand cost nothing except hauling. The machine was set up near a spring. A box something like a wagon bed with both ends out was made of boards, the block machine placed in one end and the pile of sand at one side. Three shovels of sand and one of cement were placed in a tub and mixed thoroughly. Then a boy took the sprinkler and sprinkled it while another mixed, until it was dampened evenly all through. Then they spread 35 shovels of sand in the mixing box and shook one sack of cement over it, which made a five-to-one mixture. This was thoroughly mixed by shoveling and sprinkling until it was good and damp, but not wet. This quantity made ten blocks.
A pallet was placed on the open machine, the machine closed, and some of the richer mixture of concrete placed on the face about 1 inch thick. The mold was then filled with the five-to-one mixture, while one of the boys tamped it, put in the core, and smoothed off the top with a trowel. The core was then carefully lifted out, the machine opened, and the pallet with the stone on it placed on a level piece of ground.
In three or four hours the blocks were ready to sprinkle. When 30 hours old they were placed on end and the pallets used for more stone. After standing for two days, during which time they were sprinkled frequently to keep them damp, they were dumped in the creek, where they were left until ready for use. The foundations were made by first putting into a trench about 6 inches of broken rock, then 4 inches of concrete.
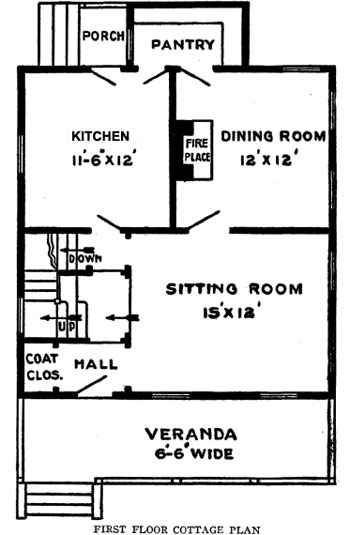
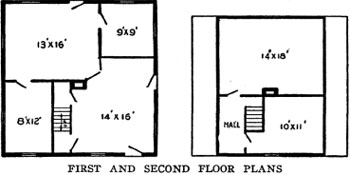
The house is 26 feet square, the walls 12 feet high, with gables north and south. The picture of the house and arrangement of the two floors are shown in the illustrations. We used 12,400 pounds of cement, which cost 60c per 100, or $74.40. Doors and windows were brought at a cost of $33.75. Chimney, plastering and lumber for floors, roof, partitions and finishing, all of the best, cost $240. The hardware was $30, making the total cost of house $378.15, not counting cement machine or labor, all of which was done by the family.
Art imitates nature, and necessity is the mother of invention.
-- Richard Franck.
Consider the end.
-- Chilo.A Practical Round Barn
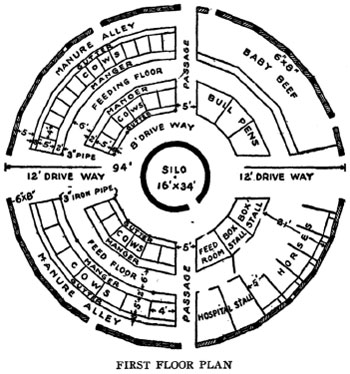
There is no economy in building a round barn, that is, strictly round. The barn here illustrated has 26 sides nearly 12 feet long, making a barn 94 feet in diameter. The sills, plates and roof in a strictly round barn are very expensive, and the work will not last as well as when built as shown. The floor space of the first floor is nearly the same as if round, and the hay loft is very little smaller. If the building is round, the walls should be lathed with metal lath, over rough boxing, and plastered with two coats of portland cement. In fact, this finish is to be preferred in building any shaped barn, as it requires no paint and practically no repairs.
The floor plan of the barn shown is self-explanatory. It has stalls for 40 milch cows, three bull pens, two hospital stalls, pen for baby beef that will accommodate about 2 1/2 cars of calves, stalls for seven horses, including the two box stalls, and the feeding room and silo. The silo is 16 x 34 feet, will hold about 140 tons of silage, and requires about ten acres of average corn to fill.
The hay loft has 166,500 cubic feet of space, and deducting the silo and bins for ground feed will hold 300 tons of loose hay. The ground feed is stored in hopper-shaped bins above the feed room, and drawn down through small spouts as wanted. The hay is handled with hay forks, and to locate the trolleys as near the roof as possible, trap doors are left in the loft floor, and the hay hoisted from the driveways. A circle trolley may be installed, or two straight ones. Several large hay doors are also built in the outside walls above the loft floor. The silo, the floors of the cow stalls, including the gutters and mangers, also the 8-foot driveway around the silo, are of cement, and, while it is intended to install litter and feed carriers, it is also intended to drive around the entire barn, or the feed floor with a cart if desired. The interior arrangement of first floor may, of course, be changed in several ways, and the cows faced in the opposite direction, etc., or stalls and other equipment arranged for different stock.
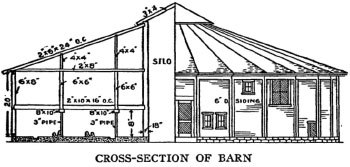
The barn, as shown, has about the same floor space as a barn would have 36 feet wide and 180 feet long. The ventilation is always much better in the round barn, the work of caring for and feeding may be accomplished with less labor, there are never any drafts on the stock, the building may be built for less money, and is much stronger. As shown, the barn has a stone foundation, the roof is covered with asbestos roofing felt, and the walls covered with 6-inch drop siding. Everything is of the best, and all exposed woodwork painted two coats. This building would cost about $4,700 without the cow stanchions. Where home labor is used, and the lumber can be secured for less than $30 per thousand, the barn may, of course, be erected for less.A Well-Arranged Barn
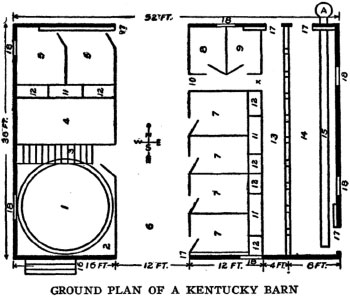
This Kentucky barn has a frame of oak, 6 x 6 inches. Center posts 23 feet 9 inches; shed posts 16 feet tall; studding and braces 2 x 6-inch poplar; joists 2 x 10-inch poplar, oak and pine. The sheeting is of poplar, beech and ash. The bevel siding is select poplar. Cornice and base, white pine. All doors are two thicknesses, front is dressed cypress and the back dressed white pine. The lower windows are 10 x 12-inch, 12 lights and upper ones inside the building. The joists are set 20 inches from center to center. The loft is 8-1/2 feet from lower floors.
The floor plan shows the arrangement as follows: Number 1, icehouse, 18 feet deep, walled up with stone; 2, carriage house, 16 x 18 feet; 3, stairs, leading to lumber room over carriage room; 4, corn crib, 8 x 16 feet, over which are the grain bins for wheat and oats. These bins have chutes running down into the corn crib, from which grain is filled into sacks. Numbers 5, 5, are box stalls, 8 x 12 feet; 6, driveway, 12 x 38 feet; 7, 7, 7, 7, box stalls, 6-1/2 x 12 feet; 8, harness room, 6 x 8 feet; 9, feed mixing room, 6 x 8 feet, with spouts running from cutting box and bran bins overhead; 10, alleyway running from driveway to feed alley; 11, 11, 11, hay chutes, with openings near the bottom, 1 x 2 feet. These openings are directly over the feed boxes and any hay that falls while horses are feeding goes into the boxes and none is wasted. Number 12, feed boxes, 1 x 2 x 2 feet; 13, feeding alley, 4 x 38 feet.
Overhead at X is an opening from the hay loft where alfalfa, clover, cowpeas and hay are kept for the cows; 14, cow shed, 8 x 38 feet. Cows are fastened with stanchions and fed out of boxes on alley floor. The cow shed has concrete floor, with a fall of 2 inches from stanchion to Number 15, the drain basin, which is 1 foot 2 inches wide and 1 foot deep at A, where it runs into a basin made of concrete, 6 x 6 feet and 2 feet deep; 16, driveway into carriage room; 17, openings in which siding doors hang when open; 18, windows.
The roof is of tin, standing seams, with Yankee gutters made on the lower edge of the roof. An opening 10 x 10 feet in the center of the driveway loft is allowed for hay and other feed taken up by an unloader that runs on a track in comb of roof. The barn will cost about $1,500 -- more or less, according to cost of building material where it is erected.A Handy Small Barn
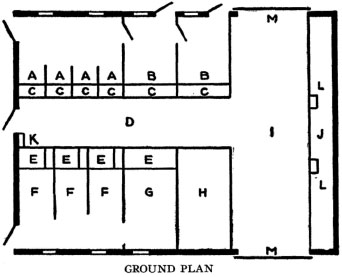
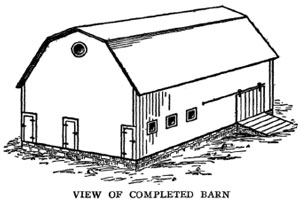
This barn is arranged to meet the needs of a small farm. It can be built in most localities at a cost not to exceed $500, and if a farmer has his own timber, at even less cost. The outside dimensions are 36 x 48 feet, and it is 16 feet to the eaves, with a curb roof. The stables should be about 8 feet high, which allows plenty of loft room above for hay.
In the floor plan the cow stalls, A, can be made of any width desired, 3-1/2 feet being best for general purposes. At B are two large box stalls for cows with young calves. The mangers, C, are 18 inches wide, with a rack for hay or fodder above. At D is the feed room and alley, which is 8 feet wide. At E are the mangers for the horses, with a feed box at the right side. At F are three horse stalls 4 feet wide, in which horses can be tied. At G is a large box stall for mares and colts.
At H is provided the granary, which can be subdivided into bins as necessary. The portion I is the driveway, which affords ample storage space for tools, wagons, etc., and is used as a driveway when hay is being elevated into the loft above.
There is a large corn crib, J, at the end, which can be filled from the outside and emptied from the inside. It is narrow and so arranged that the corn will dry out quickly. Chutes from this bin should be provided at L. A ladder to the hay loft at K is a convenience which should not be omitted.
The Farmer's Icehouse
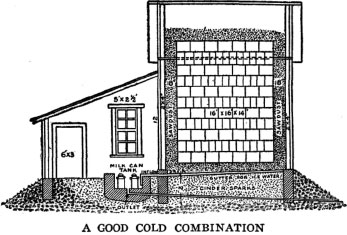
In a properly constructed icehouse, and when the ice is properly packed and cared for, no waste should take place from the inside of the pile of ice. The melting from the sides, bottom and top is caused by insufficient insulation. The waste from the bottom is generally the greatest. The amount of ice melted in the bottom of the icehouse varies from 1 to 6 feet during the year, depending upon the construction of the floor. If the icehouse is provided with an airtight floor, with the ice laid on at least 18 inches of dry sawdust, the bottom waste rarely exceeds 12 inches during the year; on the other hand, if the ice is piled in the icehouse on the bare ground without any insulation under it, or any provision made for drainage, the meltage frequently is 6 feet. The side and top meltage is not so great, but it frequently ranges from 1 to 3 feet, depending upon the insulation.
Location and Building
The location should be where the ice can be removed and delivered with the least amount of labor; however, it is very important that the icehouse should be located in the coolest place, in as dry a place as possible, and always above ground. The lowest layer of ice should always be at least 6 inches above the outside level of ground.
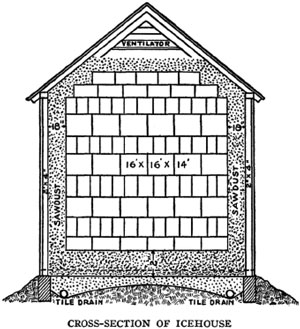
The size of the building must be determined by the amount of ice used during the year. For instance, a dairy farm upon which 35 cows are kept, and from which the milk is sold, needs an icehouse 16 x 16 and 14 feet high. If the cream is to be sold and skim milk fed to the calves, immediately from the separator, an icehouse 14 x 14 and 12 feet high is of sufficient size. In both cases we make allowance for the use of 25 pounds of ice per day during the summer months for household purposes. For a man who keeps about 20 cows and sells the milk, an icehouse 14 x 14 and 12 feet high is of sufficient size; however, in no case should an icehouse be smaller than 12 x 12 and 10 feet high, because the outside surface is too great, compared with the volume, and, therefore, too much ice is wasted in proportion to the amount used.
The building should be as near the shape of a cube as possible, for the cube contains the greatest amount of volume with the least amount of surface exposed other than circular forms. It is not always practical to build as high as we build square, owing to the amount of labor and the inconvenience of storing the ice; therefore, the dimensions given are really the most practical.
If the icehouse is not built upon a sandy surface and where rapid drainage is natural, it is necessary to cut a space to a depth of 12 to 18 inches, where the icehouse is to be located, lay a tile drain to drain this, and fill it with sand or finely crushed stone. Put a 6-inch foundation of concrete of the size you wish to build your ice-house in this pit, and fill around the outside.Framing the Icehouse
The framework is made by laying 2 x 4-inch sill on the concrete foundation; fasten this to the foundation by cementing a few bolts into the concrete and allowing them to extend through the sill; 2 x 4 studding are then placed upon the sill, 16 inches apart from center to center. The rafters for the roof are likewise made of 2 x 4's, placed the same distance apart as the studding, but the purlin plate upon the studding should be at least 6 inches wide. The outside of studding may be boarded either with common sheeting and paper, upon which poplar siding is nailed, or with patent siding or ship-lap siding, the latter being the cheapest and requiring only a single thickness of board.
The roof should be made with not less than one-half to one-third pitch, and preferably covered with shingles, for shingles are better insulators than either slate or metal. Paper may sometimes be used to good advantage. A cupola or flue should be built upon the roof to allow for the removal of the warm air from the top of the ice. A ventilator may be placed in the gable end.
A continuous door should be cut in one end to allow the ice to be put in. This door may extend from the gable down to within 5 feet of the bottom.
Before putting in the ice place from 18 inches to 2 feet of sawdust or dry peat upon the floor. The ice should be harvested in regular shape, oblong, rather than square, and not less than 18 inches in width and 30 inches in length.Ice and Milk Houses Combined
The side elevation of an icehouse with milkhouse attached is presented in the drawing, It shows the advantage of utilizing the water from the icehouse for cooling the milk. No ice needs to be removed from the icehouse. It operates automatically. If the weather is warm the ice melts more rapidly and keeps water in the tank at the required temperature.Small Greenhouses
The farmer who would make his crops of vegetables most profitable, or the small gardener who would have an early supply of early vegetables for home use or market must employ some kind of glass structures to hasten these crops. The hot-bed or cold frame have been much in use in the past, but the cost of sash, shutters and mats is nearly as much as the materials needed for a permanent structure, while the labor of caring for cold frames or hotbeds is often much more than that of the small greenhouse. In the latter one may work with comfort no matter what the weather may be outside. It requires much more skill to run hotbeds successfully.
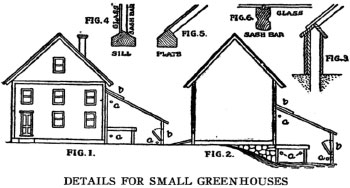
Small greenhouses may be built against the south side of the house or stable, Figures 1 and 2, or they may be built entirely away from other buildings, but the shelter of larger buildings on the north or west will be found of great advantage. If one has a basement to the house or stable, a lean-to house may be built, and heat from the open cellar in a large measure will heat the greenhouse in the mild weather of fall and spring.Material for Construction
A cheap and efficient house may be made by setting chestnut or cedar posts in the ground, covering the sides with lining boards, then two thicknesses of tarred building paper and sheathing outside, Figure 3. Cement, stone or brick will be cheaper in the end. The durability of glass structures will depend much upon the form of the materials. Clear cypress is now more used than any other material. Sills should be of the form shown in Figure 4. Plates may be made of plank as in Figure 3, or as in Figure 5. Sash bars should have grooves along the sides to catch the drip from the glass, as in Figure 6.
The glass for ordinary work may be No. 2 double thick, large sizes, 16 x 20 inches or 20 x 24 inches, being much used. Smaller sizes will be cheaper in price, but more sash bars will be needed, and they cut off much of the sunlight. The glass should be put in with putty, made with about one-third white lead in it, and firmly tacked with triangular zinc tacks of large size, or the double-pointed tacks, which are so bent as to prevent the glass from slipping down.Set Glass in Warm Weather
Glazing should be done during the summer or early fall, as putty will soon become loose if frozen before well hardened.
In building there should be no mortises, but all joints be made by toeing in with long, slender nails. All woodwork should be thoroughly painted before fitting, and all joints filled with white lead paint. After all is done the frame should be painted before the glass is put in.
The most important and expensive feature of the small greenhouse is the heating. If one has a hot water or steam heater in the house, to which the glass house is attached, it will be a very simple matter to carry pipes through, as at a, a, Figures 1 and 2. Hot air also may be let into such houses, or a small kerosene heater in very cold weather may be used, if the house is built opening into the cellar.
Ventilators must be located as shown in Figures 1 and 2, at b, b. Very small structures may be run without much heat if opening into cellars or other heated rooms by having shutters or curtains to draw down at night and in very cold, cloudy weather.Covering with Hotbed Sash
Houses of small size may be made by building a frame upon which hotbed sash may be screwed. If one has the sash this is a cheap way of building, and such a house has the advantage that the sash may be entirely removed during the summer, but it is very difficult to make a close house with such sash.
The woodwork of greenhouses and hotbed sash should have a coat of thin linseed oil paint every second year. Much of the success to be obtained from any glass structure will depend upon the skill of the operator, and the thermometer, both outside and in, must be watched very closely. The temperature should be maintained as nearly as possible like that in the open air under which the plants grown thrive the best.Wire Fence Corn Crib
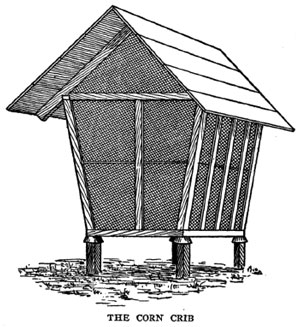
In the drawing is shown a handy, inexpensive corn crib, which possesses several advantages not possessed by the ordinary slat corn crib. It is made on 4 x 4-inch posts, with pans at their tops, to prevent rats from climbing in. The sills are 4 x 4-inch, the scantlings 2 x 4, and 2 feet apart. The fencing is nailed to these on all sides, and the door frame is similarly covered. The roof is made wide, so as to shed all possible water. The height, length and width may suit the farmer's convenience. A convenient width is about 5 feet at the floor, widening to 7 feet at the eaves. Owing to the very open nature of this crib, corn dries more quickly than in a slat crib, and as there is less chance for water to lodge in the cracks, the crib will be more durable than if built entirely of wood.
Want of cure does us more damage than want of knowledge.How to Lay a Floor
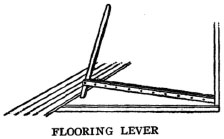
To lay a floor or board ceiling just right, and do the work fast, use a good lever, as in the illustration, taking for the supports two 1 x 4-inch pieces as long as the width of the room. The upright arm is 4 feet long with a hole 4 inches from the lower and through which it is pinned loosely between the ends of the supports. With a little practice, a good carpenter's job can be done on floor or ceiling.An Inexpensive Veranda
A vine-covered veranda is a great comfort, but in many cases the expense seems greater than the owner of the plain little farmhouse feels able to stand. A farmer in Arkansas wanted one, and he set to work in this fashion. First he went to the woods and got a load of straight poles about 1-1/2 inches in diameter and from 8 to 12 feet long. He next procured a number of nice, smooth boards for the flooring of the veranda, making it about 6 feet wide and 10 feet long and strengthening it with the necessary timbers. He securely nailed the poles about 8 inches apart around the flooring to form an inclosure, leaving an opening in front about 5 feet wide.
The poles in front were 7 feet from the floor to the roof and 12 feet at the house. About midway of their height the poles were straightened by a row of poles nailed horizontally and another row was placed at the top. To make all secure against rain, the slanting roof poles were next carefully covered with overlapping rows of bark. All this required but small outlay of cash and even less of work. It was then ready for the vines.
Being in haste for immediate results, the builder planted some roots of the hard native woodbine, which will soon cover any space with its rapid growth. It is an easy matter to sow seed of the morning glory, hardy annual gourd, or any one of several hardy climbers and the result will soon be a mass of shade and lovely blossoms besides, all of which makes the summer evenings pass far more pleasantly.
1. Workshop and Tools
2. The Steel Square
3. In and Around the House
3. In and Around the HousePart II
4. Barns and Stock
5. Poultry and Bees
6. Garden and Orchard
7. Field and Wood
8. Gates and Doors
9. When We Build
9. When We Build Part II
10. Worth Knowing
10. Worth Knowing Part II
Next: 9. When We Build Part II
Back to the Table of Contents
Back to the Small Farms Library Index
Community development | Rural development
City farms | Organic gardening | Composting | Small farms | Biofuel | Solar box cookers
Trees, soil and water | Seeds of the world | Appropriate technology | Project vehicles
Home | What people are saying about us | About Handmade Projects
Projects | Internet | Schools projects | Sitemap | Site Search | Donations | Contact us