|
 |
|
|
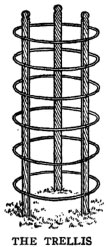
An Iron Hoop Trellis
HIS trellis is made of the iron hoops that are now used so commonly upon sugar and other barrels. They are of stout wire, welded into a complete circle, and, as barrels are constantly going to pieces, one can get together quite a collection of these, when they can be assorted into uniform sizes.
An attractive trellis is shown. Three strips of wood, pointed at the lower end and finished with a knob at the top, are provided, the length being a matter for individual taste. A trellis for tomato plants will need not more than two hoops, while one for sweet peas may require a half dozen. The strips of wood should be of inch board, 2 inches wide. The hoops are secured to the uprights by small staples made for putting up wire fencing. The wooden posts may be oiled or painted some attractive color. This trellis will be greatly appreciated both in the vegetable and flower gardens, for its strength and attractiveness.
Diligence is the mother of good luck.
-- Franklin.Plant Supports of Barrel Hoops
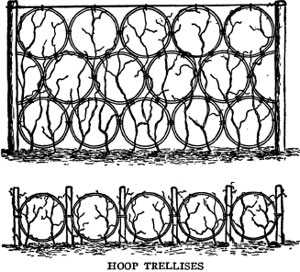
The ordinary wooden hoops from barrels may be made into an attractive trellis for grapes or a support for smaller twining plants by being arranged as shown in the sketch. Attach them firmly to heavy stakes with some No. 7 smooth wire and you have an arrangement which will last for several years and is not unattractive to the eye.A Folding Trellis
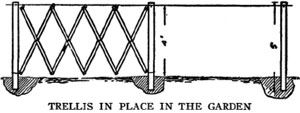
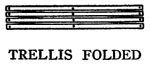
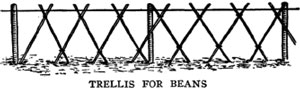
A good way to pole beans is to make a folding trellis out of plastering lath, as shown in the cuts.
Bore three small holes through each lath, as shown in the first cut and fasten them together with common wire nails well clinched.
Five-foot posts are set 1 foot in the ground and a wire strung at top and bottom. The laths are fastened to the wires with string, as shown in the second cut. The trellis is made in sections so as to be easily handled. When not in use it is folded up and laid away under shelter. The posts are spaced evenly so that one section of trellis will just go between two posts.Easy Way to Pole Beans
Set posts at convenient distances apart and stretch a wire at the top. This may be done as soon as ground is plowed. Plant and cultivate one row each side of line until beans begin to vine, then set poles slanting, tying them together where they cross at the wire. This braces the whole row and beans can be cultivated with hoe. Hills 3 feet apart in row with one vine to hill are better than two vines.Trellis that Stands Alone
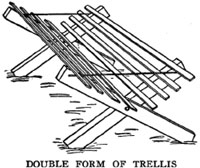
A plant support or garden trellis, such as shown in the drawing, is very handy in the garden. This double form of trellis can be folded up and takes very little room in storage. All trellises and stakes should be gathered as soon as the crop is harvested and stored under cover until the next season. They are useful for tomatoes, beans, peas, cucumbers and other plants that need some support. The double trellis is built of narrow 1/2-inch slats and pieces of 2 x 3, which are bolted together for the legs. The top may be held in place by pieces of string or wire attached at the points indicated in the drawing. The length, width and height of this trellis should depend upon the use to be made of it. A large one will be wanted for a large spreading plant and a small one for a small plant. It is important to have trellises just the right size to give proper support.Protecting Newly Set Plants
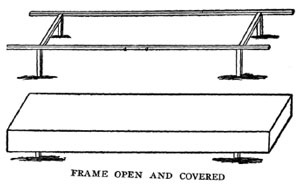
Plants newly transplanted always demand more or less protection from the blighting effects of too much sun and wind. It is best achieved by making a shelter such as is shown in the cut. Two 10-foot poles and two 3-foot pieces of any convenient thickness for the crosspieces, with four 14-inch weather-strips for the legs, constitute the frame. In the middle of it two hooks should be inserted on each side, and upon these the covering fastened which can thus be adjusted very quickly. The covering may consist of burlap or any kind of rough sacking.
Being so simple and economical to make it is advisable to have enough frames to protect the number of tender plants that are set out in a garden at one time. They possess other advantages than sheltering the young things from the direct rays of the sun. They allow slow evaporation, and so keep newly watered ground moist for hours, whereas if exposed to the sun and wind it would soon become dry and caked. On windy days it is only necessary to let the sacking down on the windward side of the shelter. In case of frost the protection that they afford is of inestimable value.
Love thy neighbor, yet pull not down thy hedge.Making the Hotbed
The value of every vegetable garden can be greatly increased and the time during which a supply of fresh vegetables may be secured for the table greatly lengthened by the use of the common manure hotbed and the cold frame. These indispensable adjuncts of the good garden are so easily made and cost so little that it is surprising they are not more common. A good hotbed made the latter part of February or in March can be made to yield an abundant supply of lettuce, radishes, spinach, etc., for table use by the time such crops are being planted out of doors, and the supply of cabbage, tomatoes and other plants for the home garden can be secured ready to transplant several weeks earlier than if plants grown in the open were depended upon.
As a source of heat fresh horse manure is used. About half manure and half fine straw mixed together should be piled in square piles 2 or 3 feet in depth, and 4 or 5 feet in width and long enough to contain the amount necessary for the beds desired. After heating has well started, the piles should be forked over, turning the outside of the old pile to the inside of the new, and when heating again is well under way the material is ready for use. In the meantime select a well-drained spot, sloping to the south, if possible.
Dig a trench 6-1/2 feet wide, 2 feet deep and as long as desired, running east and west. Now place the manure in the trench, tramping and packing in thin, even layers until level with the surface. Make a frame 6 feet wide and as long as desired, but some multiple of three, because the hotbed sash are always made 3 feet wide. The end piece should be 9 inches high in front and 15 inches high in the back. The front side board should be 9 inches wide and for the rear it will require two boards, preferably 12 and 3, with the wide one at the top.
A frame 12 or 15 feet in length will be quite large enough for the ordinary farm garden. Set this frame on top of the manure with the slope facing the south and secured by stakes. On top of the manure put 6 inches of good garden soil and cover the frame with common sash or windows 6 feet long by 3 feet wide. At first the heat will run very high, but in a few days it will fall to 80 or 90 degrees, when it is safe to plant the seeds.Making Permanent Hotbeds
Hotbed sash should be constructed of white pine or of cypress, and the sash bars should run in one direction only, and that lengthwise of the sash. The bars may be braced through the middle by a transverse bar placed through the long bars below the glass. The two ends of the sash should be made of sound timber, 3 inches wide at the top and 4 inches wide at the bottom end, mortised to receive the ends of the sash bars, and with a tenon at the ends to pass through the side pieces, which should be 2 1/2 inches wide.
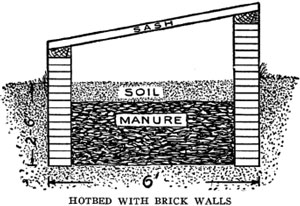
A permanent hotbed should be so constructed as to be heated either with fermenting manure or by radiating pipes from the dwelling or greenhouse heating plant. For a permanent bed, in which manure is to supply the heat, a pit 2 to 2-1/2 feet deep, according to the latitude in which the work is to be done, should be provided.
The sides and ends may be supported by a lining of plank supported by posts 4 feet apart, or, what is better still, a brick wall 9 inches thick, as shown in the drawing, may be used. In either case the pit lining should come flush with the surface of the soil. The site for the pit should be on naturally well-drained land, and a tile drain from the bottom of the excavation should be provided to prevent the water from accumulating in the pit and stopping the fermentation of the manure during the period the hotbed is in use.
Standard hotbed sash are 3 by 6 feet. The pit, therefore, should be some multiple of 3 feet in length, and the width should be the same as the length of the sash, 6 feet. The plank frame, or the brickwork of the pit, may be extended above the surface of the ground sufficiently to allow for placing the sash immediately upon these permanent structures.Heat for Hotbeds
Make an excavation 5 x 16 feet on the surface, and about a foot deep. Lengthwise along this space lay three rows of tiling, one along the center and one about a foot from each side. The tiles should be 4 inches inside measure, and 1 foot long. These are placed end to end so as to fit closely, and earth is pressed around them so as to hold every piece exactly in place. Then the excavation is filled with rich soil until level with the surface, excepting at the end the tiles are left bare for a few inches. The board frame, 5 x 15 feet, is next put in place so as to leave 6 inches of each row of tiles projecting beyond the ends of the frame.
At the east ends of the bed, a hole should be dug 3x4 feet on surface and 2 feet deep; in this hole a crude fireplace may be made of loose brick and the flue connected with the three ends of projecting tile. At the west end of the frame a brick chamber should be made into which the three tiles enter, giving them a common flue for outlet. Cover the top of this chamber closely, excepting a 6-inch circular hole, into which a single length of stovepipe is fitted. A sloping door is hung over the fireplace cavity to keep out the rain; and the earth raised high enough around to prevent surface water from running into the hole. Bank soil about the frame. You may happen to have on hand six old storm window sashes of that size. Of course the sashes slope to the south in the usual way.
When the fire is kindled in the fireplace the smoke comes freely from the stovepipe. The tiles are covered with soil to a depth of about 6 inches. With a good fire, you can quickly warm up the earth on the coldest days of spring. And when once well heated, the earth and tiling hold the heat for a long time, provided the draft is closed. Unlike beds heated with manure, the heat supply can thus be regulated to suit the demand of the prevailing weather.Cold Frames and Their Management
In the South cold frames are in use all winter. The principal winter crops grown are lettuce, radishes, beets, cauliflower and occasionally cabbage, while these crops are commonly followed in spring by cucumbers, cantaloups and sometimes Irish potatoes. The frames are easily made. Rough inch lumber (heart pine is best in the South, and hemlock in the North) and 2 x 4 or 2 x 3-inch scantling are all that is required. For the double frames, strips 3 inches wide and 3/4 or 1/2 inch thick, long enough to extend across the frame, should be provided for rafters. The back or north side of the single frame should be 12 or 15 inches high, while the front should slope down to 8 inches. In Southern practice, where canvas covers are used, the back should be 2-1/2 feet and all cracks should be well covered with building paper, held in place by laths tacked over it.
Good treatment for the posts used in construction is to dip them in kerosene over night. This will preserve them indefinitely. Drive the posts into the ground 18 inches and let them extend upward to the top of the boards, putting a post at the union of each pair of boards and nailing them to it. All ends and rafters may be made so that they can be quickly removed, so that the frames can be plowed and the ground prepared with a mule. The sides of the double frames are best made 1 foot high, with the ends sloping upward to 2-1/2 feet. Down the center of the frame, a row of 2 x 4-inch posts 2-1/2 feet above ground are set 8 feet apart.
Over each one of these a rafter is bent and fastened to the sides of the frames.
For cold frames in the North, glass is the only covering to be thought of. By all means, put the frames up facing the south or southeast and to afford protection against the north and northwest winds, cold the country over, a high wall, a thick hedge, or a piece of thick woodland should be close at the back of them.
The soil in the frames should be thoroughly prepared, rich and pulverized thoroughly. An abundance of well-rotted stable manure should be used; if thoroughly decomposed, at the rate of 75 to 100 tons an acre is not excessive, unless the soil is already very rich. Whether glass or canvas is used as a covering great attention must be given to water and ventilation. The land should be well drained that no water will stand, or the soil become water logged; that is one side of the water question, but in addition, the plants should be carefully watered from time to time to provide sufficient for their needs.
If the coverings are kept down too constantly, the growth of the plants will be weak and spindling and such diseases as damping off, Botrytis and drop will work havoc with them. Careful attention to watering, ventilation and keeping the surface of the ground stirred are the genuine secrets of controlling these pests. Watch the temperature, do not let it rise too high, lower it by raising the sash or drawing back the covers. The canvas covers should be drawn back a portion of every day when the temperature is not too low, and at other times the ends may be raised, to allow the air to circulate under them. A sharp eye must be kept on the frost item. Sometimes steam heat is provided, oil stoves may be used and glass-covered frames should be covered with burlap or straw mats, securely held down either by tying them in place or by weighting them down. Both canvas and the glass covering should be well fastened to prevent their being lifted off by strong winds.
The upper end of glass sash may be held down with a hook and staple, a hook being placed on the back of the frame at the center of each sash with the staple in the end of the sash. Canvas covers are best held down by nailing along the center to a board run lengthwise on the center of the rafters, in the case of double coverings, or along the back in the case of single ones and by placing marbles or small pebbles in the cloth and tying about these every 4 or 5 feet, along the ends and sides, slipping the looped ends of the twine used in tying them over nails driven into the ends and sides of the frame.A Hand Garden Cultivator
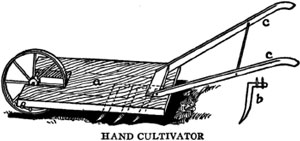
Now that garden crops are planted almost exclusively in rows a tool that will clean out the weeds, stir the soil around the plants, and, by making a good surface mulch, prevent the loss of moisture to some extent, is essential for the proper care of the garden. The wheel hoe of our cultivator is usually used for this purpose by the professional gardener, but the price is generally considered rather high by the ordinary farmer or amateur.
This machine, although homemade and not very handsome in appearance, does the work as well as a $6 or $8 tool, and cost not more than 40 cents to make. For a wheel, take the fly wheel of an old sewing machine, about 1 foot in diameter, and put a round bolt tightly through the axle. Then a piece of plank, a, 20 x 10 inches, and cut as shown, boring holes for the axle where marked. After the wheel is set in place, it should turn easily and steadily, if balanced properly. For the handle, c c, cut out and round from a piece of plank two pieces, or use any that may be otherwise obtained. Then get a blacksmith to make three teeth, b, out of a piece of spring steel 1 inch wide and 8 inches long, bent as shown. Two-inch holes are drilled through them for screws.
One tooth should be placed about 6 inches behind the wheel and directly in the center, the other two being 4 inches behind the first, and the same distance from the center tooth. When this cultivator is pushed through the rows it should run with little pressure from the operator, clearing out the weeds and stirring the soil at the same time. This contrivance does the work well, and if given two coats of brown and green paint it will be improved in appearance.
Know thy opportunity.
-- Pittacus.A Convenient Garden Stool
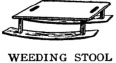
This device will prove useful in doing hand work in the garden. It is made from two barrel staves upon which is mounted a low stool. This should be narrow, so that it may be drawn between the rows of vegetables. The holes in the seat are large enough for the fingers to go through and render the stool more easily handled. The device is especially convenient for the women.Watering Seed Soil Made Easy
To avoid disturbing small seeds by watering, when planted in forcing boxes, a plan has been devised which not only insures against the disturbance of the seed, but keeps the soil of the entire box in a moderate state of moisture, which is an essential feature in early growth.
Make a box of any desired size to suit the occasion, and about 3 inches deep. Then get a few small unglazed flower pots and place same on stove until quite hot. With a short piece of candle, seal drain hole in bottom of pots, taking care not to put wax over the entire bottom of pot. Place pots in box about 9 inches apart on a thin layer of sand, and overlap pieces of broken pots, to convey by capillary attraction the water to the entire soil of the box, which soil should be sifted and box filled to within 1/4 inch of the top of the pots.
Cover the box with glass, and heat from above will draw the water up to the roots. By this method you will not have surface baking, which is so troublesome with surface watering. If so desired, you can cover the pots with circular pieces of paste-board or tin, and avoid surface evaporation from the pots. Always fill pots with warm water.
Catching Owls and Hawks
A friend of ours captured a large owl and fastened him securely with a small chain to a stake in the middle of an open field. He set three posts 5 feet tall and 4 to 5 inches in diameter 20 to 30 yards from the owl, and on each post placed a small steel trap with a bunch of hay or grass tied to the post just under the trap, to hide it, as shown in cut. At night, the owl called. Others came, and seeing nothing near, alighted in the trap on the post. During the day hawks came, and were caught in the same way. In two months two owls and 17 hawks were caught. In some places a bounty is paid, so there is a profit in two ways. The owl may be fed on the hawks caught and on rabbits or chickens that may die around the premises. The most difficult part of this scheme is often the capture of the first owl, but if you are a good hunter you will find a way.
Make no absolute promises, for nobody will help you to perform them.
Money is a good servant, but a bad master.Moving a Large Tree
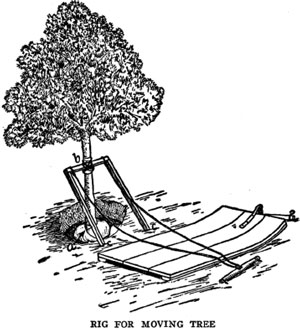
To move a large tree one may find it very satisfactory to use a rig similar to that shown in the picture. Make a three-sided standard of 2 x 4-inch stuff. Loosen the dirt around the roots of the tree and wrap the tree firmly at the base with old carpet or burlap to prevent injury. Place the standard firmly in the ground and tie the cross-piece to the body of the tree with strong rope to each side of the standard and hitch a horse to the other end. With a slow pull the tree can be drawn onto the drag and then hauled to the new location. It can be placed in the ground again by using the standard in the same way it was used to load it upon the drag.
A penny saved is two pence clear,
A pin a day's a groat a year.
-- Benjamin Franklin.
The man who builds, and wants wherewith to pay,
Provides a home from which to run away.
-- Young.Transplanting Trees
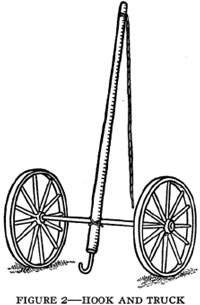
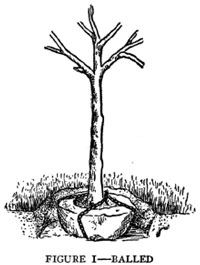
Here is a way to transplant large trees that is not so difficult as such transplanting is by many supposed to be. The first move to make is to dig all round the tree, leaving a large ball of soil, which is carefully wrapped in sacking or canvas to hold it on the roots and prevent drying. When this is well tied in place a chain is passed round the ball two or three times and hooked, as shown in Figure 1.
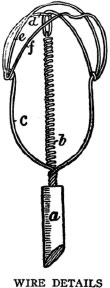
Then with a pair of heavy wheels on a short axle and a strong pole laid across it, with a massive iron hook fastened to the pole, it is easy to back up to the tree. The sketch, Figure 2, shows the truck with its lever raised ready to hook into the chain. The rope at the end of the pole brings it down and the tree up, when the pole is fastened under a second pair of wheels. The young trunk must be kept from contact with the machinery by the free use of blankets and bags. The secret of success in transplanting trees is to injure the roots as little as possible.
The manly part is to do with might and main what you can do.
-- Emerson.
Many things difficult to design prove easy to performance.
-- Samuel Johnson.Homemade Fruit Picker
This is a device that is hard to beat for reaching fruit at the top of tall trees. After a little practice, a man can operate it rapidly, far outstripping hand pickers and at the same time not injuring the fruit. The construction is shown in the upper drawing. The main frame is of heavy copper wire, to which is attached the strong spring, d. The end, a, is inserted into a wooden handle as long as needed. When the muslin sack is attached, as shown in the picture of the picker in use, the jaws of the picker are easily closed by pulling slightly on the cloth. The fruit falls through the sack or long cloth tube into the hand of the operator. Many devices have been made for this sort of service, but it will be hard to find one that works better than this one if constructed in the exact shape indicated.
A Truss Ladder
For a 14-foot ladder select four pieces of 1 x 2 hard wood, using two pieces for each side. Place rungs of 1 x 2 between the side pieces. Make ladder 12 inches wide at top, 14 inches at center, and 30 inches at the bottom. Put a 1/4-inch bolt through the side pieces just below the rungs, and , a 6d nail through the end of each rung to prevent them from slipping out. Keep all bolts tight. A ladder made as above, of Oregon pine, 14 feet long, supported on trestles at each end, deflected but 1 inch when 150 pounds were placed on the center. It is light, yet strong, and it is almost impossible to spring it. The special advantage of a truss ladder is lightness, which is a very great advantage, when strength is combined, as in the case of this particular ladder.
Let us have faith that right makes might; and in that faith let us to the end do our duty as we understand it.
-- Lincoln.
Never spend your money before you've earned it.
Never buy what you do not want; it is not cheap.Orchard Ladder on Wheels
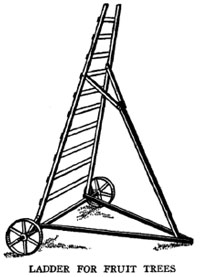
The accompanying sketch shows the manner of construction. Any farmer or orchardist can build it. Secure two old mower wheels and one piece of 2 x 4 scantling for an axle. Place the ladder upon this scantling. To keep it upright use poles, two at the bottom and one near the top of the ladder, extending to the ground. The upper one should be forked at the top so as to hold the ladder firmly. This ladder is 18 feet high, and as the foundation is broad, there is no danger of it falling over. The brace is so made that it can be adjusted, thus enabling one to place the ladder at any angle.Convenient Sorting Tables
Where fruit is packed from the trees a sorting table will always be found convenient. It generally saves time and labor to do the packing right in the orchard. A handy table is one mounted on wheels which may be of any size desired and should be large enough to hold at least four barrels. The wheels can be picked up from discarded machinery or quickly made by nailing together crosswise two boards to prevent them from splitting, boring a hole in the center for the axle and rounding them off with a key hole saw. One end of the table should be made several inches higher than the other, so that the culls will roll into a pile at the lower end.
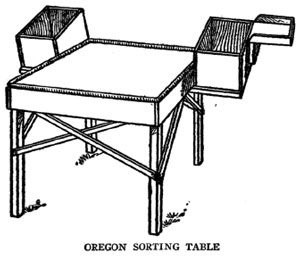
In the Hood river district of Oregon a table such as shown here is commonly used. This is made to accommodate two packers. To make such a table take four standards about 3 feet high. It is made 3 x 4 feet in size, the top covered with strong burlap or canvas and allowed to hang rather loosely. Saw off the tops of the legs on a bevel so as not to have the sharp corners push into the burlap, or make points that will bruise or cut the fruit.
A piece of old garden hose is generally nailed around the top of the table to protect the fruit. Besides the braces shown in the cut it is also well to wire the legs and braces together firmly, as there is a heavy load to support. The shelves on each side are for holding the boxes, as all the good fruit in this region is boxed. The height is only relative, the point being to construct it so each packer can work with the greatest comfort, avoiding back bending in all cases. The top should not be greater than 3 x 4 feet, as anything larger would not allow two packers to reach all points of it without unnecessary stretching.
1. Workshop and Tools
2. The Steel Square
3. In and Around the House
3. In and Around the HousePart II
4. Barns and Stock
5. Poultry and Bees
6. Garden and Orchard
7. Field and Wood
8. Gates and Doors
9. When We Build
9. When We Build Part II
10. Worth Knowing
10. Worth Knowing Part II
Next: 7. Field and Wood
Back to the Table of Contents
Back to the Small Farms Library Index
Community development | Rural development
City farms | Organic gardening | Composting | Small farms | Biofuel | Solar box cookers
Trees, soil and water | Seeds of the world | Appropriate technology | Project vehicles
Home | What people are saying about us | About Handmade Projects
Projects | Internet | Schools projects | Sitemap | Site Search | Donations | Contact us