|
 |
|
|
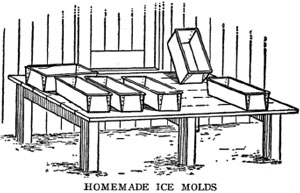
Freezing Ice in Blocks
HERE a pond or stream is not handy from which to get the year's supply of ice, blocks can be frozen in forms with comparatively little labor. A supply of pure water is essential. The forms are best made of galvanized iron of any size desired. A convenient size is 16 inches wide, 24 inches long and 12 inches deep inside measure. The sides and ends should be made to taper 1/4 inch, so that the frozen block will drop out easily. The top of the mold should be reinforced with wire for the sake of strength and durability.
With a dozen or 20 forms one can put up quite a supply of ice during the winter. The forms should be set level on joists or boards and placed a few inches apart. Fill them nearly full with pure water and let them freeze, which they will do in one or two days and nights in suitable weather. When frozen solid, turn the forms bottom side up and pour a dipper of warm water on them, which will release the cake of ice. The form can then be lifted off, the ice put away in the icehouse and the form filled with water again.Saving the Seed Corn
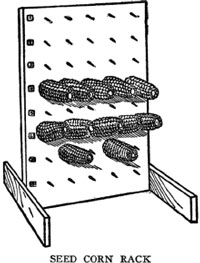
Here is a handy device for preserving select ears of seed corn. It consists of a wide board fastened between two supports nailed to the edges. The board stands upright on one end and may be as long as desired. Drive heavy spikes through it from the opposite side and stick an ear of corn upon each spike. This allows for the passage of air, and the ears can be examined without removing them from the rack. It is much to be preferred to expensive wire racks, as each nail may be numbered and a record kept of the ears in this way. This rack was designed at the Idaho experiment station.
Rack for Seed Corn
Here is a simple arrangement for keeping choice ears of seed corn. Take a 2-inch square timber for the upright, and make a solid base by boring a hole through the two base pieces, then drive the timber into it. Drive 4-inch spikes through the upright at intervals of 6 inches from four sides, and stick the ears of corn on these spikes by thrusting the same into the butt of the cob. Numbers may be placed above each spike, so that records can be kept of all of the corn. The corn should be placed on this rack as soon as picked and husked, and may be left there until planting time if the rack is placed in a dry room where rats and mice cannot get at it. A large post strongly mounted on a heavy pedestal may be used in a manner similar to the small upright described above. The bigger the post and the larger the number of spikes used, the greater the capacity of the rack, of course. It is a good plan to make the pedestal heavy and strong in order that it may not be tipped over too easily.
The first years of man must make provision for the last.
-- Samuel Johnson.
Put your trust in God, my boys, and keep your powder dry.
-- Colonel Blacker.Drying and Keeping Seed Corn
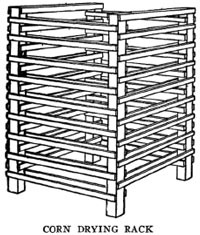
Never let it freeze before it is dry. Farmers have had seed corn exposed to a temperature of 30 degrees below zero without injuring its vitality, and have had it ruined at 10 degrees above zero. We would not recommend kiln-drying for the general farmer, as this is only practicable where a grower is in the seed business. A very convenient way is to take four pieces 4 x 4, 6 feet long, set them up in a square, and nail laths on them two and two opposite. Leave a 6-inch space between the laths, so the corn will have plenty of ventilation. Lay your corn on this to dry, and if thoroughly dry it can lay there all winter.
Knowledge is worth nothing unless we do the good we know.
It is better to give one shilling than to lend twenty.
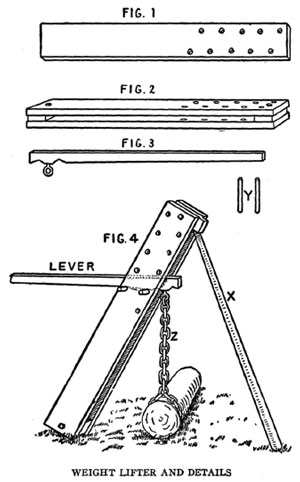
Keep your mouth shut and your eyes open.Weight Lifter
The drawings show the different parts and one of the many uses of this device.
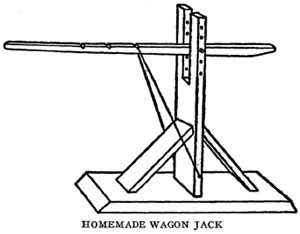
Strong and Simple Wagon Jack
Here is a good, practical wagon jack suited to almost all kinds of vehicles. The whole thing is made of wood with the exception of the curved piece, b, which is of iron and hooks over an iron bolt, e. It is well to have a strong 1/2-inch bolt at f, so as to support the heavy weight on the lever, a. The bottom, d, and the piece, c, are each 2 inches thick. In using the jack, the axle is lifted by simply pressing down on the handle of the lever. The teeth of b catch and hold on e automatically. The height of lever is regulated by moving f up and down.
Write down the advice of him who loves you, though you like it not at present.A Jack for Heavy Wagons
Many lifting jacks which are designed for light vehicles would not work well in the case of a heavy log wagon. Here is one that will stand a lot of hard usage and is simple and effective. Make the base and upright of heavy 2-inch oak plank and insert a 3/4-inch bolt through the lever for a support. Have a good, strong hemp rope attached to the base, passing over the handle end of the lever, so that as it is drawn down and the wagon is lifted it can be hooked in a notch to hold it in position.A Cheap Wheelbarrow
The construction of this barrow is very simple. Get a pair of old plow handles, two gate hinges about 1 foot long, and a wheel, which may be found at the junk dealer's. The legs of the wheelbarrow are those of an old chair, braced with a piece of iron. These articles in themselves are worthless, but in their combination we create something very useful.A Wheelbarrow Cheap and Strong
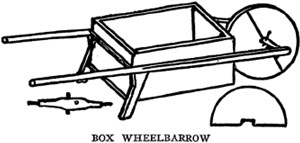
Here is a picture of a handy, strong wheelbarrow that any farmer can make on a rainy day. Take a dry-goods box 30 inches long, 24 or 26 inches wide and 20 inches deep, and two sticks 5-1/2 to 6 feet long and 3 x 3-1/2 inches for handles. Nail or screw on crossbrace in front and rear, and pieces with brace as shown for legs. Cut four half circles from inch hardwood board and a notch in center to fit around axle. Nail these securely together for the wheel.
For the axle, take a stick 3-1/2 inches square. Trim and band each end or wrap with wire. Bore holes and drive a 6d. wire nail in each end. Just 2 inches apart in center, bore two 1-inch holes on opposite sides to hold the wheel in place. A band of hoop iron around the wheel will make it last longer. When it is put together, you have a very substantial wheelbarrow that cost but little.
How to Hang a Kettle
Using stones for a kettle support seems handiest oftentimes, but let the heat crack one of the stones and tip the kettle over, as it frequently will, does not tend to improve a man's language, let alone the loss sustained. It is much better to make a support such as is presented in the cut. The three uprights, of suitable length to correspond with the size of the kettle, may consist of any good wood. Through the top of these a hole is bored for the bolt to hold them together, which must be long enough so they will have play to set up easily. All that is necessary then is to suspend two chains from the top and letting them extend downward to the proper distance, attach the ears of the kettle into the hooks on them. When not in use, the device can be folded together and laid away.
A Snow Plow
No person not owning a snow plow can appreciate how useful one is after every storm. A horse, or if the snow be a heavy one, a span or a yoke of cattle and this simple homemade arrangement, and in less time than is required to tell it there is a path, and no back-breaking work either. It is only a big V braced so the snow is pushed both ways by it. It must be made of 2-inch planks at least 1 foot wide and not less than 6 feet long. If shorter it wobbles and does not stay on the ground well.
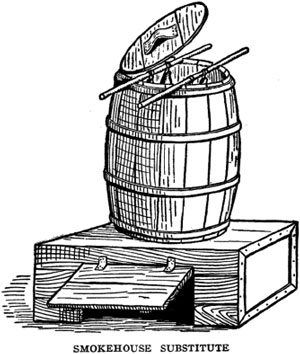
To make a good road for teams, chain it to one side of the wood sled and drive up and down. It spreads 2 feet, and will make your farm front look as if somebody of pluck lives there. For foot-paths draw it from a ring at the top of the front so it will root.Temporary Smoking Device
If one butchers only once a year it is not necessary to build an expensive smokehouse, for almost as good results can be obtained from a device such as that shown. It is made by taking both ends out of a barrel and mounting it upon a box or above a fireplace in the ground. The meat to be smoked is hung from the sticks laid across the top of the barrel, the fire built underneath and the lid put on.
Homemade Heater and Cooker
A cheap and economical heater may be of home construction. Make a frame of 2 x 8-inch pine 7 feet long and 27 inches wide. Put a bottom on this of No. 18 galvanized iron, letting it project 1/2 inch on each side and 14 inches at one end for a stovepipe fitting. Spike the frame together and cover the corners with heavy tins to prevent any leaking. Nail the bottom on with two rows of nails.
Make a fireplace on the ground of stone and blue clay or brick and cement of mortar if preferred, 2 feet wide by 3 feet long and 18 inches high. Pile up dirt 1 foot high and 3 feet wide at the end of the fireplace for a flue, put stone on the earth the length of the galvanized iron, place the tank on this foundation and bank it up with dirt. In cutting a hole for the stovepipe, turn up strips of the galvanized iron for a collar, then drive an iron rod into the ground, put on two lengths of stovepipe and wire it fast to the rod.
A piece of sheet iron should be set up before the fireplace to control the draft and keep the fire. Such a heater, on one farm, is located near the windmill and storage tank and can be filled from either. The water can be heated quickly with cornstalks, straw, cobs or brush. One may boil pumpkins and small potatoes for fattening the pigs, and cook ground feed by pouring scalding water on the meal in barrels and covering with old blankets or carpets. A light fire will take the chill from ice water for the milch cows.Use for a Tough Log
Most farm wood piles have two or three old logs lying about which nobody cares to tackle with an ax or blasting powder, and are too short for the sawmill. If straight, they will make good water troughs. Square the ends, mark off about 10 inches from each end, chop out the inside and trim the edges. An inside coat of oil or pitch tar will increase wearing qualities.
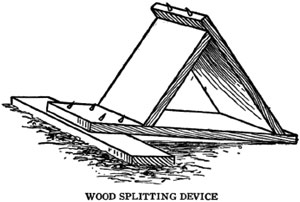
A Handy Wood Splitter
For splitting wood a farmer in eastern Massachusetts uses a device as shown in the cut. Take a 2 x 8-inch plank about 3 feet long and an upright of the same material about 20 inches long. Set this upright at an angle of 20 degrees and use a brace of the same material. The sharp points shown in the cut are 40d wire nails. Set the wood against these spikes in splitting it.How to Split Wood
Wood splits much more readily in the direction up from the root of the tree than when the blow of the ax is downward. In other words, to split a chunk place it upside down -- contrary to the direction in which it grew. It is much easier to split by slabs than to try to cleave through the center. This means to split off pieces near the edge.
A Pulling Hammer
If you want to make your old claw hammer do more work and do it better and easier, have the handle projecting a little beyond the head. You will find it much more convenient in drawing a nail, as it makes a right angle for pulling the nail without bending it to one side. It takes the place of a block and is always on hand and ready in the right place for immediate use. The handle is simply whittled a little more than usual and driven through to the required distance. Don't drive it through too far, but about as shown at a in the picture. If it sticks out too much, it will be in the way when driving nails. Whittle it off rounding, and give it a finished appearance.
Mounting the Farm Anvil
To make a solid foundation for an anvil, build a form of boards 14 x 18 inches square at the base, 18 inches high, tapering to 8 x 10 inches at the top. Fill this mold with rich concrete and fix a bolt in the center of the top of it to fasten the anvil. Afterward, melted lead can be poured around the base of the anvil, completing a very nice pedestal.
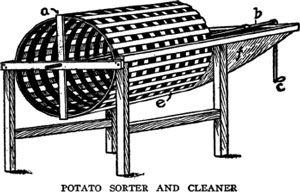
Sorting Potatoes Quickly
The sketch shows a homemade potato cleaner and sorter. It consists of a number of hoops to which are fastened 1/2-inch slats so as to make holes 1-1/2 inches square. Two heavy pieces, a, are placed inside the cylinder to hold the axle, b, which extends entirely through the machine and is turned by a crank, c. The frame made is 4 inches lower at the opening end of the cylinder so that the potatoes will run through freely.
At the crank end is a hopper, f, into which the potatoes are poured. The cylinder is 2-5/8 feet long and 3 feet in diameter. It will not bruise the potatoes, and the dirt and small ones run through on to the floor or crate and the marketable ones run out at the open end of the cylinder into another crate. With one man to turn the crank and another to fill the hopper, from 700 to 800 bushels can be sorted in a day.
An indiscreet man is more hurtful than an ill-natured one; for as the latter will only attack his enemies, and those he wishes ill to, the other injures indifferently both friends and foes.
-- Addison.
Handling Potatoes Easily
A bushel crate is often more convenient to use in handling ear corn, potatoes or other vegetables than a basket. Crates that will hold a bushel when level full may be piled upon one another and thus stored in less space than baskets. At the same time they can be just as easily and just as quickly moved. They may be of light material. Pieces of wood 2 inches square are used for the corner posts. The slats may be made of 1/2-inch boards 3 inches wide nailed securely to the corner posts. There should be just room enough between the two upper slats so that the fingers can be inserted when lifting the box. The box will be more durable if the upper slats are an inch thick. A handy size for the completed box is 16 inches long, 14 inches wide and 12 inches deep, outside measurements.
Cutting Seed Potatoes
In the principal potato growing sections, medium to large seed is used for planting and cut to two eyes. In the famous Greeley district of Colorado, cutting is done by hand. Potatoes are shoveled into a bin or hopper, made of a dry-goods box raised on legs. The back is made higher than the front, so that potatoes will run down to the opening and the bottom is slatted to let out the soil shoveled up with the potatoes.
The cutting is simple. An old case knife, a, is fastened to the end of a plank or board, b, in such a way that potatoes can be pushed against the knife and fall from it into the basket beneath. The operator sits on the box to which the board is fastened and can work very rapidly.Another Seed Potato Cutter
A wide bench is boxed in on both ends and one side. It is divided into two or three compartments, these being open in the front which corresponds to the side boxed in. To each of the compartments is attached a sack on hooks, and along one side of the bench in the middle of each compartment and right over the opening of the sack is fixed, in an upright position, a shoemaker's or common steel table knife.
Potatoes to be cut for planting are shoveled into the compartments of the box and in front of each compartment a man takes his position, being seated on a box or stool for comfort's sake. He seizes the tubers in rapid succession and by pulling them against the blade quickly cuts each one into as many pieces as desired; the pieces are then dropped into the open sack. It is claimed that by this indirect method of using the knife two fairly good cutters can cut each day all the potatoes ordinarily required for the use of one planter.How to Test Seed Corn
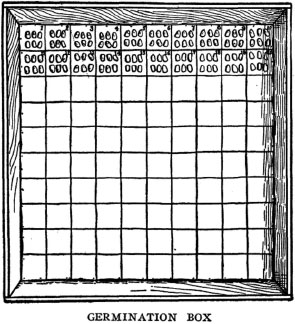
Of the different methods for testing seed corn, the most convenient and satisfactory is a shallow box provided with wet sawdust to furnish the moisture and a marked cloth on which to lay the kernels. The most convenient box is one 2 feet square. This will accommodate 100 ears. It is best to make it about 6 inches deep. Fill a sack half full of clean sawdust and soak it for three or four hours in water. Then spread this sawdust in the bottom of the test box to the depth of 1 inch. Take a smooth brick and pack the sawdust down all over the box, making it as level as possible. Be sure to get it packed firmly around the edges and in the corners.
Then take a piece of white muslin 25 inches square. Stretch this tight on a table so that it can be marked. Rule off on this cloth with a heavy blue pencil 100 squares 2 inches each way. Beginning at the upper left-hand corner number these squares in rotation from left to right. When the ruling is done, pack the cloth in the germination box so that it will rest firmly on the sawdust. This can be done by pointing the tacks in the edge of the box downward, and as the tack is driven in it will draw the cloth tight over the sawdust.
Of course, there is no advantage testing any ears that are of undesirable shape or conformation, therefore the first step is to pick out those nearest to the type wanted. Lay these out in rows upon a plank or upon the floor, separating each ten ears with a nail driven into the plank or floor. Starting at the left-hand end of the row call the first ear No. 1, then the first ear beyond the first nail will be No. 11, the one beyond the second nail No. 21 and so on. Remove six kernels from ear No. I and place them in square No. 1 in the test box. Put six kernels from ear No. 2 in square No. 2 and so on through the row. In removing the kernels from the ear take a pocketknife in the right hand and the ear in the left. Place the blade at the side of the kernel you wish to remove and pry it gently. The kernel will come out easily and should be caught in the palm of the left hand. First remove a kernel from near the butt of the ear; turn the ear a quarter turn in the hand and remove a kernel from the center; turn the ear another quarter turn and remove a kernel from near the tip; another quarter turn and remove a second kernel from near the butt; another quarter and remove the second kernel from the center; another quarter turn and remove a second kernel from the tip. This makes six kernels from six different rows and representing the butt, middle and tip.
In placing the kernels in the box it will be found of advantage to point the tips all in the same direction, and also to lay the kernels with the germ uppermost. If the kernels are laid in the squares promiscuously, they may be thrown out of their places when the sprouts begin to grow. When the kernels are all in place, take a second piece of white cloth fully 24 inches square, moisten it and lay it carefully over the kernels. This will hold them in place while the top layer of sawdust is being put on. Take a third piece of cloth about 48 x 30 inches and lay it over the box so that the edges lap about equally. Then in this cloth put another inch of wet sawdust and pack it down firmly, especially around the edges. When this is done turn the edges of the cloth over the sawdust to keep it from drying out too rapidly and place the test box where it will not be subjected to cold below a living-room temperature.Reading the Results
After seven days carefully roll back the cloth containing the top layer of sawdust and lift the second cloth off the kernels. This must be done with care, because sometimes the sprouts grow through the cloth and the kernels will cling to it.
Observe the results in square No. 1. If all six of the kernels have vigorous sprouts, from 3/4 to 2 inches long, you can be sure that ear No. 1 is thoroughly good. If in square No. 2 only two of the kernels have sprouted, you may know that ear No. 2 will make much better hog feed than seed corn. As soon as you have determined that ear No. 2 is really bad, pull it out from the row about half its length, leaving the other ears in place. After you have gone through the whole line, you may then go back and pick out the bad ears and discard them.
Of course, we would all prefer to use only those ears that gave a perfect germination, and if one has enough, that is the thing to do. But experience has taught that it is quite safe to use an ear, four of whose kernels grow strong sprouts. Or, if seed corn is scarce, one should not hesitate to use one that gave three strong sprouts and two weaker ones.
This testing may be done at any time after the ears are dry. It is generally more convenient to do it in winter, when there is not much outside work to be done. The box may be set behind the stove or any other convenient place, where it is sufficiently warm; in many cases, where there is an attic above the kitchen that room is a sufficiently warm place for testing.
Some put sand in an ordinary dinner plate, flood with water, and then drain the excess water off, place the seed on top of the sand, and cover with another dinner plate, Others use a saucer made of porous clay. The seeds are placed in this, the saucer set in a pan of water, and the pan covered.
These methods may be used for other grains as well as corn. In case of sowing grasses, alfalfa or wheat, it is often of great advantage to test the seed.
Every man has two educations -- that which is given to him and the other, that which he gives to himself. Of the two kinds, the latter is by far the most valuable. Indeed, all that is most worthy in a man he must work out and conquer for himself. It is that that constitutes our real and best nourishment. What we are merely taught, seldom nourishes the mind like that which we teach our selves.
-- Richter.Killing Insects in Grain
If one has not time to make a substantial box for fumigation of seed grain for insect destruction, barrels may be utilized for the purpose. Get two tight, strong barrels, such as coal oil barrels, and make water tight. Put in the seed to be fumigated, cover with a blanket and close-fitting cover. Before covering pour carbon bisulphide, which is explosive, over the grain, at the rate of 3 to 4 ounces for 5 bushels of grain. If it is not desirable to pour this poison on grain, set a saucer on it, and pour the poison in the saucer. Place a small block near the saucer to hold up the blanket 1 or 2 inches higher, lay blanket over the barrel, and place cover securely in place and weight with stone. This will kill the weevil in peas and beans.
Binding Pins for Hay
Every person moving hay ought to have a set of binding pins. They are made in a minute and serve an excellent purpose for a lifetime. The sketch shows a rope stretched over the top of a load of hay or straw. The upright pin is worked down into the load and the other twisted in the rope and turned around the upright until the load is tightly bound. Then a small rope that is kept tied in end of the horizontal pin is tied to the binding rope and the pressure is held. Each pin is 3-1/2 feet long. One is sharpened and the other has a 1/2-inch hole bored through one end. Old fork handles are just the thing to make them of. One pin only may be made and a fork used to bind in the manner shown after the load is on.
Nothing is impossible to industry.
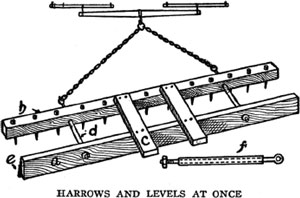
-- Periander.Combined Drag and Harrow
This road drag is all right. The front piece consists of a 4 x 4 oak strip, b, 10 feet long, through which are driven ordinary harrow teeth about 3 inches apart. This is attached to the rear piece, a, which is a 2 x 6 oak timber 10 feet long faced with 3 inches of 1/4-inch metal on the bottom, e, which projects 1 inch. These pieces are kept apart by wooden blocks, d, upon the bolts, f, and by the top strips, c, each 2 x 6. This makes a fine level road, as it harrows it and scrapes it at the same time.
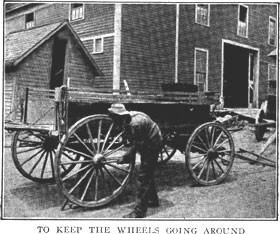
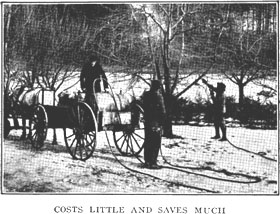
If your wagon jack isn't a good one, make a good one. You can do it yourself. Have the right kind of things to take care of the wagons easily, and use them often.
If you can't afford an expensive spraying outfit, rig one up like this.
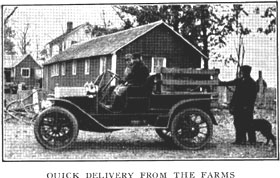
Hundreds of farmers are today making profitable use of automobiles, although their first appearance upon country roads caused only fear and anger.
How to Handle a Rope
A rope is one of the most useful articles that are constantly needed about the farm; but too many farmers are not familiar with the many uses to which the rope may be put. The various sailors' knots may often be used to great advantage. To sling a plank for painting or other purposes make a bight of rope as shown in Figure 1, bringing the rope entirely around the plank, so as to prevent its turning and throwing the workman down. One-half to 3/4-inch rope is usually sufficient for all practical purposes. A hemp rope is more generally used and stands wear better than other kinds.
A useful way to sling a can or pail from the end of a rope is shown in Figure 2. Prepared in this way the vessel is secure so long as the rope is not slipped off from the bottom. Secure the knot firmly at the top to allow no slipping and so that the pail may not become lopsided.
Scaffolding may often be erected by tying poles together as shown in Figure 3. This sort of lashing will not slip if made tight. In many cases a chain may be used as shown in Figure 4, in which case the weight should be on the side of the upright where the chain is lowest. All of these lashings must be drawn very tight so as not to allow any play, which may result disastrously.
An excellent hitch knot is shown in Figure 5, readily made, easily loosened and valuable for many purposes on the farm. This knot is readily untied by slackening up the drawing strand. It does not become tight and hard as many ordinary knots after heavy usage.
In many cases where heavy hooks are used they are liable to come unfastened unless a cord is affixed, as shown in Figure 6. A few turns of heavy twine or light wire in the middle will frequently prevent any loosening of the chain.
A ring hitch, shown in Figure 7, is a very effective and safe method, which may be made on short notice. The loose end of the rope is allowed to hang free or may be tied with a slip knot to the drawing strand.Tying Some Useful Knots
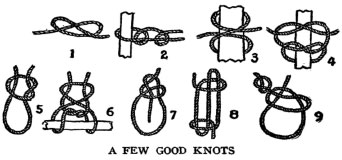
A sailor judges knots for their holding qualities and also their ability to be quickly unfastened, without regard to the strain they have been subjected to. A knot's main office is to hold, without working loose or slipping, yet they do occasionally fail absolutely to accomplish this, when made by inexperienced hands. The accompanying diagrams show some of the simpler knots that may be of everyday use. In these, the mode of formation can be readily discerned, because the rope's position is shown before tightening. The overhand knot, Figure 1, is probably the simplest of all. It is used only for making a knot at the end of a rope to keep it from fraying or to prevent another knot from slipping. If a slight change in formation is made, as in Figure 5, it develops into a slip knot or, as it is sometimes called, a single sling, and its purposes are obvious. A double sling is represented in Figure 6, and though it is slightly more complicated, it is considerably more useful for any purpose where a rope is to be attached to a bar or beam and stand a steady strain.
Probably for convenience and emergencies no knots equal the bow-line, Figure 7, because it will not slip or give, no matter how great the tension; in fact, the rope itself is no stronger, and the instant the strain ceases it can be untied as easily as a bow. When the end of a rope is to be secured, the two half-hitches or clove hitch, Figures 2 and 3, are of great importance, for either of these bends can be attached instantly to almost anything, and their holding powers are exceeded by none. The square knot, Figure 4, can be used for infinite purposes, from reefing a sail to tying a bundle, the advantage being, if made properly, of resisting any separating strain on either cord, and yet can be untied immediately by pulling one of the short ends.
One of the best and safest slip knots is shown in Figure 9, made with the overhand at the end, which, until loosened by the hand, maintains its grip. When a rope requires shortening temporarily the sheep shank, Figure 8, affords a means of so doing. This knot can be applied to any part of the rope without reducing its strength of rectilineal tension.Carrying a Barrel Made Easy
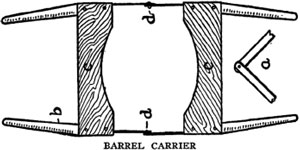
In the cities the ash collectors use a simple device, which farmers might make and often find handy, as barrels often become dried, weak and will not stand rough handling. The device is made of six pieces of wood; four pieces are about 2 feet long and 4 inches in thickness and width. Handles may be whittled on one end of each. About 10 inches from the other end, boards about 2 feet long and 8 inches wide are nailed as shown at c, c, in figure. Pieces c, c, are then cut in circular form so as to fit the outside of a barrel.
An old wheel tire may be straightened and four pieces cut to be fastened to the ends of each of the four handle pieces, as at d. These are then riveted together so as to make hinges as shown at d, d. The tire need be only long enough to fasten securely to the handle pieces. Of course, the blacksmith should drill holes in them, that they may be securely riveted.
To use this device, drop it over the barrel. One man lifts on the two front handles and another man on the rear handles. Boards c, c, close up in circular form, just beneath the lowest hoop round the upper end of the barrel, and cling tightly. The barrel is then lifted and readily carried without jar to its contents or straining the barrel. Of course, if all the barrels on the farm are of uniform size, the device could be made without hinges, and the barrels headed up could be rolled on pieces c, c.
The best part of one's life is the performance of his daily duties. All higher motives, ideals, conceptions, sentiments, in a man are of no account if they do not come forward to strengthen him for the better discharge of the duties which devolve upon him in the ordinary affairs of life.
-- Henry Ward Beecher.
Harness Clamp
The accompanying drawing represents a very handy harness mender which anyone who can use a saw and hammer can make in a few minutes. It is made of lumber of the dimensions indicated in the drawing. The clamp is tightened by the worker sitting upon the seat, which should extend at least 2 feet from the clamps. The drawing shows the device with a shorter seat than that. It would doubtless be better to have the seat extended to twice the length shown from the left of the clamps and to have the base extended in a similar manner, so that the device will not tip over too easily. The joint at the upper right-hand corner may be hinged with heavy wire run through holes and twisted together underneath, or real strap hinges of iron may be attached.
They who provide much wealth for their children, but neglect to improve them in virtue, do like those who feed their horses high, but never train them to the manage.
-- Socrates.
1. Workshop and Tools
2. The Steel Square
3. In and Around the House
3. In and Around the HousePart II
4. Barns and Stock
5. Poultry and Bees
6. Garden and Orchard
7. Field and Wood
8. Gates and Doors
9. When We Build
9. When We Build Part II
10. Worth Knowing
10. Worth Knowing Part II
Next: 10. Worth Knowing Part II
Back to the Table of Contents
Back to the Small Farms Library Index
Community development | Rural development
City farms | Organic gardening | Composting | Small farms | Biofuel | Solar box cookers
Trees, soil and water | Seeds of the world | Appropriate technology | Project vehicles
Home | What people are saying about us | About Handmade Projects
Projects | Internet | Schools projects | Sitemap | Site Search | Donations | Contact us