|
 |
|
|
The Steel Square
Use of the Steel Square
By J. Hamilton Elliot
A steel square, often called a carpenter's square, can be found in almost any kit of mechanic's tools and a little knowledge of this instrument will aid the user to perform many problems easily and quickly that otherwise might prove difficult. Squares of different kinds and materials have been used by mechanics in all ages. The first were made of wood and were used in the construction of the earliest buildings of which we have historic record. The squares of today are made of steel, finely polished and stamped with many figures, tables and rules, according to the taste of the manufacturer and the special mechanic for whom they are designed.
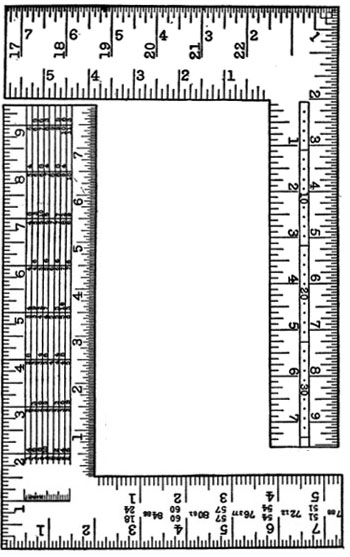
We will not attempt to deal with the several special kinds or makes, taking up only a few of the possibilities of the standard 2-foot square. This is 2 feet long on the blade, which is two inches wide, and it is 16 or 18 inches on the tongue or angular leg. The latter is 1-1/2 inches wide. Beginning at the heel or corner of the square, inches and fractions of inches are marked. It is necessary that the marking be in this way, in order to form the different combinations desired in connection with the different problems which have to be solved. A few of these problems are explained in the following pages.Lumber Rule
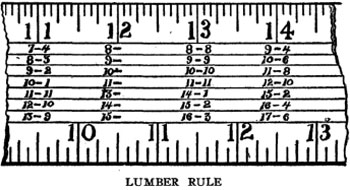
On the side of the blade of the square that is divided into inches and eighths is placed the lumber rule or scale. This is used for computing the number of feet in board measure contained in a given board or piece of lumber. We show a picture of a section cut from the center of the lumber rule. The space running lengthwise of the blade between the parallel lines contains the number of feet board measure for a given width of board. The first space is for boards 8 inches wide, the second for those 9 inches wide, the third for those 10 inches wide and so on. To determine the space which should be used for any given width, look under the 12-inch mark on the outside edge of the blade. These numbers give the width of the board, also the number of feet board measure. If a board is 10 inches wide and 12 feet long, it contains 10 feet board measure.
Now let it be required to find the number of feet board measure in a board 13 inches wide and 11 feet long. Find the space for boards 13 inches wide under the 12-inch mark on the square, follow this space to the left and under the 11-inch mark on the square will be found the answer desired: 11--11. This is read 11 feet and 11/12, and is the number of feet board measure contained in a board 13 inches wide and 11 feet long. With a little practice, anyone can measure lumber or timber and check up his bills for this kind of material.
Do not confound foot board measure with square feet. Square feet are in surface measure, with no reference to thickness, while a foot board measure is the equivalent of a foot square and 1 inch in thickness. The square feet of a 3-inch plank would contain 3 feet board measure.
After becoming familiar with the use of the lumber rule, as described above, you will discover that the space may be taken to contain the amounts for a given width and the different lengths in feet as represented in the different columns, or the space may be taken as containing the amounts for a given length and the different widths arranged in columns; therefore, find either length in feet or width in inches under the 12-inch mark and follow this space until under the inch mark representing the other measurement. In this space will be found the feet board measure.The Brace Rule
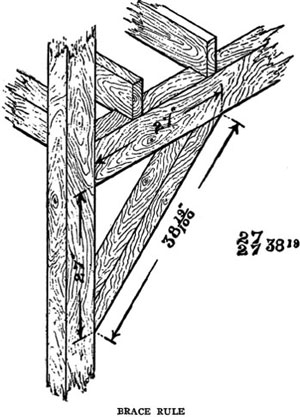
The brace rule is on the tongue of the square, and has a series of figures representing the rise or vertical height, the run or horizontal reach and the true length of a brace. For example, they are written:
27/27 3819 and 45/45 63 64.
These would be read 27 inches run, 27 inches rise and a length of 38 and 19/100 inches, and 45 inches run, 45 inches rise and a length of 63 and 64/100 inches.
A glance at the illustration will give a good idea of the application of the brace rule as it appears on almost any modern make of square.The Octagon Scale
There is an octagon scale on one side of the tongue of the square, but we will not attempt to explain its use, as there are easier and simpler methods of obtaining the same result.
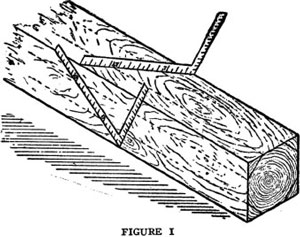
One method is shown in Figure 1. To obtain the lines on a square stick where the corners should come when converted into an octagon or eight-sided stick: Lay the square on the one side of the square stick at such an angle that the end of the square will come exactly at the edges or corners of the stick, make a dot on the 7-inch mark and at the 17-inch mark. Through these dots gauge or mark a line parallel with the edge of the stick. Continue this operation on all of the four sides. This gives the lines for the corners of an octagon. In making a flagpole or spar for a boat or to round any large stick this is the operation used by all mechanics doing the work by hand.The Miter Box
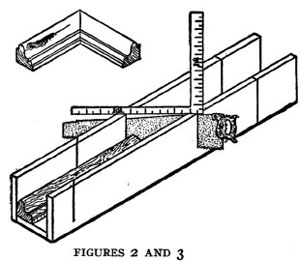
Of all homemade devices, one of the most frequently used in the shop is the miter box. After the box is put together it is a simple problem, with the use of a steel square, to make the cuts necessary to intersect two pieces of wood, as shown in Figure 2. First, the box must be straight and true and the sides form a perfect right angle or square with the bottom. Lay the steel square on the top of the box so that the 12-inch mark on the blade and the 12-inch mark on the tongue will both come exactly on the edge of the box. This gives the miter cut of the intersection of the angle of a perfect square, as shown in Figure 2. Figure 3 shows the manner of placing the square on the box to give the desired angle.
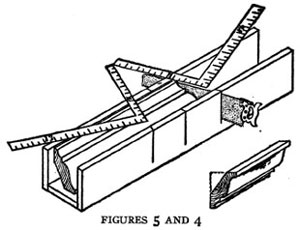
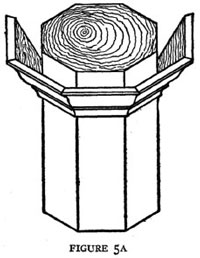
A sprung molding, which is a molding not solid on the back, as shown in Figure 4, must be placed in the box bottom side up as shown in Figure 5, so as to get a solid bearing to hold it. Cuts in the box to miter around an eight-sided figure or an octagon, as shown in 5A, can be obtained by using 7 inches and 17 inches, marking the cut on the 7-inch side, as shown in Figure 5.Truing the Square
After obtaining a steel square, the first and most essential thing is to test or prove it to see that it is accurate, forming the angle of a perfect square.
Take a board planed on one side and straighten one edge of it perfectly as described under "Making a Straight Edge" (below). Make a mark across this board with the square, as shown in Figure 6, Position A, then reverse the square to Position B. If the square is true it should exactly fit the mark made. It is necessary to work very accurately, making the mark with the point of a knife and having the edge of the board absolutely straight.
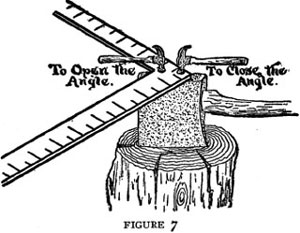
If the square is found to be out or inaccurate, it is not necessary to throw it away; it can be made true by a simple method by any handy mechanic. If you do not possess an anvil, make a substitute by sticking the ax into a chopping block, lay the square on the head of the ax so that the bearing will come from the throat or inside angle to the heel or outside of the square. To close up the angle, strike with a hammer a sharp blow at a point near the heel; to open the angle, strike near the throat at a point indicated in Figure 7. Don't strike too hard. Use a bell-face nail hammer and the dent will not be noticed.Making a Straight Edge
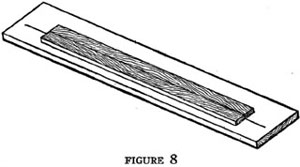
In connection with the work with the steel square a straight-edged board is necessary to have ready for immediate use. Procure a board 8 or 10 feet long of good, dry pine, free from knots and 6 to 8 inches wide. Plane the edge until it seems straight to the eye, then lay it on the bench or on another board and make a mark along the edge, just straight with a fine lead pencil; reverse it or turn it over and fit it to the other side of the pencil line. This multiplies any inaccuracy or deviation from a straight line. Make a new line each time you plane the edge. Work with as long a plane as you have and set the blade to take a fine shaving. When the edge will fit both sides of the line made from it while in one position, it is straight. Figure 8 will give a clear idea of this operation.Rafters
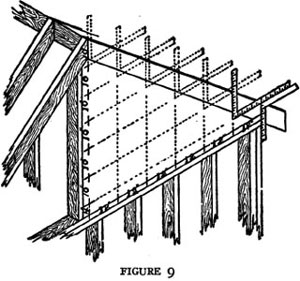
The common rafter for a pitch roof is easily laid out with the steel square. There are many methods, but the easiest and most simple is by spacing. Two dimensions, half the width of the building and the height of the roof, are divided into an equal number of parts. The width of half the building is called the run and is usually divided into parts of 12 inches or a foot for convenience. The height is called the rise, and is divided into an equal number of parts. A glance at Figure 9 tells us that the run there shown is 10 inches rise to 12 inches run.
When the square is laid on the stick to be cut into a rafter, the 10-inch mark on the tongue and the 12-inch mark on the blade are held so that they come exactly even with the outside edge. The blade then takes a level position and the tongue a vertical position or plumb position. This gives the proper level for the cut at the top of the rafter and the level cut at the top of the plate. As the square now lies on the stick make a fine mark and move the square along, marking another space. Mark as many of these spaces as the parts into which the rise and run were divided. This gives the length of a rafter from the ridge to a point exactly over the outside of the plate.
Where the rafter overhangs the plate, it is necessary to square down or in to form the notch for the plate. By studying Figure 9 you can readily see the different positions taken by the square, also, how and why the rise and run are divided into an equal number of spaces. By this method the length of the rafter is obtained without use of mathematics.Stair Stringer
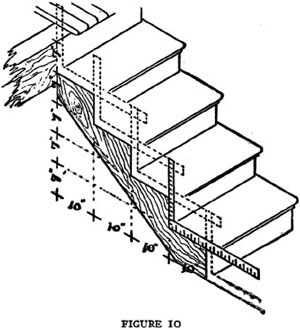
The stair stringer is laid out in much the same manner as the common rafter. The total rise of height to go up is divided into parts of about 7-1/2 inches, as near as possible. This makes the easiest step. The run is always divided into one less space than the rise. The reason for this can be easily understood by examining Figure 10. Lay the square on the stick to be used as a stair stringer, taking the numbers into which the rise and run have been divided, mark, and slide the square along until the required number of spaces are marked. A little experience, with allowance made for the surrounding conditions, and any handy mechanic can lay out stringers for an ordinary flight of stairs. To get an easy flight of stairs for the person of average size where plenty of room can be used, experience teaches that 7-1/2 inches rise and 10 inches run or tread makes an easy flight.
From this some stairbuilding experts have put together the following rule, which works very well for the average stair: When the rise multiplied by the tread equals 75, the run will be an easy one, as 7-1/2 inches rise by 10-1/2 inches tread equals 75; 8-1/3 inches rise by 9 inches tread equals 75; 8 inches rise by 9-1/2 inches tread equals 76, which is very near the desired result. When the rise is 9 inches or over, the rule is not good, as the tread must be shortened up much more, and the rise should never be more than 11 inches -- that is about the rise in an ordinary ladder leaning against a house.The 47th Problem of Euclid
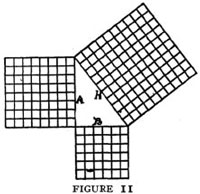
The problem shown in Figure 11 is known as the 47th Problem of Euclid, and is an invention by an ancient Greek geometer who sought many years for a method of finding the length of the hypothenuse of a right angle triangle in mathematics, and when the method was discovered, history tells us there was great rejoicing. Pythagoras is credited with having first proved the rule successfully applied to the problem.
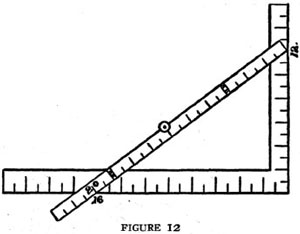
The rule is that the square of the base added to the square of the altitude equals the square of the hypothenuse. The base of a right angle triangle is the side on which it rests, marked B in Figure 11. The altitude is the height and is marked A in Figure 11. The hypothenuse is the connecting side of the triangle, marked H in Figure 11. The base, 6, squared or multiplied by itself, equals 36. The altitude, 8, squared, equals 64. By adding these together we have 100, which is the square of the hypothenuse. It remains but to extract the square root of 100, which we know is 10, therefore 10 is the length of the hypothenuse or third side of this right angle triangle. All right angle triangles can be figured in the same manner, but only multiples of the length of the three sides come even -- such as 3, 4, 5 and 12, 16, 20, as shown in Figure 12; and many others, of course.The Rule of 6, 8 and 10
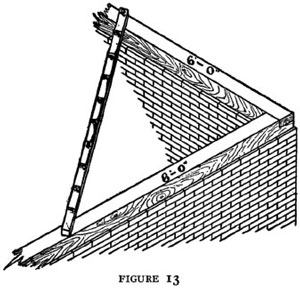
This is a rule so extensively used in the building trades and others that it has finally come to be known by the above name. It is derived from the 47th Problem of Euclid, and is used in the manner shown in Figure 13.
Measure 6 feet on the end sill of a building and 8 feet on the side sill. If it measures 10 feet across the angle the building is square. This is a very useful rule and easily remembered. It is always available in running lines for batter boards for masonry or lines for walks. By starting from a corner stake into which a nail is driven, measure off on the string or line used and insert a stake to mark the place. Drive a nail into this stake and proceed in like manner on the other side. With a little care and practice, quite a job of surveying can be done by using a few stakes, a ball of string and a tape or 10-foot pole.
Angles
An angle is the opening between two lines meeting at a point. Angles are usually spoken of as being of a number of degrees. The degrees are measured on the circumference, the center of which is on the point of the angle. There are 360 degrees of the circumference of a circle. The surface of the earth is so divided north and south by the parallels of latitude, which are numbered from the equator each way; also east and west by the meridians of longitude, which are numbered from Greenwich, England. They can be seen on any map.
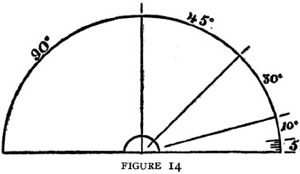
By the use of a protractor, the number of degrees of any angle can be obtained. Figure 14 shows one-half of a circle or 180 degrees.Plotting Angles
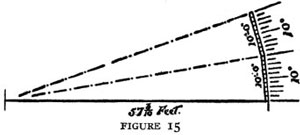
To strike an angle in a field on a large scale where one line is given or can be obtained, measure off from the point of the angle 57-3/10 feet; lay one end of a 10-foot pole at this point. The other end should be swung around so that it also will be 57-3/10 feet from the starting point. Each foot marks off 1 degree on the circumference of a circle whose radius is 57-3/10 feet. If more than 10 degrees are required, continue as before, keeping the ends of the 10-foot pole always on the circumference of the circle from the starting point. A clear idea of this operation can be obtained from Figure 15.
Labor is rest from the sorrows that greet us;
Rest from all petty vexations that meet us,
Rest from sin-promptings that ever entreat us,
Rest from world-sirens that hire us to ill.
Work -- and pure slumbers shall wait on thy pillow;
Work -- thou shalt ride over Care's coming billow;
Lie not down wearied, 'neath Woe's weeping willow!
Work with a stout heart and resolute will!
-- Frances S. Osgood.
1. Workshop and Tools
2. The Steel Square
3. In and Around the House
3. In and Around the House Part II
4. Barns and Stock
5. Poultry and Bees
6. Garden and Orchard
7. Field and Wood
8. Gates and Doors
9. When We Build
9. When We Build Part II
10. Worth Knowing
10. Worth Knowing Part II
Next: 3. In and Around the House
Back to the Table of Contents
Back to the Small Farms Library Index
Community development | Rural development
City farms | Organic gardening | Composting | Small farms | Biofuel | Solar box cookers
Trees, soil and water | Seeds of the world | Appropriate technology | Project vehicles
Home | What people are saying about us | About Handmade Projects
Projects | Internet | Schools projects | Sitemap | Site Search | Donations | Contact us