|
 |
|
|
Portable Hay Derrick
VERY satisfactory derrick for stacking hay is shown in the sketch. The base pieces are 6 x 6 inches by 16 feet. For the center pole we use a straight round pole 7 inches in diameter at the base and 5 inches at the top about 24 feet long. We put an iron band around the base and insert the peg upon which it turns. About halfway to the top is an iron collar, which has three loops to it that form an attachment for the braces, which are fastened about 15 feet from the bottom of the central pole. This allows the pole to turn readily when in upright position. The top framework is made of 2 x 6-inch pieces 12 feet long. The rigging, consisting of three pulleys and the hay rope, is attached as shown in sketch. By having the lower pole attached near the base of the upright the arms will make half a turn when the hay fork is lifted, thus swinging around from the ground or wagon onto the stack.
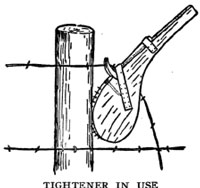
A Wire Tightener
Here is a device easily made and very convenient to use in tightening barbed wire when stringing it upon the posts. Cut out a piece of inch board in the shape shown in the picture with a notch to let in the face of a hammer. Insert a long bolt at the point indicated by the light dotted lines, to prevent splitting. Fasten on the hammer with leather straps. The sharp brads should stick out about half an inch. Carefully finish the handle so that it will be smooth and not hurt the hands when you are using the device. It should be made of tough hardwood.Fence Wire Reel
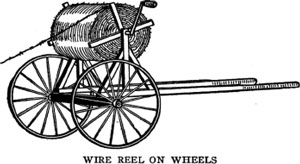
Here is a device on which one can wind barbed wire that is much better than an old barrel. The reel is mounted on a truck made of old buggy wheels with short shafts. The cart may be drawn along by a man while a boy steadies the reel to keep it from unwinding too rapidly. For winding up wire, the machine is best pushed just fast enough to keep up with the wire as it is being wound on the reel. A crank placed upon the reel proves serviceable in winding up.
Never sign a writing till you have read it; neither drink water till you have seen it.
One part of knowledge consists in being ignorant of such things as are not worthy to be known.
Get the work habit.Safe Way to String Barbed Wire
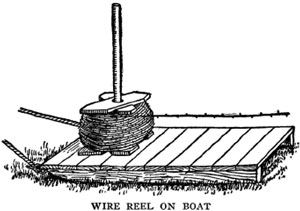
One of the most satisfactory ways to unreel barbed wire is to make a contrivance similar to the one shown. Fasten a short piece of plank to the front end of a stone boat. Bore a 2-inch hole in this plank and set the spool of barbed wire on top. Run a piece of gas pipe about 5 feet long through the spool and let the bottom end rest in the hole made in the plank.
Attach the stone boat to the rear end of the wagon and have an assistant sit in the wagon and hold the top end of the pipe. If the wire becomes kinked the assistant simply lets go of the pipe and the spool rolls off the boat without breaking the wire.A Boxed Stone Boat
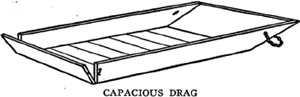
A flat stone boat or drag is convenient for many purposes, but its uses are limited because it has no great capacity. On page 158 is shown an arrangement for increasing the utility of a stone boat 100 per cent. It is made of plank and has sides 1 foot high. It may be used for the purpose for which the ordinary drag is employed, and in addition is very convenient for hauling apples, potatoes, or other root crops from the field.
By increasing the size of the box, manure can be hauled out from stables as it is dumped into it from wheelbarrows without having to reload or wheel up an incline. It is low on the ground and very convenient for loading. All light, bulky articles, as well as heavy stones, bags of fertilizers and seed, can easily be hauled on this contrivance.A Homemade Road Roller
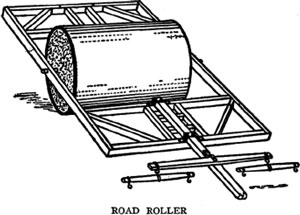
If you need a road roller get a heavy sheet iron cylinder, stand it on end and place a length of 1-1/2 or 2-inch pipe through the center. The end should be placed on planks which are well soaked or are well oiled, and the pipe braced to keep it exactly in the center. Fill the cylinder with good concrete, and when it has set tip it over and build a frame for it, so you can hitch a removable tongue at either side. The frame should be made of good strong hardwood well braced. The cuts show plainly just how the roller is made and put together.An Old-fashioned Drogue
Homemade handy drogue
Drogue is an old-fashioned word applied to a low drag or sled, something like the stone boat in general use now. The word is seldom heard today.
So accustomed are we to the regulation stone boat that most of us do not know that there is still a more handy arrangement that is fully as easy to build and better to use, because it cannot slide sidewise on a hill. Select a small tree that has a bend in it the shape of a sled runner and split it with a sharp saw while it is green. It saws fastest and easiest while frozen. Saw or hew the bottom and top flat, so planks about 4 feet long may be pinned to it. Bore the front ends so a heavy stake with a shoulder may be inserted to prevent the runners from drawing together, and the drogue is done. It is handy for all work, but may need side rails spiked to it, if small stones are to be drawn.
Regular boat planks are not easy to obtain now that the old up and down saws are not in use.A Ditching Scraper
There should be a ditching scraper on every farm. They can be purchased made of steel, but a homemade one costs little and is quite serviceable. Take two planks, each 10 inches wide and 3 feet long, of good 2-inch hardwood. Bolt to them securely a pair of old plow handles. To the bottom bolt an old crosscut saw blade which will make a sharp edge. Let this project about an inch at the bottom. Attach two singletree hooks near each end of the lower board and your scraper is ready to use. With this scraper and two men a ditch can be cut one-quarter mile long and as deep as it could be plowed with a turning plow in two days' time. It is also very useful in filling holes in the highway.
Barrels, barrel hoops and barrel staves may be worked into many useful things upon a farm. From the few described in this book your ingenuity will lead you to others.
Modern harvesting machinery has come to take the place of old-time hand tools on the big farms; but many a reaper of the ancient type still swings through the golden grain, a relic of the days when men worked harder and accomplished less than they do today.
Bridge for a Small Stream
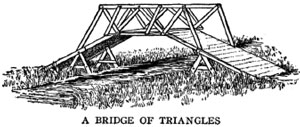
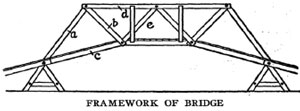
For crossing a small creek or deep ditch a cheap bridge can be built as shown in the illustration. The lumber used is 6 inches wide and 2 inches thick, except for the floor and four side braces.
Saw 11 pieces the length required for each of the two sides, then bore bolt holes 1-1/2 inches from each end. Use 5/8-inch bolts 8-1/2 inches long where four pieces come together and 6-1/2-inch bolts where three pieces meet. The A-shaped supports and the pieces for the approaches are bolted on at once, and then the side braces are put on. The sides of the bridge are made entirely of triangles. The first triangle is made of pieces, a, b and c. The second triangle of the pieces, b, d and e. The piers may be posts, stone or concrete.Dam for Farm Pond
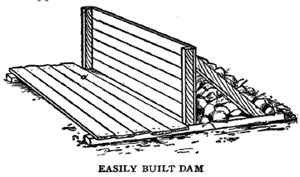
A small pond held by a good-sized hydraulic dam supplies water for house, barn and two acres of garden and fruit, also floods a cranberry meadow when needed. A section of the dam is placed 6 feet apart and covered with plank fitted tight. The apron is of 12-foot plank spiked to the sills so as to break joints. The bottom is made tight with brush and clay. Stones are piled in behind the plank coverings, as shown in cut.Sowing Seed Evenly
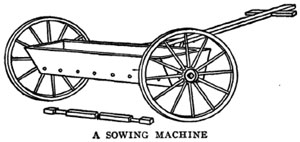
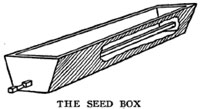
These drawings show the construction of a wheel seeding device that can be easily made at home.
The axle is tightly fitted into the wheels so that it turns when the wheels do. This agitates the grain or other seed and helps to keep the seed running out of the holes at the lower back side of the box. The quantity of flow may be regulated at pleasure by making the holes large or small and increasing or diminishing the number of holes.
It may be found desirable to have a considerable number of holes and then having plugs, for alternate ones, perhaps, which may be removed to make the seeding thicker. From 4 to 6 feet is suggested for the length of the box. Any old wheels will do if they are not too heavy to be easily drawn by hand.Berry Crate Carrier
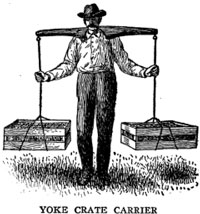
One of the most convenient appliances for use in the strawberry field is illustrated in the picture shown herewith. It shows a novel use for the old-fashioned yoke used so commonly on the old-time farms. The picture is so readily understood that no description need be given. This also suggests the many purposes for which a yoke may be used on a farm. Every farmer ought to have one, to make more easy the task of carrying things. In some places yokes may be found for sale, but if you cannot buy one, make one yourself. Take a piece of strong, tough wood, shape it out to fit around the neck and shoulders and taper off the ends to what you consider the right size. Usually a groove is cut around about 1-1/2 inches from each end and a rope is securely tied. At the other end of the rope a hook is attached the right size to go around the bail handle of any ordinary pail. The hook may be iron or may be formed from a strong, branched stick.Handy Loading Device
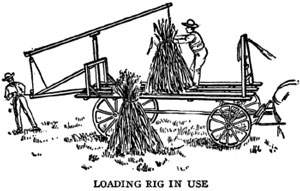
Here is a rig simple and strong that works well for loading corn in the field. The picture shows the construction of the rack and hoisting device with pulley attachment. Such a rig will be found useful for loading many things on a farm.Rack for Hauling Fodder
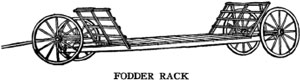
A handy rack for hauling fodder from the field is shown in the drawing. It may be used for any kind of corn, of course, for sorghum, and may be found useful in moving brush. Each end of the rack is hung from the axles by two straps of iron that can be obtained from any blacksmith at very little expense.Pulling Fence Posts
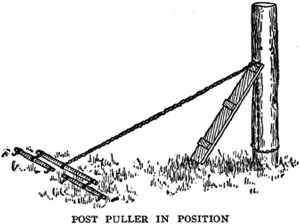
An easy and practical method of pulling fence posts, by which all digging and hand labor is eliminated, is here shown. Take a plank 4 feet long, 1 foot wide and make a V-shaped notch in one end, nailing on several crosspieces to prevent splitting. This plank is used to change the horizontal draft to the vertical.
Place one end of chain around the post close to ground. Incline the plank against the post so the lower end of the plank will be about 1-1/2 or 2 feet from the base of the post. Place the chain in the notch of the plank, start the team and the post in a few seconds will be clear of the ground.
In moving fences the chain should be attached to the rear axle of the wagon, so the posts may at once be loaded and hauled to the new location of the fence.One Way to Pull Stumps
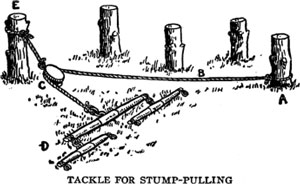
A Connecticut man has a very handy device for pulling peach stumps from old orchards, and can pull 200 or more a day by this means. The limbs are cut off and the stumps, E, left as long as possible. A short rope or chain with a single pulley is attached to the top of the stump. The anchor rope, B, which runs through the pulley, is fastened to the bottom of a stout stump, A.
A pair of steady horses is attached to the rope and always pull toward the anchor stump. With a steady pull there is no jumping or jerking, and they will walk right off as if pulling a loaded wagon. Use about 60 feet of 1-inch rope, which costs $2.40, and the pulley, $1.75, making a total cost of $4.15.Simple Land Measure
Having much land measuring to do that requires greater accuracy than just "stepping it off," make a simple affair like this. The manner of construction is made plain. Use hardwood pieces; 5/8 or 3/4 x 1 inch is heavy enough. Have lower points exactly 5 feet 6 inches apart. Make a round head on the handle. Grasp the top lightly in hand, holding at the side, whirl handle to bring rear point to front, moving off in direction to be measured. Continue to revolve measure, changing points in advancing. It takes three lengths to the rod.Storing Water
An easy way to make a reservoir at the spring is to throw up a bank, perhaps laying a wall first, founding it below the surface. Should the soil be such that water percolates through it, face the soil with loam on top and puddle it well. If this leaks, face it with clay and puddle the clay. These rules apply to all dams made of stone and earth.
Pipes entering reservoirs should enter at the bottom and the soil be well puddled around them to prevent the water working through beside the pipe. Each pipe must have a strainer over its supply end and have no air holes in its entire length. A good strainer can be made from a piece of large lead pipe punched full of holes. One end may be flattened or turned over and the other drawn on over the end of the water pipe. Let nobody suppose that simple, inexpensive arrangements are faulty because primitive. If constructed correctly and in line with natural laws, they are not only all right, but are preferable to fancy, complicated devices that get out of order easily or in a year or two and require a master mechanic to put them into working condition again.Getting a Supply of Fuel
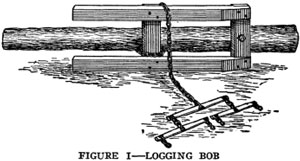
PLAN for getting up the year's supply of fuel is suggested as follows: Fell the trees on the ground with a small sapling under them, so a log chain can be passed beneath. Then a logging bob (Figure I) is tipped up on its side near the end of the log; a chain is hooked to the bolster near the ground, passed under the log and over the top runner of the bob and the team hitched to the end of the chain. A quick pull of the team and the bob comes down on both runners, with the log on the top of the bolster.
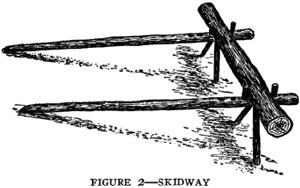
The log is now drawn to some sheltered place near the woodhouse and sawed into stove lengths with a 6-inch crosscut saw on the skidway shown in Figure 2. The limbs are trimmed in the woods, drawn on a pair of bobs to the shop, where there is a three-horse power boiler and two-horse power engine, and are sawed at the rate of 1-1/2 cords an hour with a buzz saw.
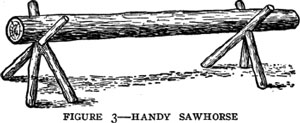
A handy device can be made of two crotched limbs, as shown in Figure 3, to saw large limbs on. A 2-inch auger hole is bored where the limbs branch, and a hardwood limb driven tightly into the hole.
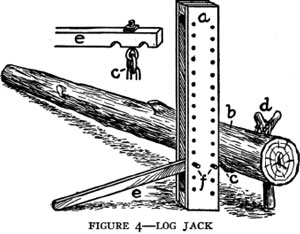
The following described device (Figure 4) is very handy to hold and lower the tree after sawing the stump off. [a, planks with holes bored in them; b, log; c, chain; d, crotched limb; e e, lever; f, iron pins.] It is made of two hardwood planks about 8 x 5 inches and 1-1/2 inches thick bolted together at the top and bottom, with a 2-inch space between for the lever to work in. One-inch holes are bored through the sides of both planks, in which iron pins are placed for the lever to pry over. The lever is made of white ash, and has two notches near the large end, with a chain link attached midway between notches. A stout chain is hooked in the link, passed under the log, and attached to a crotched limb leaning slightly against the opposite side of the log. By working the small end of the lever up and down and moving the pins up one hole at a time, a good-sized tree can be raised from the ground high enough to be sawed easily without a backache.Simplest of All Camping Tents
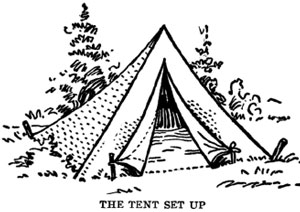
The great trouble with camping-out tents is the weight of the frame, but the weight of the latter in the case of the tent figured herewith will hardly prove a burden to anyone, as only two light sticks are used, such as are shown in Figure 1. These are pressed into the ground 8 or 10 feet apart, according to the size of the tent, and brought together and fastened at the upper ends with such a joint as is shown, or with a string passing through a screw-eye in each pole, if a simpler method is preferred.
The tent is made from four triangular pieces of cloth, as suggested in Figure 2. One of these is cut up the center and hemmed, to afford an entrance to the tent. The triangular pieces are sewed together at the edges and at two of the opposite corners pieces of stout cord are sewed into the corners of the cloth, the cloth being reinforced as suggested in the cut.
Two stout pegs of wood and two lighter ones are provided. To pitch the tent, put up the two frame poles A-fashion and draw the tent cloth over them, opposite seams and corners fitting over the poles. Draw out the other two corners and tie by the ropes to the stout pegs which have been driven into the ground. The two lighter pegs are used to fasten back the flaps of the front. It may be found well to hem a light cord into the bottom of the side having the opening, leaving the flaps free from the cord. The position of the cord is shown by the dotted line. It will not be in the way when lying across the opening of the tent on the ground and will strengthen the whole when the outer corners are drawn tightly up to the stout pegs.
This makes a practically square tent and the size can be as large or small as may be desired. To cut the side pieces, decide on the width of the sides and the height you wish the tent to be. Then draw a triangle (Figure 2), having the base as long as desired for the side of the tent, and a perpendicular 2 feet longer than the height desired for the tent, since the four sides of the tent are to be inclined, and must, therefore, be enough longer to make up for this.
This will prove a very satisfactory tent for boys who are camping out, and it has the merit of being easily made and very easy to carry about.
1. Workshop and Tools
2. The Steel Square
3. In and Around the House
3. In and Around the HousePart II
4. Barns and Stock
5. Poultry and Bees
6. Garden and Orchard
7. Field and Wood
8. Gates and Doors
9. When We Build
9. When We Build Part II
10. Worth Knowing
10. Worth Knowing Part II
Next: 8. Gates and Doors
Back to the Table of Contents
Back to the Small Farms Library Index
Community development | Rural development
City farms | Organic gardening | Composting | Small farms | Biofuel | Solar box cookers
Trees, soil and water | Seeds of the world | Appropriate technology | Project vehicles
Home | What people are saying about us | About Handmade Projects
Projects | Internet | Schools projects | Sitemap | Site Search | Donations | Contact us