|
 |
|
|
The Farmer's Workshop
HERE is no doubt that of all the handy farm devices good tools head the list. So, in this book, we are going to start with carpenter tools and the place to keep and use them. Every farmer ought to have a workshop in which he can do odd jobs and make things when the weather prevents out-of-door work, or at times when there is little to do on the farm. Economy and thrift demand that a farmer should have and keep in good condition a few essential carpenter tools. First of all he should have a long, strong, smooth-top bench and, either on racks above the bench or in a tool chest, he should keep in order, and where he can easily find them when wanted, his stock of carpenter tools. Some of the tools that will be found useful are the following:
A rip saw, a crosscut saw, a back saw, and a compass saw; a jack plane, a fore plane, and a smoothing plane; a shave or drawing knife; two or three chisels of different sizes for woodworking and a cold chisel for metal; a gouge or two; a good hatchet; two or three hammers, including a tack hammer and a bell-faced claw hammer; a brace or bit stock with a set of half a dozen or more bits of different sizes; one or more gimlets; a mallet; a nail set, a large screw driver and a small one; a gauge; a spirit level; a miter box; a good carpenter's square -- No. 100 is a good standard size; compasses or dividers; cut nippers, a pair of small pincers and a pair of large ones; a rasp; a large, flat file; at least one medium-sized three-cornered file and a half-round file.
It is poor economy to buy cheap tools. Of course extravagance is to be avoided, but be sure that you get first-class material in every tool you buy. It is a good plan to get a good practical carpenter to assist you in selecting your tools. Keep on hand in the shop a variety of nails, brads and tacks, screws, rivets, bolts, washers and nuts, and such small articles of builders' hardware that are likely to be needed occasionally, including hinges, hasps and staples and some sandpaper. Have a good plumb line, chalk and pencils. Keep in a handy place a jar of a good liquid glue, and some cement. See to it that the shop contains a good stock of well-seasoned lumber, both hard wood and soft. Attached to the bench should be a bench screw or vise. This need not be an expensive one, but should be of good size and strong. There should also be a pair of carpenter's saw benches, a shaving horse, a small anvil and a grindstone. Every farmer has a grindstone somewhere about the buildings, but it is a great convenience to have a good one in the workshop.
A corner of the shop should be devoted to painting supplies, including several colors of good standard ready-mixed paints and stains, raw linseed oil, boiled linseed oil, turpentine, varnish, putty, points for setting glass, several brushes of different sizes, a good putty knife and panes of glass of different sizes ready for emergency.
A farmer ought to be able to do occasional little jobs of soldering. He needs soldering iron, a bar of solder, resin, a little bottle of soldering fluid, which can be purchased already prepared, also a small sheet-iron furnace in which to heat the soldering iron.
It would cost quite a tidy sum to buy all these things at once, but they can be gradually accumulated as one is able to purchase them, and then the outfit should be kept complete. Whenever anything in the shop is broken, worn out, or disappears it should be replaced.
Whenever farm implements or anything about the barn or house are broken or out of order, they should be properly fixed. Often a few minutes spent at the right time will make a thing almost as good as new, while, if neglected, it may soon get beyond repair and have to be thrown away. A thrifty farmer always keeps his farm implements well housed and in repair. It is not what we earn, but what we save, that makes us rich. It is quite as important to stop the leaks as it is to figure on big profits directly.Running the Grindstone
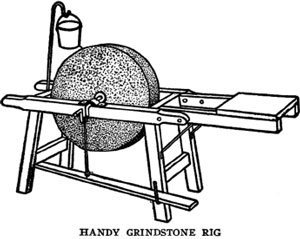
If the face of the grindstone is hard and glazed pour a little sand on the stone every few minutes until the glaze is worn off and the stone will cut like a new one. This condition is caused by exposing the stone to the weather. It is best to keep the stone in a shed under cover, but if this is not possible, set it under a tree and put a box over it when not in use. It is surprising how easy a little oil on the bearings will make the stone run. A few drops of kerosene will cut the gum if it runs hard and then some oil or axle grease will make it go easy.
It is hard to stand on one foot and work the treadle with the other. The job can be made easy by bolting two boards to the grindstone frame, and extending it 2 feet, on which place a seat as shown in the cut. An uneven stone needs to be cut down and toned up. This can be done by grinding against the end of a piece of pipe, having the stone dry.
Good nature is as contagious as the measles. Put on your best smile when you get up in the morning and observe how everybody will greet you with a sunny face.A Homemade Anvil
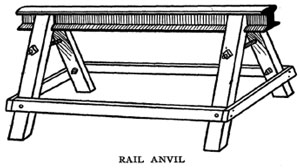
A homemade anvil can be constructed from a 4-foot piece of railroad rail mounted on a trestle, as shown in the sketch. This affair will stand a lot of heavy pounding, and comes in handy in many ways. The rail is just about the right shape to make an anvil.Making a New Tool
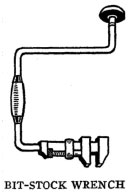
A very handy wrench for many kinds of work, such as making gates and contrivances, where small bolts are used, is shown in the cut. From a small monkey wrench remove the wooden handle, and weld the metal part to an old bit-stock, as shown in the cut. This permits of very rapid work in screwing up small bolts. Where there are so many things to do as there are on a farm, it pays to do things in the easiest and quickest way. This is one of the real time-savers.
Learn to live, and live to learn,
Ignorance like a fire doth burn,
Little tasks make large return.
-- Bayard Taylor.How to Make a Shaving Horse
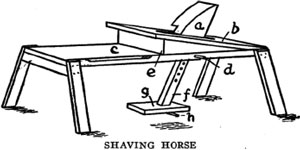
One of the most useful devices on a farm is a shaving horse. Make a bench 18 inches high of a good 2-inch plank, c, level off the edges so that it will make a comfortable seat. Upon this place a slanting platform, b, through which is cut a hole in which the clamp, a, works.
The clamp must be made of heavy hard wood that is tough and will not split. The shank, f, must be an extension of the clamp, a. Several holes in the plank will allow the clamp to be raised so as to take in larger pieces of wood. The treadle, g, is kept in place by a peg at h. To operate this horse the workman places his foot upon the treadle, inserts the wood to be clamped under the edge of a, and pushes backward upon the treadle. This clamps the wood and the drawing knife can be used readily and much more rapidly than with a vise.A Convenient Farm Horse
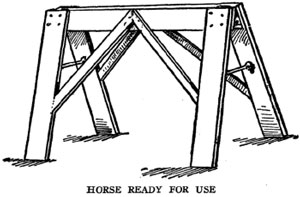
On the farm there is continual use for such a horse as is shown in the drawing. Not only when doing little jobs of carpentering, but also in many other operations, such a support is found necessary. This little horse is an improvement over the ordinary stiff affair, in that it shuts together when not in use, and so can be packed out of the way.
It is made of boards cut in strips, the two horizontal boards at the top being hinged together, as shown herewith. While in use the legs are kept apart by long hooks, as may be plainly seen in the picture.
When tillage begins, other arts follow. The farmers, therefore, are the founders of human civilization.
-- Daniel Webster.A Wire Splicer
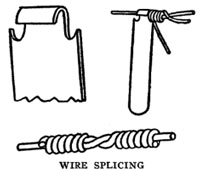
The neatest and strongest splice can be made with this little instrument. It is a strip of iron 1 inch wide and 1/8 inch thick. One end is cut narrow and is bent into a hook large enough to fit neatly the largest wire to be spliced. At the sides of this two notches are filed, as shown at the left. At the right the splicer is seen in position on the wire. The splicer should be turned backward, as it appears in the right-hand drawing, to make the splice. A pair of large pincers or a vise should be used to hold the two wires between the coils while turning the splicer. The splice as finished appears above. The length of the handle may vary. If the splicer is to be used for net wire, of course the handle cannot be longer than the width of the mesh. Otherwise, 6 or 7 inches is about right for No. 8 wire. If it is to be used only for small wire, the length of the handle should be reduced for the sake of convenience.Serviceable Homemade Level
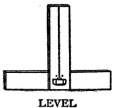
A serviceable level is shown in the illustration. Take two 1-inch boards of rather hard wood, well-seasoned, 2 to 3 feet long, bolt or screw them together at right angles. This union must be so strong as never to be moved by ordinary pressure. At the top of the perpendicular piece cut a slit and insert a piece of strong thread. To the bottom of the thread tie a thin circular weight. Lay the device across two trestles of nearly the same level. Just above the weight mark the place where the string hangs. Reverse the position of the instrument by turning it end for end, and again mark the position of the string. Half way between the two marks place a third. When the string hangs over this mark the lower board will be level. A shield of tin may be placed over the weight. A nail on each side of the string, just above the weight, will keep it from swinging far out of place. It must be allowed to swing freely. A simple level may be improvised by filling a small flat bottle with water, so that only a bubble of air remains, and attaching it lengthwise and near the middle of a straight stick or narrow board.To Make a Handle Stay On
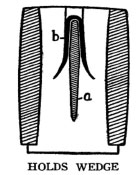
To secure the handle of a hammer or ax is often quite a bothersome problem. A special wedge made with a piece of wood as at a, in the sketch, held in place by a fence staple, b, has been devised to meet the need for a wedge that really holds. The prongs of the staple should be bent slightly outward before it is driven in, so that they will spread in the handle. There is little danger of handles coming loose when they are attached in this manner, and it is little more difficult to set a handle as indicated than in the old-fashioned way.A Tool Box Requisite
Among the handiest things to have in the tool box are some small bolts about 2 inches long with thumb nuts. A dozen or so of these will prove their value many times over in the course of a year. In making tables for fairs or suppers or in any sort of knock-down arrangement, or temporary convenience where strength is essential, nothing surpasses a bolt of this description. With a brace and a bit the right size, one may be entirely independent of nails and screws.
A farmer friend of ours was once called upon to make a fence about a child's crib without any marring nails. A slot in the fence post with a thumb bolt just above the crib line gave an alligator jaw result which was very satisfactory. On another occasion a knock-down stage was carried from the storeroom in pieces and put together by two men in 20 minutes. An actual computation of its strength showed that a locomotive might safely run over it.
The man referred to above has 100 feet of tables for hall purposes, depending entirely upon the 2-inch bolt and thumb nut for their fastenings and braces. There is never any trouble about knocking out nails. To one having a brace and bit these handy things will suggest of themselves many satisfactory uses. A supply of iron washers should be kept in hand, and in time a collection of various sizes of wooden washers will accumulate.Soldering
Soldering may be done by anyone having a very simple outfit. All that is required is a copper soldering iron, some solder, a vial of muriatic acid and some resin. A fairly successful job of soldering a tin dish may be done by scraping the surface bright where the hole is, sprinkling on a little finely powdered resin, laying on a bit of solder and holding the dish over a flame, which may be from an alcohol lamp, until the solder melts. It will cover the hole and stick. If the dish is rusty or badly tarnished use muriatic acid in place of resin. Resin works best when tin is bright, but usually solder sticks most successfully when the acid is used.
For soldering large breaks or doing important jobs of soldering the iron must be used. In order to work well the iron has to be kept coated with solder. When it gets blackened it should be filed until bright and then rubbed upon a smooth board while hot in a mixture of melted solder and resin. When the hot iron is taken from the fire wipe it on a damp cloth before trying to use it to lift the melted solder. A soldering iron is best heated in charcoal or the coals of a wood fire. The copper should never get red hot, as that causes the coating of the point to be burned off. The metal to be soldered must always be heated before the solder will unite it.
Solder may be obtained in bars at any tin shop. It can be made by melting together 2 parts of lead and 1 of bar tin. This is the usual proportion for most purposes. Soft solder that will melt quickly and can be easily used for mending tinware can be made of pure lead and tin in equal parts. A hard solder is made by melting together 2 parts of copper to 1 of tin. Brazing solder is made by melting together brass and one-sixth its weight of zinc. When cool it should be granulated by pounding with a hammer. For soldering steel and iron to brass the following combination of metal is melted together, 3 parts tin, 39-l/2 copper, and 7-l/2 zinc. Before it is applied, all the metals to be jointed together must be heated to the same temperature as the soldering alloy. Gold solder is made of 24 parts gold, 2 parts silver and 1 part copper. A hard silver solder is made of 4 parts silver to 1 of copper. A soft silver solder is made of 2 parts silver to 1 of brass.
1. Workshop and Tools
2. The Steel Square
3. In and Around the House
3. In and Around the House Part II
4. Barns and Stock
5. Poultry and Bees
6. Garden and Orchard
7. Field and Wood
8. Gates and Doors
9. When We Build
9. When We Build Part II
10. Worth Knowing
10. Worth Knowing Part II
Next: 2. The Steel Square
Back to the Table of Contents
Back to the Small Farms Library Index
Community development | Rural development
City farms | Organic gardening | Composting | Small farms | Biofuel | Solar box cookers
Trees, soil and water | Seeds of the world | Appropriate technology | Project vehicles
Home | What people are saying about us | About Handmade Projects
Projects | Internet | Schools projects | Sitemap | Naturam expellas furca, tamen usque recurret, et malaSite Search | Donations | Contact us