|
 |
|
|
Feeding Dry Ground Grain
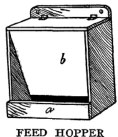
OME of our friends have found that a poultry feed hopper for feeding ground grain has proved very satisfactory. Make a box 18 x 18 inches and 6 inches deep, then take off one end and fasten to the back with hinges, which forms the cover. Nail a strip, a, 3 inches wide across the open side at bottom, which forms the box for the poultry to eat from. Take a board, b, the width of inside of box, 14 inches long, and insert in front of box, nailing as shown in cut, with the upper end even with front edge of box and slanting in until a space of 2 inches is left between bottom of board and back of box to allow the feed to pass through.
The feed is poured into this hopper and runs down into the box at the bottom as fast as needed. The size of the hopper can be varied to suit the size of the flock. It should be screwed to wall of poultry house about 12 inches from floor. By using this hopper one may keep a dry mixture consisting of wheat bran and middlings and occasionally corn meal, or a small amount of linseed meal, always before the fowls. In addition, some people feed a mixture of whole corn, oats and wheat in the litter morning and evening, also ground green bone and beef scraps.Keeping the Water Clean
Few drinking fountains are more successful than a large bottle or jug filled with water and inverted. It can be fastened wherever convenient with straps. If a small pan is placed close beneath it the water will flow out as it is used and will remain clean and cool. Place it high enough above the floor of the house so the fowls will not scratch litter into the pan.
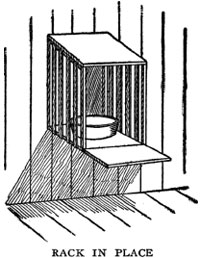
A Watering Rack for Hens
Build a crate of lath 2 feet square, 3 feet high, with a slanting cover to keep the hens off the top. Then tack an 8-inch board in front, level with floor of crate. Nail the rack to post or side of henhouse about 2-1/2 feet from floor, and put your water pan in crate. By putting corn on the lighting board the hens will quickly learn to fly up and drink. This contrivance keeps the hens from spilling their water or scratching dust or chaff into it. Be sure to nail the rack securely to the wall or post where it is put up.
Keep your shop and your shop will keep you.Drinking Fountain
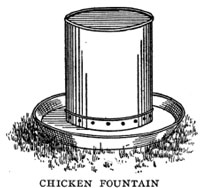
The best drinking fountain, in that it is impossible for small chicks to get drowned, and they cannot stand in the water to befoul it, is made by inverting a can or pail in a pan a trifle larger. Tomato cans with the edges pounded down, leaky pails with the ears bent up, in fact anything with a smooth top and in which a hole can be made, can be used. Punch a hole or holes in the side just a little less distance from the top than the depth of the pan to be used. Fill with water, invert the pan over the top, and turn over quickly.Folding Chicken Roost
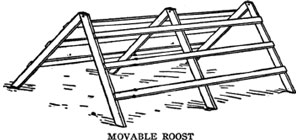
This roost is made of 3-inch boards cut any desired length. A small bolt fastens the upright pieces at their top ends, and the horizontal pieces are fastened on with nails. This roost can be kept at any angle, and may be quickly taken out of the house when it is time to clean up. This sort of roost will accommodate more fowls in the same space than the flat kind, but it should not be made very high.A Good Poultry Nest
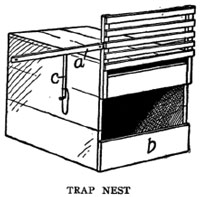
A useful trap nest can be made of grocery boxes. They should be at least 12 inches each way. The illustration shows how they are made. In the cut the trap is set ready for the hen to enter. A cleat, c, is fastened to a small piece of cord, which is tied to a nail on the side of the box. Set the trap by raising it and resting the cleat on the nail, with the other end under the arm marked a. This leaves an opening from 4 to 6 inches wide, which is not enough for the hen to enter. In going into the nest she will be obliged to raise the trap door, which will let the cleat fall, thus closing the trap after the hen has gone in.
The trap door, the arms and the cleats may be made out of lath. Leave a little space between the boards in the walls, so the heat can escape, otherwise it will be too warm in summer. The bottom board, b, in front should be 3 or 4 inches wide, and the lower piece of the trap door should rest against this so the hen cannot get her head through, raise the trap and get out.Two Coops from a Barrel
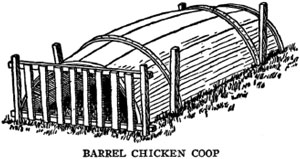
Very good coops can be made at small cost from empty barrels, as shown in this picture. First, drive shingle nails through the hoops on both sides of each stave and clinch them down on the inside. Then divide the barrel in halves, if it is big enough, by cutting through the hoops and the bottom. Drive sticks into the ground to hold the coop in place, and drive a long stick at each side of the open end just far enough from coop to allow the front door to be slipped out and in. The night door can be made of the head from the barrel or any solid board, and the slatted door, used to confine the hen, by nailing upright strips of lath to a crosslath at top and bottom.
Weak men wait for opportunities; strong men make them.
-- Marden.A Box Chicken Coop
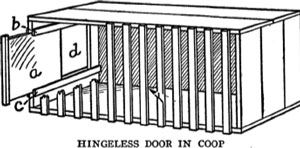
The diagram shows a convenient way to make a coop for the poultry yard, of which the special feature is its door. Procure a box of the right dimensions and saw a hole, d, in one end. Then strengthen the box with narrow strips of wood, b, c, on each side of the hole b, c. This acts as a groove for the door, a, to slide in. Thus you have a sliding door, which opens and shuts with the greatest ease. The front of the coop is inclosed with lath, or narrow strips, placed 2-1/2 to 3 inches apart. The top should be covered with a good grade of roofing paper to make it waterproof. A coop of this sort should be 2 to 2-1/2 feet long, 16 inches deep and 2 feet high.A Low Poultry Run
A safe and secure run that requires less material than a high pen can be made from laths sawed in two, which would make the sides 2 feet high, making the frame of scantlings and the top of sawed laths, box boards or similar material. The top of the run should consist almost entirely of trap doors, using bits of old harness for hinges, which will look well if cut neatly. The picture shows one of the doors propped up to show the construction more plainly. The doors are 4 feet long, the length of a lath, and may be 8 to 10 feet the other way and still not be clumsy, being constructed of such light material. This trap door is an important feature, as it permits the tender to enter easily for removing top soil and replacing with fresh earth, or otherwise caring for the birds. The frame material is of 2 x 2-inch scantling at the corners, while the side strips are made of inch boards sawed 2 inches wide. The earth under this run should be slightly mounded for the sake of dryness.
Whatever is worth doing at all is worth doing well.
-- Earl of Chesterfield.A Portable Chicken Coop
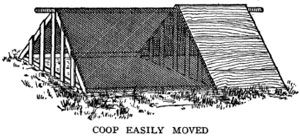
One of the annoyances about an ordinary chicken coop is that it is not easily moved from place to place, nor provided with a yard. To obtain a yard the coop must be moved separately, and thus require the loss of more or less time. In the drawing shown herewith is a simple, homemade coop, which can very easily be moved by the aid of the handles at the apex at each end. The coop is built of ordinary material on a base frame, and with a V-shaped roof and side frames. The ridge pole is extended, as shown at each end, to form a handle. A convenient length is about 2 feet for the coop and 3 or 4 feet for the yard. If desired, the hen may be allowed the freedom of the yard or may be held in by slats, as shown in the drawing.A Homemade Brooder
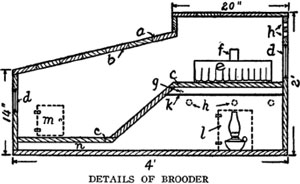
The material costs about $2 and a handy person can build one in a day. The gas from the lamp does not go into the chick apartment at all, but filters around under the floor, making it dry and warm. The lamp flame is about 3 inches from the sheet iron. The heat flows up gently through the drum, f, which is perforated with holes in the side, thus letting part of the heat out into the hover and the balance in the brooder above. The heat reservoir, g, between the sheet iron, k, and the floor, c, is about 1 inch deep. The tube, f, should not touch the sheet iron, merely extending through the floor, c. It takes very little oil.
In the cut, a, is the paper roofing over inch-matched boards, b; c is board floor of same material; d are small windows, e is the hover, h are holes in each side of the brooder for the escape of gas and fumes, l shows door to reach the lamp, n air space below the floor.Movable Brooder House
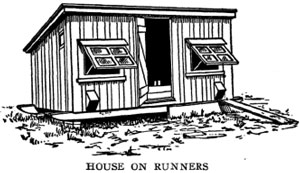
The type of house shown in the cut is one of the best for raising poultry. It may be built on runners, with a tight board floor of matched boards. A convenient size is 6 feet wide and 10 feet long, 6 feet high in front and 4 feet at the rear. The door is in the middle, and there is a window on each side, with two openings below. The roof should be covered with a good quality of prepared roofing.
The same material used to cover the sides will make the house warmer. Roosts may be put in after the brooders are taken out, and the chickens easily protected from foxes and other animals.A Very Cheap Henhouse
It was built by a "down east" Yankee. The studs and rafters were made of two pieces of 1 x 2-inch stuff nailed together T shape. These were set up 2 feet 10 inches apart on centers and covered with wire netting drawn taut. This was then covered with tarred paper, which made the only material between the fowls and the outside air. They have wintered in these houses without discomfort, and gave a good egg yield. The wire netting prevented the paper from sagging when the house was covered with snow.
They can who think they can.A Daylight Chicken Catcher
Do you, when you want fried chicken on short notice, run it down, provided it doesn't run you down ? Here is a better way. Fasten a barrel hoop securely to a handle about 6 feet long, and to it fasten a bag about 3 feet deep. A piece of an old hammock is fine for a bag, or horse net or fish net -- anything the chicken cannot get out of. Lay it on the ground, call the chicken and throw the corn over the bag, and when one suitable goes on lift up the hoop and you have it. If the bag is made not over 1 foot deep it can be dropped down over the chicken while eating.
A Simple Hawk Trap
Make a box 4 inches deep, 6 inches square and nail to a 4-foot pole with cleats at the bottom to keep from turning over. Cover top of box with 1-inch mesh wire. Place a little chicken in the box; then put a steel trap on top of box and set it out under the trees where the hawks lodge to watch for the chickens. If there are hawks around, it is pretty sure to catch them.
Scare Away Crows and Hawks
For keeping hawks and crows away from the poultry yards, get a few bright tin shingles, link them together with wire, and hang upon an arm extending from the top of a high pole, where sun and wind strike fairly. The jingle and glitter is sufficient to keep these pests at a safe distance. You will also find them useful in the corn and melon fields where crows are troublesome.
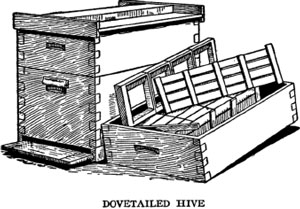
Practical Hives and Hive Making
VERY apiarist knows that there is no item in bee keeping of more practical importance than the hive and brood frame. The Langstroth, or Simplicity size of frame has become almost standard, for there are more frames of this size in use than all others combined. The frame proper is 17-5/8 inches long, 9-1/8 inches deep, and the top bar is 19 inches long. There are several styles made, but many prefer what is known as the Hoffman. This has a heavy top bar in depth, as well as width. The ends, or end bars, are made 1-3/8 inches wide for about 3 inches down and one side is worked off to a knife edge, which comes against the square edge of the next frame, making them self-spacing, but not a closed-end frame, and allowing the proper bee space between the top bars. This works fairly well without the use of the honey board, though one is preferable.
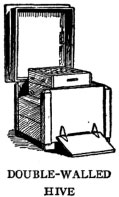
The hive for this frame, to be best adapted to the production of comb or extracted honey, should contain 10 frames, the inside dimensions being 15 inches wide, 10 inches deep and 18-3/8 inches long. A follower can be used at one side to assist in removing frames by first removing the follower or division board. This arrangement leaves 3/8 inch between the top of the frames and the top of the brood nest, so that when the surplus cases are put on the proper bee space is preserved. This hive is made of scant 1/2-inch lumber for the outside, ship-lapped together in a manner to make a perfect joint. It is 20 inches wide, 24 inches long, about 20 inches high to the eaves, or roof, outside measurements, and weighs complete about 50 pounds. The inside dimensions of the brood nest should be the same as any 8 or 10-frame hive, as the bee keeper may prefer. The brood nest is raised sufficiently to admit of packing between it and the hive proper, also a space for packing at ends and sides.
The lower portion of the hive being well protected against the cold, the warmth of the bees will care for the upper portion. To avoid condensation cover the brood nest after removing the surplus cases with a porous substance, or chaff cushion. Make a wooden rim about 4 inches deep, covering the top and bottom with burlap and filling with wheat chaff or cut straw. Many prefer the cut straw both for cushions and packing the hives. This rim should be made a little smaller than the inside of the hive.
In extremely warm weather the cover can be raised a few inches in front, giving a circulation of air all around the surplus department, and shading it at the same time. The cover is hinged at the back end, and when raised, as shown in cut, makes two shelves for the use of the operators, which are highly appreciated; besides, there is no lifting on or off of covers, as is the case in other hives. The alighting board is hinged and can touch the ground, which is of great advantage to the bees during a heavy flow of honey.
Perhaps there are more single-walled hives used in the United States than double-walled or chaff hives, but in northern states a double-walled hive is preferable.Device for Extracting Beeswax
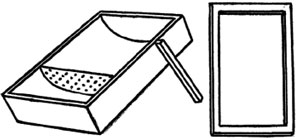
Wax, as produced by the bees and worked into comb, is almost pure white, but, on being melted and cooled, is yellow. A man who knows advises every beekeeper to use the solar wax extractor.
All that is necessary is to have a box with glass to fit over it, as shown in the drawing. To melt combs, put in the box an old dripping-pan, having a hole at one corner, and that corner the lowest, with some kind of a dish set under to catch the wax. Set in the sun. To get the most out, break up the combs into fine pieces, then soak in water for a day or two longer before rendering.Self-feeder for Bees
A very simple device for feeding bees on syrup may be made if you take an ordinary fruit can, fill it full of syrup and over the top tie a thick rag with a string. Then invert the can in a small pan or dish. The syrup will seep out through the rag around the edges of the jar just fast enough for the bees to keep it cleaned up.
1. Workshop and Tools
2. The Steel Square
3. In and Around the House
3. In and Around the HousePart II
4. Barns and Stock
5. Poultry and Bees
6. Garden and Orchard
7. Field and Wood
8. Gates and Doors
9. When We Build
9. When We Build Part II
10. Worth Knowing
10. Worth Knowing Part II
Next: 6. Garden and Orchard
Back to the Table of Contents
Back to the Small Farms Library Index
Community development | Rural development
City farms | Organic gardening | Composting | Small farms | Biofuel | Solar box cookers
Trees, soil and water | Seeds of the world | Appropriate technology | Project vehicles
Home | What people are saying about us | About Handmade Projects
Projects | Internet | Schools projects | Sitemap | Site Search | Donations | Contact us