|
 |
|
|
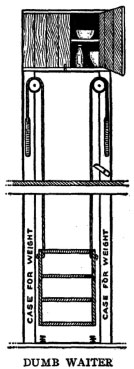
The Step-Saving Dumb Waiter
NE may save many steps in every house where the kitchen is situated over the cellar, to say nothing of other considerations, with a small outlay of time, and perhaps, without the expenditure of a single dollar, by a dumb waiter, means of which may be placed in any convenient corner out of the way. A handy size for an ordinary family is 2 feet square with four shelves, counting the top, 1 foot apart. These shelves may be hung from the corners, the center or the middle of the sides, by means of manila sash cord over pulleys placed close to the ceiling of the kitchen and nearly balanced with weights, which should be confined in a little case. They should be guided in ascending and descending by means of grooves in the middle of the sides extending from top to bottom of the inclosed case. In the cellar the case may have a fine wire screen door and in the kitchen an ordinary cupboard door or one with a glass front, as desired.
The doors should slide upward and be balanced like an ordinary window with sash weights and pulleys. In order to prevent the waiter from descending when being overloaded a pivoted wooden latch, as shown on the right-hand side, should engage with the ends of the shelves, and to prevent any shock from too quick descent some coiled springs should be placed at the bottom of the case. If desired a small cupboard may be built at the top of the case for storing little-used articles.
Some advantages of such a waiter are that food may be placed on the shelves and lowered into the cool cellar and either allowed to stay there or removed to the refrigerator. Thus it will be unnecessary to carry anything to or from the cellar, and this will often mean a saving of several trips up and down. If the cellar is clean and cool there may be no need to use a refrigerator or an ice box.Rack for Preserves
A convenient rack for preserves may be made just at the turn of the cellar stairs in a house, so that the housewife need not step off the stairs, when she descends for a can of preserves. Several circular pieces of wood are pierced through the centers and nailed to a kind of wooden shaft that runs through the entire rack. Nail barrel hoops of the thick, wide variety around the edge of the shelves, so that the contents cannot fall off. The barrel hoops are soaked in water for several hours to make them pliable, so they can be fitted around the shelves.
In a socket at the bottom, the middle shaft slips, the upper end working in a socket in the end of a stout piece of wood nailed to the beam overhead. The sockets may be purchased at the hardware store. The glass cans are arranged on the shelves, and the housewife can stand in one spot and turn the rack around until she finds the jar for which she is looking.
From the covers of large cheese boxes anyone could make a similar rack, using it in attic or kitchen, anywhere where one wants a rack which will hold an extra large number of articles for the amount of space involved.
Ill husbandry braggeth
To go with the best: Good husbandry baggeth
Up gold in his chest.
-- Tusser.Transforming a Washstand
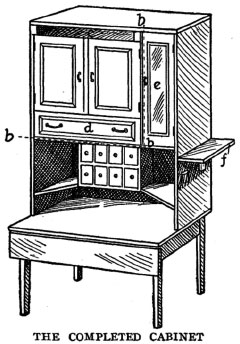
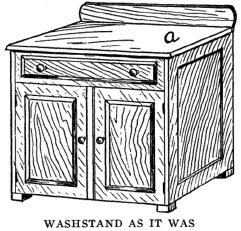
The kitchen cabinet here shown was made from an antiquated washstand and table, using old lumber, odds and ends of varnish, nails and screws, the finished article costing less than 50 cents. The only tools used were a saw, hammer, plane and square, such as can be found in any farmer's collection.
First, the shelf shown in Figure I was made, it being wide enough to reach each end of the table and deep enough for the washstand to set on it flush. To the right end was screwed a board of the same width, the shelf being so placed that it would be 2 feet above the table. A board of equal width formed the support at the other end.
Then the wash-stand, from which the top had been removed, was placed upside down on the shelf (bbb), one end of the washstand reaching to the extreme left end of the shelf, and the two were securely fastened together. This left a narrow open space between the right end of the washstand and the right support of the shelf. A board was then nailed on top from one end to the other, and a back added.
The drawer of the washstand had to be fixed so that it would slide the other way, as it was now upside down. That necessitated a shelf inside the wash-stand above the drawer. Old lumber was used, and this was smoothed with a plane, then sandpapered and holes and cracks filled with putty. When the putty was dry it was sandpapered again.
A support was then nailed to the back of the recess for a spice cabinet. This left the cabinet about 4 inches from the table. This support also did for two shelves, one in each corner of the recess. The spice cabinet contained eight small drawers and added much to the whole. A door with a glass sash (e) was then made for the narrow space to the right of the washstand above the recess. This made a little china closet with two shelves and containing over a dozen brass cup hooks. The space near the top on the left-hand side, between the short legs of the washstand, was left open for the crumb and draining trays. A piece of batten was nailed around the top as a finishing touch.
A leaf, which could be raised when required, added to the table room. The cabinet being placed in a corner left the front and one end free. On this end or side were placed two salt boxes, one for salt, and the other for kitchen cloths. Directly above these and reaching the length of the end was a shelf (f) for the clock, etc. Finally, walnut varnish stain, two coats, was applied. In each side of the recess were screwed two large cup hooks. Similar hooks were screwed on the inside of the washstand doors, to hang up biscuit cutter, corkscrew, nutmeg grater, etc.Homemade Dresser
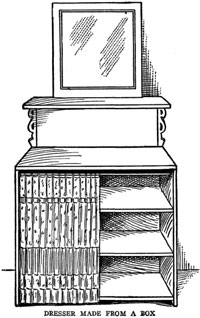
Sometimes it is necessary to use homemade makeshifts in the house furnishing, and sometimes it is done through a desire to exercise one's ingenuity in fashioning simple affairs. The accompanying illustration shows a plan for making a simple dresser that when finished will not only be very useful in itself, but will also add a useful bit of furnishing to the room.
Select a dry-goods box of the right size to fit well into the space to be utilized, then fit two shelves to the interior, as suggested. The whole box should be covered on the outside with some pretty cloth, the edges being drawn over and around the front edges of the box, and neatly tacked inside. Make a shelf with a length equal to the width of the box and fasten it to the wall above the box with some pretty nickel brackets, as shown in illustration. Cover the shelf with cloth, also. Now place a looking-glass above the shelf and have a curtain like the covering in front of the opening. This curtain can have little brass rings sewed to the upper edge, which will slide on a small brass rod.
Dost thou love life? Then do not squander time, for that is the stuff life is made of.
-- Benjamin Franklin.
Earth is here so kind, that just tickle her with a hoe and she laughs with a harvest.
-- Douglas Jerrold.
Blest is the man whose wish and care
Is just to be happy anywhere.Kitchen Window Cabinet
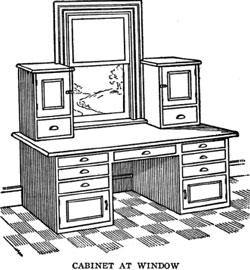
Nothing lightens labor so much as cheerfulness, and cheerfulness may often be secured by very simple means. In the accompanying picture is shown one way that works well. Instead of the usual kitchen table a cabinet is built below and at the sides of the kitchen window and the top made large enough to serve as a table. In this way the wife may have a pleasant view when she looks up from her kitchen work. It is not necessary to go into details concerning the construction of such a cabinet, because no two people would be satisfied with the same plan. The plan shown is merely suggestive for the thoughtful wife and the handy man to work out to suit their own particular needs.To Let in More Light
Many farm kitchens and dining rooms are dark and gloomy. It is not an easy matter to cut new windows in the outside wall, though this can often be done to great advantage; but where there is an outside door in a dark room, conditions can very easily be improved, and that, too, at small expense. Doors vary greatly in the manner of construction, some having wide panels at the top and some having two narrow ones of varying lengths. But almost every panel door that was ever constructed can be treated in the way which we will describe. The two upper panels can be removed, and their place filled with two lights of glass. If the door is of modern make it will be found that the wooden panel is held in place by a narrow molding all about it, both inside and out. Remove the molding on one side, and take out the panel. Put in the glass and replace the molding, and the work is done. If, however, the door is of older manufacture the molding on either side may be found to be a part of the door frame. In this case, cut the molding away on one side, neatly and evenly, and remove the panel. Then insert the glass, and having made, or bought, a little strip of molding, fasten it neatly in place around the glass with brads.
In the case of some doors the two panels could be removed, and also the upright between them, leaving a large rectangular opening, into which a single sash of four, or nine, lights could be inserted, the joints being made tight about it with putty and white lead. Then tack a narrow bit of molding about the sash, both inside and out, and a door that will give light to the room will be the result. An outside door looks better with glass in the upper half, and the interior will certainly be made more cheerful and healthful because of it.
We know what we are, but know not what we may be.
-- Hamlet.A Barrel Cradle
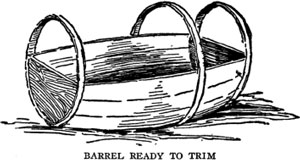
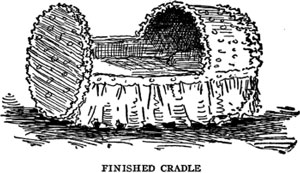
Anyone who can use a hammer and nails and needle and thread can make this inexpensive, accessible, easily moved, and cool yet sheltering cradle.
Secure a nice white sugar barrel, clean it thoroughly and remove half of both heads. Place the barrel on its side, removing half the staves, and leaving the other half to form the bed of the cradle.
Next remove the hoop that is second from the bottom, and then two hoops will be left at the top to form the frame for the hood, and one hoop at the bottom to form the foot. (See illustration.) Carefully nail the remaining staves to the hoops, clinching each nail securely.
Now cover the frame thus formed, as shown in the accompanying illustration. Any thin cotton goods that may be laundered can be used. Figured lawn would be very pretty, and if economy is an item, a worn bleaching sheet will do. Place a little mattress or pad and a tiny pillow within, or the usual cradle furnishings may be used. One yard of mosquito netting stretched over the opening of the cradle will prevent insects from bothering, and the netting itself cannot touch and awaken the baby.To Protect Baby from Hot Stove
Winter months mean extra care for the mother of a baby, but possibly the greatest of the additional cares that winter brings in this regard is that of keeping the curious tot from the hot stove. Build a pen around the stove to protect him from it. The pen is a simple affair. It consists of four little gates, made just large enough to surround the stove, and covered with netting. The wire netting does not interfere with the free passage of heat and is very effective in keeping baby from getting burned. The gates are made of 1-1/4-inch strips, mortised or neatly fitted. For netting use ordinary poultry wire of 2-foot width. The gates are held in place by hooks and screw eyes. This arrangement is better than hinges, as it makes the taking down of the affair, for sweeping or cleaning the stove, much easier.
In the summer you may use the gate at the foot of the stairs, across the porch door, and in other places where baby is determined to go, and where he is in danger of falling and getting hurt unless protected in this way. For this pen, the lumber costs 25 cents, the netting 25 cents, and the hook and screw eyes 15 cents, making a total of only 65 cents.A Box for Clothes
In many of the furniture stores one may see pretty cloth-covered boxes that are used in bedrooms as a receptacle for various articles of apparel, the inside, as well as the outside, being covered with pretty figured cloth. The inside of the cover is fitted with pockets for slippers and slumber shoes. These little chests are so light that they may be lifted about with one hand.
To make such a chest, select one of the very light and well-made grocery boxes in which cereals and various brands of breakfast foods are shipped, which may be had at any grocery store. See that the corners and the bottom are nailed securely. The top will be composed of at least two pieces of board, and these can be made into a solid cover by nailing two cleats beneath them. But these will not look very attractive when the covering is being put on, so a more workmanlike plan will be to saw off a couple of inches from each end of the top boards and supply the place of the wood removed by nailing along the ends a 2-inch strip of the same thickness. This gives a cleat at each end, but the cleats in this way form part of the cover itself.
Use long wire nails to secure these end pieces in place.
It will be a simple matter to cover and line the box when the covering material is at hand. Use very small tacks and carry the outside covering up over the top and down over the inside, which will make the use of tacks along the top unnecessary. The lower edge of the cover can be tacked on the bottom of the box, so the tacks will not be seen on the outside at all.Scoops from Tin Cans
Scoops for handling sugar and flour are among the most convenient utensils that one can have about the pantry; and in a short time a good supply may be made from materials that are going to waste about almost every home.
Take an ordinary tin can and either melt or cut off the top. With a pair of tinner's shears (a strong pair of household shears may be used), begin at the open end and split the side of the can to within about an inch of the bottom. Opposite this one make a similar slit. Parallel to the bottom of the can, cut from the lower end of one slit to that of the other. Round the corners of the remaining half, and the body of your scoop is finished.
For a handle, about 4 inches off the end of an old broomstick is just the thing. If this is not available, a handle may easily be shaped with a knife from a piece of soft wood. To attach the handle, from the inside drive a small nail through the center of the bottom of the can and into the center of the handle.
Some additional strength is obtained by planning so that the seam of the can will run down the middle of the lip of the scoop, thus stiffening it. A salmon or corn can makes a very convenient sized scoop for the sugar, while tomato cans serve very nicely for flour and meals, and half-gallon paint buckets may be thus utilized for handling light materials.A Homemade Folding Table
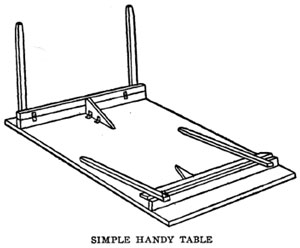
A handy game or sewing table may be made as follows: Take two planed boards 12 inches wide and 3 feet long. Fasten them together with two strips 2 inches wide and 24 inches long. Fasten these strips by strong screws in upright position. Now take two similar strips and fasten them by hinges to the pieces screwed on the boards. Fasten four stout legs to these in the manner shown in the cut. Take two three-cornered boards large enough to hold the legs stiff when dropped into position, and fasten them by hinges, as shown.
The same general plan may be followed in making a much larger and heavier table or a lighter one.A Homemade Butter Worker
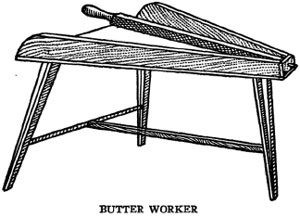
A butter worker is one of the handy devices that should be upon every farm. A good type is shown in the drawing. It is made of close-grained hardwood -- maple or birch are recommended -- tight-jointed, free from knots and perfectly smooth in size. It slopes enough to drain readily at the narrow end through a short piece of lead pipe inserted at the bottom. The working bar has a strong, smooth iron rod or spike at its lower end, which is easily inserted into or removed from the hole in which it works. The part of the bar that comes in contact with the butter is half-round on one side and two flat sides meet at a right angle. Of course, it must be as smooth as possible.Home Cheesemaking
Nearly every farm home contains, or may easily be supplied with, the necessary appliances to make cheese, and it is not a difficult task when one is once familiar with the process. For a small batch of about 12 gallons of milk the following method is a good one: Take about 6 gallons of the evening's milk and leave it covered with a cloth in a temperature of 65 to 70 degrees until morning and then mix 6 gallons of morning's milk with it in a large tub or boiler. All milk may then be heated together to 80 to 90 degrees. Care must be used not to get it too hot or to expose it to a draft so that it will cool quickly.
Another good method preferred by some is to use 11 gallons of perfectly sweet morning's milk and to this add 1 gallon of milk that has soured and thickened. The sour milk should be stirred well to get out all the lumps and left for about 15 minutes before the rennet is put in. The easiest way to heat the milk is to place it in a wash boiler right on the stove until it gets up to 86 to 90 degrees and then raise it from the stove by placing it on two bricks. The stove must not be too hot.
Rennet in the form of tablets is most convenient and useful for home cheesemaking. Dissolve one tablet in half a glass of cold water and add to the milk after it has been heated and stir well for two minutes. Some cheesemakers use two or three tablets, as it saves time, but for beginners two are usually enough. If you have liquid rennet extract, use about two tablespoonfuls.Cutting the Curd
The rennet will curdle the milk and the curd will be ready to cut in 20 to 40 minutes. This can be determined by noting if the curd breaks clean like jelly when raised on a knife blade. The cutting can be done with a wire toaster, a long knife or a heavy wire. Cut lengthwise of the vessel and then crosswise until the curd is in nearly uniform pieces of 1/2-inch squares. After cutting, leave the curd on for five minutes, then heat slowly to 100 degrees, stirring all the time. Cook for about 40 minutes at as near 90 degrees as possible, stirring occasionally to prevent the curd from sticking together. Keep the heat up and do not allow the mass to cool.
To determine when the curd is ready, take a handful and squeeze it in the hand firmly and if it feels elastic and does not stick together, it has been cooked long enough. If the milk is good, the curd should have a pleasant, slightly acid odor. As soon as the curd is cooked, draw off the whey or dip off the curd with a sieve and place in another vessel. After the curd is well drained and before it sticks together, add 1/4 pound of fine salt and mix well. After salting, let it cool for 15 minutes, stirring occasionally, when it is ready for the hoop.Pressing and Curing
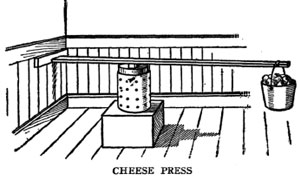
For a cheese hoop, one can use a tin hoop 7 inches in diameter and 12 inches deep or an old peck measure without a bottom if holes are punched in the sides for drainage. For a press a device shown in the sketch will serve well, the pail at the end of the lever being filled with stones. Before the curd is placed in the hoop, line it with cheesecloth, one piece the size of the bottom and another around the side. Turn the upper edge of the cloth over the edge of the hoop and fasten it tight. When the curd is packed firmly, put a piece of cloth on the upper end and fold it over tight. Make the pressure slight at first, but after an hour rearrange the cloth and make the pressure heavier. The pressing should be finished by the next day. Do not press in too cool a place, but keep the temperature about 50 degrees.
For curing, set the cheese in a damp room or cellar which has an even temperature. Turn it around daily, and if it shows signs of molding, rub occasionally with butter. It should be ready to eat in three or four weeks. Cheese will cure at 40 degrees, but it takes longer than when warmer. Twelve gallons of milk should make about 10 pounds of cheese, according to richness of milk.
After one or two attempts any housekeeper should be able to make good cheese by this method. It is necessary to keep all utensils very clean and the liberal use of boiling water with a little soda will accomplish this purpose.Washes While Reading
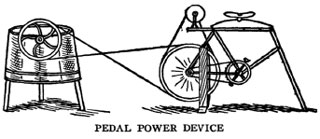
Here is a way of making play of wash day. Perhaps some of our bright boys will try this to help mother. A friend of ours had an old bicycle unfit for use. He made a frame to raise the hind wheel from the floor, wound the rim with twine (tire being off) and reversed the seat. In place of the form he inserted a piece of pipe (a stick would do as well). Then he took some old belting, cut it to 1-3/4 inches wide and about 10 feet long, and with that he runs the washing machine for his wife. He can read the paper while he washes, and he does not lose much time from field work either. An emery wheel can also be run with it by bolting 1-inch strips to the top part of the frame extending over the wheel and mounting a polishing head on same.
Knowledge is power.
-- Bacon.Tread Power in the Dairy
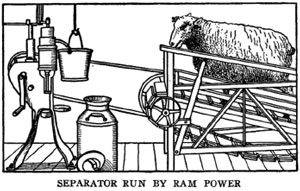
While the small gasoline engines adapted to running cream separators have been hailed with delight by many dairymen, the old tread power is still a very economical and reliable source of power. With a heavy sheep, dog or the dairy herd bull enough power can be produced to run the separator and churn at practically no cost except for the tread.
One difficulty has been to secure a uniform rate of speed, but this is solved if a heavy flywheel is attached to the tread. While the sketch shows a direct drive from tread to separator, a more desirable arrangement is to have the tread located in a. room adjoining the separator room, where the milk will not be exposed to the breath of the animal.
A great many men wear themselves out devising schemes to sidestep honest work.A Lamp for Cooking
A lamp may be utilized for cooking purposes in the following way: Make a tripod by taking three strips of wood of equal length, putting in one end a headless nail and making slightly slanting holes in the corners of a 6-inch triangular piece of board in which to fit them. A screw hook in the center of the board, on the under side, completes the device, which has only to be stood over a lighted lamp to be ready for work. A small stew kettle, or tin pail, hung on the hook, within a half inch of the lamp chimney, enables one to have a " pot boiling" in short order. If you have a large lamp, with a round wick, it will give the heat of two or three common ones, and you can cook almost as rapidly as over a stove.
With an ordinary lamp, food can be heated, eggs boiled, or coffee made very quickly, helping wonderfully in the getting of a meal. This is also an easy and convenient way to heat baby's milk, or water, in the night, in case of sickness. Stood on a chair by the table, the device can be used to keep the coffee or chocolate hot during meal time. A round piece of sheet iron, with chains attached to suspend it from the hook, is an additional help, to hold a steeper for tea.
As this tripod can be taken apart readily, when not in use, it will be found a good adjunct to a camping outfit, even though you carry a camp stove, for there will be times when nothing will be wanted but a hot drink, which can be made over the lamp with less trouble than it would be to make a fire in the stove.Hot Water All Night
One of the things that must be had quickly when medicine is needed, and still more often for a bottle baby, is hot water at night. The following contrivance has been found to be worth many times the trouble to make it, for it saves annoyance at a time when baby's worrying may mean hours of sitting up.
Place the socket of a wall bracket lamp just high enough above a table so that the top of a hand lamp chimney will be 5 or 6 inches below it. Make an arm of round iron or small piping long enough to extend out over the lamp and to this hang a hook, on which hang a small teakettle or pail. In this enough water for the needs of a night can be kept hot without boiling, and will be ready at an instant's notice. As a night lamp is a necessity in a house where there is a youngster, the cost of this device will be nothing, for the blaze of a small burner will provide sufficient heat. The proper height for the socket on the wall can be determined by measuring the hook and the kettle to be used. The lamp chimney should not be nearer than 2 inches to the bottom of the kettle, or the water will boil and steam away.
1. Workshop and Tools
2. The Steel Square
3. In and Around the House
3. In and Around the House Part II
4. Barns and Stock
5. Poultry and Bees
6. Garden and Orchard
7. Field and Wood
8. Gates and Doors
9. When We Build
9. When We Build Part II
10. Worth Knowing
10. Worth Knowing Part II
Next: 3. In and Around the House Part II
Back to the Table of Contents
Back to the Small Farms Library Index
Community development | Rural development
City farms | Organic gardening | Composting | Small farms | Biofuel | Solar box cookers
Trees, soil and water | Seeds of the world | Appropriate technology | Project vehicles
Home | What people are saying about us | About Handmade Projects
Projects | Internet | Schools projects | Sitemap | Site Search | Donations | Contact us