|
 |
|
|
Worth Knowing (part II)
Substitute for Pipe Wrench
The drawing shown here illustrates a useful device for twisting pipe off or on its connections. Three or 4 feet of new rope is frayed out at both ends, which are put together and wound tightly around the pipe to be turned, so that the first coil twists over the loose ends and continues around the pipe, two or three times, ending in a loop, through which a bar of iron is slipped, to be used as a lever. This simple plan will be found very effective in ordinary requirements for the pipe wrench, and is worth a trial. A more durable wrench may be made by using wire instead of rope. The loop can be formed by closely twisting the ends of the wire with pincers. The rope is rather easier to handle because more flexible.
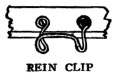
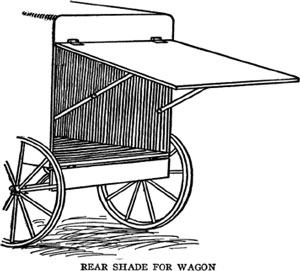
Market Wagon Conveniences
Farmers who regularly haul produce to market or deliver direct to customers will find the conveniences described to be of much value. They save much time and considerable trouble and cost but little effort to make them. Instead of wrapping the reins about the whip, or letting them lie over the dashboard, a hook, such as shown in the first sketch, may easily be made of stiff fencing wire and secured to the top of the wagon or the dashboard.
Two other hooks may be arranged at the sides of the wagon to hold an umbrella, which would be kept there rain or shine, and never forgotten and left at home. This will save a drenching some time and perhaps some valuable produce.
Another convenience is a rear curtain of oilcloth stretched over a light board frame and hinged at the top, as illustrated. Two old stays from a buggy top will serve to support it, when it must be left open, and it will protect the driver from sun and rain while taking things from the wagon.Carrying Butter to Town
A refrigerator that one farmer uses in which he takes butter to town nine miles away in hot weather is made thus: Get two clean, tight boxes of some odorless wood, one 12 x 15 x 13 inches deep, and the other 9 x 12 x 10 inches deep. Slip one inside the other with a notched block in each corner to hold the inside box in place. Fasten the covers together so as to leave an air space of about 1 inch between them all around. The inner box will hold 20 pounds of butter nicely. It will carry butter solid in wagon all day in 9O-degree weather.
To Sharpen Scissors
Do you know that you can sharpen scissors, and easily, by passing the blades over glass jars? Take a bottle or jar, make believe you are trying to cut it (have one blade in and the other outside of the top of the bottle) and then allow the scissors to glide off the hard surface naturally, just as if you were trying to cut the glass. Use firm but not too hard pressure, and repeat the operation several times.
How to Paper a Room
If a room has been papered several times, tear off all the loose parts you can and with a sponge and water loosen what remains on the walls, removing as much as possible, so as to have a smooth, even surface. If the room has never been papered, first go over it and fill all large cracks and holes with a paste made of whiting and water, or plaster of paris and water. When using the latter, mix only a little at a time, have it rather thin, and use quickly. Then, give the room a coat of sizing, which is made of common glue, three or four handfuls dissolved in a pail of boiling water. The sizing is applied with a large brush and should be allowed to dry overnight.
Choose Judiciously
For very sunny rooms, select cool-looking papers such as blues, greens and browns in various shades, while for dark rooms pinks, reds, terra cottas and yellows are best. When selecting papers, pay careful attention to the color scheme of your room, and don't have an inharmonious mixture, which will offend good taste. Small, plain patterns are the most economical, and the easiest to match. The cheap, trashy papers, costing only a few cents a roll, are not worth the trouble of putting up. Gold paper is not to be recommended for wear.
No borders should be used for rooms having a low ceiling. For such, a striped paper of pretty design running right up to the ceiling is best. The ceiling may be papered in a plain or very small-patterned design, to harmonize with the side walls, or treated with several coats of tinted kalsomine or paint. A picture molding of appropriate color is used to finish the side walls, being placed scarcely 1 inch from the ceiling. The ceiling whether papered, painted or kalsomined, should be done first. It is a very difficult matter to paper the ceiling, and, unless you can have help, it would be better not to attempt it. Plain tints in paint or kalsomine are always pretty and in good taste. If, however, you want to risk papering the ceiling yourself, get some handy body to help you.Paste and Tools
The paste is made by simply boiling flour and water together, and adding a very little alum, salt and glue -- about a tablespoon of each to a pound of flour. It should be of a consistency thick enough to apply easily, and not so thin that it will run.
Provide yourself with a good-sized paste brush, another one (a whitewash brush will do) to use dry over the paper, sharp scissors and a knife, plenty of clean rags, two barrels, two long, smooth, clean boards, each about 10 inches wide, and a step-ladder.
Make a long table by placing the two barrels about 8 or 9 feet apart and on top of these the boards.Trimming and Cutting
The first thing to do is to cut the necessary number of strips of paper long enough to allow for waste in matching, and lay them all face downward on the "operating" table, one on top of the other. Next spread the paste evenly over the top or first strip of paper, being very sure to have the edges well pasted. Then turn top and bottom parts down, bringing pasted sides together, so that they meet, and none of the paste part is exposed, and carefully trim off edge on one side, with large, sharp scissors. Lift up the part thus trimmed and folded, and mount the ladder, which should previously have been placed convenient to the place where you intend to begin operations -- the largest wall space is best, next to a door or window.
Hanging the Paper
Now take hold of the top end which was doubled over (it will open and hang by its own weight) and adjust to its proper place on the wall. Then, with a large clean rag in your hand, rub downward, never up or sideways, and take great care to keep the edge straight. If you find that you didn't start straight from the top, loosen paper and do it over again. A "straight eye" is needed to do the work neatly. Don't rub too hard and always rub downward, doing a little part at a time, and lifting paper occasionally, so that no air bubbles are left under it. When the upper part is done, dismount from ladder, undo the folded part at the bottom of the width, and proceed in the same manner to adjust to the wall. When you are sure it is on straight and smooth, trim with a sharp knife along the baseboard. Then give the strip another smoothing by going all over it again with a dry, clean brush. Proceed in this way until all the full length parts are covered, and then match in the small spaces over and below windows and doors. All the matching must be done with great care.
Practical and Economical
Wainscoting in living or dining rooms are nice, and very practical, especially where there are small children. For this purpose burlap, or the less expensive dark, heavy papers that come in wood-grain imitation are good. Matting is sometimes used with very good effect, too. A narrow wooden molding is used to finish the top of the wainscoting, and in that case the work of papering the side walls is so much easier, the lengths being short.
The Farm Blacksmith Shop
A blacksmith shop is of immense practical value on a farm. To those who have one it is almost as essential as livestock, farm tools and crops. One does not need to be a professional blacksmith. The elementary practice in welding, upsetting and tempering is easily learned with a little practice. Nor is it necessary to have many tools. An entire equipment may cost but a few dollars.
An old railroad rail will do for an anvil. But after getting the real article one is better satisfied and can do the work with greater ease. The forge should be obtained at the start. With it almost anyone can heat any small iron to welding point with as much ease as a regular blacksmith.
In the equipment of an Ohio farmer are a pair of tongs that he made himself, two other tongs and a large pair of pinchers picked up in a junk shop. He got the hammer and sledge from a hired man who had worked in a car shop. The anvil and vise also came from the junk shop, and both were in good repair. These cost $8, the hammer and sledge, $1.15, and an old, second-hand forge, $1.80. Not a large outlay to be sure, but a wise expenditure. If purchased at first hand the cost would be greater, but cheap at any price when you consider what you can do in the way of making and repairing with such a list of blacksmith tools.
In addition to the above list this man, Frank Ruhlen, has chisels, pinchers, fullers and other small tools, all of which he has made out of old pieces of steel taken from old worn-out machines. By figuring and planning just a little, any farmer can make the greater part of his own tools and at a very small cost for materials and labor.Why the Shop Pays
Mr. Ruhlen says: My shop was not started to replace the town blacksmith shop; and it will never do so. But it does serve for repair work, and it saves many trips to town. It is helpful in other ways, also. Last winter a sudden ice spell came on, so severe that I could not get the horses out to the field to feed the flock. Only one thing was possible: to have sharpened shoes put on the horses. But it was a disagreeable trip ahead to walk and lead the horses to town; so I decided to do the work myself. I had never set a shoe myself, but that trip before me quickly decided. The horses were brought into the shop, the old shoes pulled off and sharpened, and within an hour the feeding was done. Had I gone to town for the work it would have required time going and coming, and then, maybe a long wait ahead for my turn at the shop.
Last year I sharpened the shoes on the corn planter, and both cultivators, six shovels each. We wore out a steel point or shear, and never had it to shop but once, and then it was to get a new nose or point. I do not try to put steel points on anything, as it is too particular work for anyone who just picks tools up when something breaks. A sharp harrow is a luxury on most farms, because the average smith does not draw the teeth out enough, and they are dull in a few days.
And I do not believe the average smith can harden the farm tools as good as a farmer who has had some experience in tempering, as the farmer is the one who works with the tools, and soon learns when they are too hard or not hard enough. I sharpened my smoothing harrow last year before we commenced on our corn crop of 64 acres, used it on all the land, on some more than once, and my harrow is sharper now than my neighbor's, who paid $1.50 at the shop for the same work. We never use a dull mattock or pick now as we did before we had a forge. Welding chains, making chain hooks, open rings, clevises, are all easy to do on rainy days. I could not tell all the different uses I make of my shop.Blacksmithing Not Hired Man's Work
I do the work in the shop myself, finding other chores for hired men. You cannot afford to break them in, for the reason that they may soon leave and all the teaching and trouble would be for nothing. By doing the work myself, I have learned a little more each year, have acquired the knack of it, and really enjoy doing what is to be done. Had we had a shop when I was a boy all of the repair work could have been done by the boys, and I would at the same time have had splendid training for my own needs now.
My experience is all in favor of the shop on the farm. It pays well. Get the forge first, and then gradually add other tools as you can. I used a claw hammer for some time before getting a smith's hammer. I did not equip my shop all at once. Start in a small way, build up gradually, learn slowly, and the shop will develop itself. Get a shop, and you will believe in it because of its help to you.Horseshoe Lever
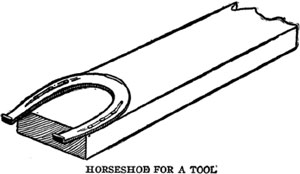
A handy lever for prying up boxes or barrels may be made by nailing an old horseshoe on the end of a 2 x 4, letting the ends of the horseshoe extend about an inch or two beyond the end of the timber. A more finished device may be constructed by cutting the upper part of the lever down to the form of a rounded handle. A horseshoe should be selected with fairly long and well-sharpened heel calks.How to Paint Tin Roofs
Remove all rosin and other loose substances from seams and have roof clean. Paint immediately after laying is finished; do not allow the tin to rust -- you coat the base plate with tin and lead to prevent rust, and paint the finished goods to prevent oxidation of the coating. Use only the best red or brown oxide of iron, mixed with pure linseed oil all raw, or half raw and half boiled. Use litharge only as a drier. Litharge makes paint adhere hard to coating, so that when thoroughly dry you cannot scrape it off. Don't use any turpentine or patent driers.
Apply all paint with hand brushes and rub in well. This is very important. Don't put paint on thick -- one coat that covers well, and is thoroughly rubbed in, is better than three put on thick. Let roof stand two weeks to a month before applying second coat. Six months or so after applying second coat put on a third coat. After this you do not have to paint roof more than once every two or three years. Too much paint injures a tin roof.
Keep paint well stirred up; put on thin and rub well in. By following these directions you will have a roof that will last many years.Preserving Wood
Creosote, or sulphate of copper or iron, are effective for preserving wood. There are objections, however, to their use for floorings or ornamental woodwork. Creosote leaves a permanent, disagreeable smell. The sulphates discolor the wood. Borax is excellent for keeping wood from decay. The preparation of it is simple, and consists in immersing the wood in a saturated solution of borax, which is then heated to 212 degrees Fahrenheit. The wood is left for 10 or 12 hours, the time depending upon the density and size of the pieces of wood. When taken out, the wood is stacked until dry, then reimmersed in a weaker solution of the borax for a brief time, dried again, and are then ready for use. Boards thus prepared are practically indestructible from rot, and are nearly incombustible.
Another preservative is a compound of one part silicate of potassa and three of pure water -- the wood to remain in the solution 24 hours, then dried for several days, then soaked and dried a second time and afterward painted twice with a mixture of one part water-cement and four of the first-mentioned mixture. Thus prepared, it will not decay in the ground, and will be incombustible out of it.
Another process for preventing decay of wood is by use of a paint which possesses the advantages of being impervious to water. It is composed of 50 parts of tar, 500 parts of fine white sand, 4 parts of linseed oil, 1 part of the red oxide of copper in its native state, and 1 part of sulphuric acid. The tar, sand and oil should be first heated in an iron kettle; the oxide and acid are then added very carefully. The mass is thoroughly mixed and applied while hot. When dry, this paint is as hard as stone.
Decay in wood may be prevented by the following method: Take 20 parts of resin, 46 parts of finely powdered chalk, some hard sand, and a little linseed oil and sulphuric acid; mix and boil for a short time. If this is applied while hot, it forms a kind of varnish, thereby preserving the wood.To Preserve Shingles
Following is an effective method to prevent the decay of shingles: Take a potash kettle or large tub and put into it one barrel of lye of wood ashes, 5 pounds of white vitriol, 5 pounds of alum, and as much salt as will dissolve in the mixture. Make the preparation quite warm, and put as many shingles in it as can be conveniently wet at once. Stir them up with a fork, and, when well soaked, take them out and put in more, renewing the preservative solution when necessary. Then lay the shingles in the usual manner.
After they are laid, take more of the preservative, put lime enough into it to make whitewash, and, if any coloring is desirable, add ocher, Spanish brown, lampblack, or other color, and apply to the roof with a brush or an old broom. This wash may be renewed from time to time.
Salt and lye are excellent preservatives of wood. Leach tubs, troughs and other articles used in the manufacture of potash never rot. They become saturated with the alkali, turn yellowish inside and remain impervious to the weather.To Render Wood Fireproof
Rendering the woodwork of houses secure against catching fire can be done at an insignificant cost, and with little trouble. Saturate the woodwork with a very delicate solution of silicate of potash as nearly neutral as possible, and when this has dried, apply one or two coats of a stronger solution.
Another method is simply to soak the wood with a concentrated solution of rock salt. Water-glass will act as well, but it is expensive. The salt also renders the wood proof against dry rot and the ravages of insects. Still another method is to immerse the wood in a saturated solution of borax, heat being gradually applied until the solution reaches 212 degrees Fahrenheit. It is then left for 10 or 12 hours, according to the nature and size of the wood.Fireproof Wash for Shingles
A preparation composed of lime, salt and fine sand or wood ashes, put on like whitewash, renders the roof 50 per cent more secure against taking fire from falling cinders, in case of fire in the vicinity. It pays the expense a hundredfold in its preserving influence against the effects of the weather. The older and more weather-beaten the shingles, the more benefit derived. Such shingles generally become more or less warped, rough and cracked; the application of the wash, by wetting the upper surface, restores them at once to their original form, thereby closing up the space between the shingles, and the lime and sand, by filling up the cracks and pores in the shingle itself, prevents warping.
Petrified Wood
Mix equal parts of gem salt, rock alum, white vinegar, chalk and Peebles' powder. After the mixture becomes quiet, put into it any wood or porous substance, and the latter becomes like stone.
How to Season Wood
Boiling small pieces of non-resinous wood will season them in four or five hours -- the process taking the sap out of the wood, which shrinks nearly one-tenth in the operation. Trees felled in full leaf in June or July, and allowed to lie until every leaf has fallen, will then be nearly dry, as the leaves will not drop off themselves until they have drawn up and exhausted all the sap of the tree. The time required is from a month to six weeks, according to the dryness of the weather.
Bleaching Wood
Sometimes it is more feasible to bleach a small part of a wood surface, especially in repairing, than to darken a larger portion of the work. This can be done by brushing over the wood a solution composed of 1 ounce oxalic acid in a pint of water, letting it remain a few minutes and then wiping dry. The operation may be repeated if necessary. A few drops of nitric ether, or a quarter of an ounce of tartaric acid, will assist the operation; or a hot solution of tartaric acid may be used alone. Lemon juice will also whiten most woods. Cut the lemon in half and rub the cut face upon the wood.
When the bleaching has been done and the wood is dry, give a thin coat of shellac or French polish, as the light and air acting upon the bare wood will bring back the original color.
If the wood obstinately resists bleaching, it may be lightened by mixing a little fine bismuth white, flake white or ball white (the cleansing balls sold by druggists) with the shellac, and give it a thin coat. This whitens, but it also somewhat deadens or obscures the grain and is, therefore, not so good as the bleaching method.Wood Polish
Rub evenly over the wood a piece of pumice stone and water until the rising of the grain is cut down; then take powdered tripoli and boiled linseed oil and polish to a bright surface.
Furniture Polish
Take equal parts of sweet oil and vinegar, mix, add a pint of gum arabic finely powdered. This will make furniture look almost as good as new and can be easily applied, as it requires no rubbing. The bottle should be shaken, and the polish poured on a rag and applied to the furniture.
Size Stains
By the aid of glue in the solution, the colors are fixed in size stains. They are employed for the purpose of giving a color to cheap work in soft woods, such as chairs, bedsteads and common tables and ordinary bookcases. The colors usually wanted are walnut, mahogany, cherry color, oak and even a rosewood.
For Mahogany -- Dissolve 1 pound of glue in a gallon of water, and stir in 1/2 pound Venetian red, and 1/4 pound chrome yellow, or yellow ocher. Darken with the red and lighten with yellow, as desired. If the Venetian red does not give a sufficiently dark look put in a pinch of lampblack. Apply hot.
For Rosewood -- Same as mahogany, omitting the yellow, and using 3/4 pound Venetian red (or more) instead of 1/2 pound. Give one coat of this and then add lampblack, one pinch, or more, to the color; with the latter put in the figure or dark parts of the rosewood.
For Oak -- In a gallon of glue size (as above) put 3/4 pound powdered burnt umber. Lighten with yellow (chrome or ocher), if need be. Hot.Dark Wood Stain
White woods may be given the appearance of walnut by painting or sponging them with a concentrated warm solution of permanganate of potassa. Some kinds of wood become stained rapidly, while others require more time. The permanganate is decomposed by the woody fiber; brown peroxide of manganese is deposited, which afterward may be removed by washing with water. The wood, when dry, may be varnished, and will be found to resemble very closely the natural dark woods.
Red Stain for Wood
Boil chopped Brazil wood thoroughly in water, strain it through a cloth. Then give the wood two or three coats, till it is the shade wanted. If a deep red is desired, boil the wood in water in which is dissolved alum and quicklime. When the last coat is dry, burnish it with the burnisher and then varnish.
Liquid Glue
Dissolve 1 pound of best glue in 1-1/2 pints of water, and add 1 pint of vinegar. It is ready for use.
Cement for Metal and Glass
Take 2 ounces of a thick solution of glue, and mix it with 1 ounce of linseed-oil varnish, and half an ounce of pure turpentine; the whole is then boiled together in a close vessel. The two bodies should be clamped and held together for about two days after they are united to allow the cement to become dry. The clamps may then be removed.
Cement for Broken China
Stir plaster of paris into a thick solution of gum arabic till it becomes a viscous paste. Apply it with a brush to the fractured edges, and draw the parts closely together.
Cement for Crockery and Glass
Take 4 pounds of white glue, 1-1/2 pounds of dry white lead, 1/2 pound of isinglass, 1 gallon of soft water, 1 quart of alcohol, and 1/2 pint of white varnish. Dissolve the glue and isinglass in the water by gentle heat if preferred, stir in the lead, put the alcohol in the varnish and mix the whole together.
Mending Glassware
Broken dishes and glassware may be easily mended as follows: Fit the pieces in their proper places and tie a string around the vessel to keep the parts from slipping out. Then boil the entire dish for two or three hours in sweet milk. This will firmly glue the vessel together and it will last for years with proper care.
Armenian Cement
This will strongly unite pieces of glass and china, and even polished steel, and may be applied to a variety of useful purposes. Dissolve five or six bits of gum mastic, each the size of a large pea, in as much rectified spirits of wine as will suffice to render it liquid; and, in another vessel, dissolve as much isinglass, previously a little softened in water (though none of the water must be used), in French brandy or good rum, as will make a two-ounce vial of very strong glue, adding two small bits of gum galbanum of ammoniacum, which must be rubbed or ground till they are dissolved. Then mix the whole with a sufficient heat. Keep the glue in a vial closely stopped, and when it is to be used set the vial in boiling water.
Japanese Cement
Thoroughly mix the best powdered rice with a little cold water, then gradually add boiling water until a proper consistence is acquired, being particularly careful to keep it well stirred all the time; lastly it must be boiled for one minute in a clean saucepan or earthen pipkin. This glue is white, almost transparent, for which reason it is well adapted for fancy paper work, which requires a strong and colorless cement.
Roofing Preparation
Take 1 pint of fine sand, 2 of sifted wood-ashes, and 3 of lime ground up with oil. Mix thoroughly, and lay on with a painter's brush, first a thin coat, and then a thick one. This composition is not only cheap, but it strongly resists fire.
Fire Kindlers
Take 1 quart of tar and 3 pounds of resin, melt them, bring to a cooling temperature, mix with as much sawdust, with a little charcoal added, as can be worked in; spread out while hot upon a board, when cold break up into lumps of the size of a large hickory nut, and you have, at a small expense, kindling material enough for one year. They will easily ignite from a match and burn with a strong blaze, long enough to start any wood that is fit to burn.
Mending Pipes with Water On
Many farmers have had trouble in repairing pipes where the water could not be shut off conveniently. A lead pipe which has been cut off accidentally in making an excavation, for instance, may be repaired by the following plan: The two ends of the pipe are plugged, and then a small pile of broken ice and salt are placed around them; in five minutes the water in the pipe will be frozen, the
plugs removed, a short piece of pipe may then be inserted and perfectly soldered. In five minutes the ice in the pipes may be thawed and the water set to flowing freely again.To Join Water Pipes
Water pipes may be united by using a preparation made by combining four parts of good portland cement and one part of unslaked lime mixed together in small portions in a stout mortar, adding enough water to permit it to be reduced to a soft paste.
Welding Metals
Welding together two pieces of metal of any kind can be accomplished only when the surfaces to be joined are equally heated, and both surfaces must be brought to such a temperature that the particles will form a perfect continuity between the pieces united. This embraces the entire theory of welding, soldering or brazing metallic substances of any kind. In addition, however, to the equal and adequate heating of the surfaces to be united, every particle of coal dust, cinders or scales of oxide must be removed, so as to present two perfectly clean surfaces at the very moment when the union is to be effected.
The piece of metal that would fuse at the lower temperature must be the guide, when bringing the surfaces of conjunction up to the proper heat. If, for example, two pieces of wrought iron are to be welded, the part that will melt at the lower temperature must be brought just to a welding heat, and the surface of the other piece must be heated quite as hot, or a trifle hotter than the first piece. Then, if the surfaces are clean when the parts are brought together, the union will be satisfactory. The degree of heat aimed at must be, not to produce a fluid, but simply to bring the metal into a condition between the fluid and plastic.Grinding Tools
All steel is composed of individual fibers running lengthways in the bar and held firmly together by cohesion. In almost all farm implements of the cutting kind the steel portion which forms the edge, if from a section of a bar, is welded to the bar lengthwise, so that it is the side of the bundle of fibers hammered and ground down that forms the edge. So, by holding on the grindstone all edge-tools, as axes, scythes and knives of strawcutters, in such a manner that the action of the stone is at right angles with the edge, or, this is to say, by holding the edge of the tools square across the stone, the direction of the fibers will be changed, so as to present the ends instead of the side as a cutting edge. By grinding in this manner a finer, smoother edge is set, the tool is ground in less time, holds an edge a great deal longer, and is far less liable to nick out and to break.
Plane irons should be ground to a level of about 35 degrees -- chisels and gouges to 30. Turning chisels may sometimes run in an angle of 45. Molding tools, such as are used for ivory and for very hard wood, are made at from 50 to 60 degrees. Tools for working iron and steel are beveled at an inclination to the edge of from 60 to 70 degrees, and for cutting gun and similar metal range from 80 to 90.
1. Workshop and Tools
2. The Steel Square
3. In and Around the House
3. In and Around the HousePart II
4. Barns and Stock
5. Poultry and Bees
6. Garden and Orchard
7. Field and Wood
8. Gates and Doors
9. When We Build
9. When We Build Part II
10. Worth Knowing
10. Worth Knowing Part II
Back to the Table of Contents
Back to the Small Farms Library Index
Community development | Rural development
City farms | Organic gardening | Composting | Small farms | Biofuel | Solar box cookers
Trees, soil and water | Seeds of the world | Appropriate technology | Project vehicles
Home | What people are saying about us | About Handmade Projects
Projects | Internet | Schools projects | Sitemap | Site Search | Donations | Contact us