
![]()
Search the Journey to Forever website – click HERE
|
Journey to Forever: Make a donation |
![]()
Navigation
| Small farms library | |
| City farms | |
| Organic gardening | |
| Composting | |
| Introduction Compost and organics What is compost? |
|
| Making compost | |
| Good compost How not to fail Greens and browns Hints Compost containers Assembling the materials Adding liquids Batches Animal manure Sifting Cold weather |
|
| Composting resources | |
| Virtual composting Core texts General composting |
|
| Composting indoors | |
| Think small Filling the bin Problems Think even smaller Resources |
|
| Vermicomposting | |
| Vermicompost and plants The worms Breeding Worm boxes Dimensions Bedding Feeding Harvesting Problems Garden wastes Using vermicompost |
|
| Vermicomposting resources | |
| Humanure | |
| Foundation work Modern developments Best of all! |
|
| Composting for small farms | |
| Foundation On-farm composting resources |
|
| Small farms | |
Contact usTo Keith Addison Handmade Projects |
Vermicomposting
Vermicomposting uses earthworms to turn organic wastes into very high quality compost. This is probably the best way of composting kitchen wastes. Adding small amounts of wet kitchen scraps to a large compost pile in the garden day by day can disrupt the decomposition process so that the compost is never really done. But it works just fine with vermicomposting.
Many gardeners use vermicomposting systems for all their garden and kitchen wastes, many more use both types of composting, and thousands of households without gardens use neat and unobtrusive worm boxes indoors to compost their kitchen scraps (as well as newspapers and cardboard boxes), reducing their garbage by up to a third and providing their own organic soil for pot plants and container gardens on balconies and roofs to grow their own healthy food.
See "Friend Earthworm: Practical Application of a Lifetime Study of Habits of the Most Important Animal in the World" by George Sheffield Oliver, 1941 -- one of the all-time classics on the earthworm. Dr Oliver was one of the first to harness the earthworm to the needs of the farmer and gardener, making highly fertile topsoil for optimum crop growth, and producing a constant supply of cheap, high-grade, live protein to feed poultry. He devised simple yet elegant and effective systems to bring costs and labour down and productivity up to help struggling farmers make ends meet. Oliver had an observant and critical eye and understood Nature's round. His ideas on the nature of modern food and health (or the lack of it) are only now being confirmed, half a century later. A delightful book. Full text online at the Journey to Forever Small Farms Library. Plus "My Grandfather's Earthworm Farm", "Eve Balfour on Earthworms", "Albert Howard on Earthworms", "The Housefly" by Roy Hartenstein.
Vermicompost and plants
-- "Worms seem to be the great promoters of vegetation, which would proceed but lamely without them, by boring, perforating, and loosening the soil, and rendering it pervious to rains and the fibres of plants, by drawing straws and stalks of leaves and twigs into it, and, most of all, by throwing up such infinite numbers of lumps of earth called worm-casts, which, being their excrement, is a fine manure for grain or grass." -- The Rev. Gilbert White of Selborne, 1777 These are not the usual big burrowing earthworms that live in garden soil. Called red worms, tiger worms, brandlings, angle worms, manure worms, or red wrigglers, they occupy a different ecological niche, living near the surface where there are high concentrations of organic matter, such as on pastures or in leaf mould, or under compost piles. Worm populations double each month. In ideal conditions they can reproduce much faster than that: 1 lb of worms can increase to 1,000 lbs (one million worms) in a year, but in working conditions 1 lb will produce a surplus of 35 lbs in a year, because hatchlings and capsules (cocoons or eggs) are usually lost when the vermicompost is harvested. This section mainly applies to using worms to compost kitchen wastes. For garden wastes, the same basic principles apply, with a few cautions: see below, Garden wastes. The size of the unit should be geared to your household's production of kitchen scraps. Fill the box with moist bedding for the worms to burrow in and to bury the food scraps in. You need about 6 lb (dry weight) for a 2ft x 2ft x 8" box. Worms will eat the bedding as well as the food scraps, so you'll need to top it up in a few months.
Add a couple of handsful of soil or sand -- it helps the worms grind up the food in their gizzards. Sprinkle a bit of lime, ground limestone or wood ash over the bedding (not too much!). Ground limestone is best. No metal, foil, or plastic. Use vegetable and fruit scraps, coffee grounds (including paper filters), tea bags (remove the staple), eggshells (best dried and crushed first, then sprinkled over the surface), stale bread, houseplant trimmings. Chop up big chunks. Some people advise against citrus, and also onion and garlic, others use them: try small quantities first. Not too much vegetable oil, be cautious at first with dairy products, meat and fish -- small amounts chopped fine, well-dispersed and well-covered with bedding should be okay. Broken chicken bones are okay, bigger bones won't break down but shouldn't cause problems either -- they'll be picked clean. If it's mainly the worm casts you want to use as garden compost, any of the following methods will do. If you value production of worms as well as casts, use the light separation method or a wire mesh screen. Dump the finished material from the box onto a big piece of plastic (eg, an opened-out garbage bag) on the floor or on a table under a 100W light, or outside in the sun. Shift all the material in the box to one side and fill the other side with fresh bedding; put your kitchen scraps and feed only in the fresh bedding side. In the next week or two the worms will migrate from the finished vermicompost into the fresh bedding. In the meantime the capsules will hatch and most of the hatchlings will also move across, so you won't lose them, which is an advantage over the dump-and-sort method. Get a piece of nylon or mesh window screening a bit bigger than the surface of the box and lay it flat on the surface of the vermicompost. It should be big enough to flatten against the sides and leave some overlap at the top. Fill the box up with fresh bedding on top of the screen and continue feeding it with kitchen scraps. The worms will migrate up through the screen into the new bedding as the food runs out below. This method will give you lots of trouble-free castings, but no extra worms. Go on feeding kitchen scraps to the box for up to four months, and then start a second box -- prime it with fresh bedding and a supply of worms from the first box. Just leave the first box until the second box is full, by which time the first box will contain a very high proportion of fine castings, and very few worms. The vermicompost might need screening, especially if you've used rough stuff (sticks etc.) in the bedding that takes time to break down. A circular gardener's sieve with a 3/16" mesh will work best. Try to get one with stainless steel mesh, it'll do the job much quicker, the worm castings won't stick to the mesh, and it won't rust. Flies and smells -- there shouldn't be any, but sometimes it happens. Worm casts have a pleasant, earthy smell, like forest soil. If the worm bin starts to smell, there's too much feed in it, more than the worms can process -- you've overloaded the system. Stop feeding the worms, add more dry bedding, a little sprinkled lime, and stir the bin with the hand cultivator (hand-fork). Repeat until the smell vanishes. Outdoor boxes can be bigger. The simplest way of all is a 12-inch-deep trench in the soil about 2ft wide or more with 8" of bedding and/or compost to put the worms in. Red worms can't survive long in ordinary garden soil so they won't crawl away. Add garden wastes as they come, putting it in a different part of the trench each time, and cover with a sprinkling of soil and lime. Bury kitchen wastes at the bottom, under the garden wastes. Use like compost -- dig it lightly into the topsoil around your plants. In composting growing beds or preparing new beds, vermicompost generally goes about twice as far as ordinary (aerobic) compost, so use half as much. But each garden is different (and so is each gardener!) -- some people have good results simply dumping large amounts of the stuff on top of their beds (6" a year in one case), others with very little. See Vermicomposting resources for more information.
Vermicompost consists mostly of worm casts (poop) plus some decayed organic matter. In ideal conditions worms can eat at least their own weight of organic matter in a day. In fact it seems they don't actually eat it -- they consume it, sure enough, but what they derive their nourishment from is all the micro-organisms that are really eating it. And yet -- mystery! -- their casts contain eight times as many micro-organisms as their feed! And these are the micro-organisms that best favour healthy plant growth. And the casts don't contain any disease pathogens -- pathogenic bacteria are reliably killed in the worms' gut. This is one of the great benefits of vermicomposting.
Worm casts -- the best soil there is
Worm casts also contain five times more nitrogen, seven times more phosphorus, and 11 times more potassium than ordinary soil, the main minerals needed for plant growth, but the large numbers of beneficial soil micro-organisms in worm casts have at least as much to do with it. The casts are also rich in humic acids, which condition the soil, have a perfect pH balance, and contain plant growth factors similar to those found in seaweed. There's nothing better to put in your garden!
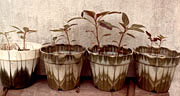
Chinese spinach seedlings grown with (from left) chemical fertilizer, powdered horse manure, vermicompost, and nothing.
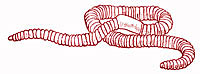
-- "All the fertile areas of this planet have at least once passed through the bodies of earthworms." -- Charles Darwin, "The Formation of Vegetable Mould through the Action of Worms with Observations on their Habits", John Murray, London, 1881The worms
Two breeds are used in vermicomposting: Eisenia foetida or Lumbricus rubellas. Many garden centres now supply them, and in most countries they can be bought by mail order from worm farms. Some sellers advertise special high-performance breeds or specially developed hybrids, but don't believe them -- they'll be one of these two breeds. There's no such thing as a hybrid worm.
You'll need 1,000 worms (1 lb) to start a worm box, maybe twice that if you want to process your garden wastes too -- they breed very fast in the right conditions, but starting with more will give the system a good start.Breeding
Mature redworms make two or three capsules a week, each producing two or three hatchlings after about three weeks. The hatchlings are tiny white threads about half an inch long, but they grow fast, reaching sexual maturity in four to six weeks and making their own capsules. Three months later they're grandparents!
This rapid breeding rate means the worm population easily adjusts to conditions in the worm box according to the feed supply and the proportion of worm casts to feed and bedding -- their casts are slightly toxic to them, and as the box gets "full" they'll either leave, if there's anywhere for them to go, or they'll die off.
This is an important consideration -- if you only want the vermicompost for the garden it doesn't much matter if the worms die off, as long as you've kept some aside to set a new box going. It also makes it easier to harvest the castings, and you'll have a higher proportion of pure castings.
But if you want to produce excess worms as well, to extend your worm system, for sale as fishing bait, or to feed to poultry or fish (they really thrive on wormfeed), you'll need to separate them from the vermicompost before the proportion of castings gets too high. See below, Harvesting.Worm boxes
There's a good range of specialized worm composting units that you can buy: Can-O-Worms, Worm Factory, Worm-a-way, Eliminator, Worm-A-Roo, Tiger Wormery and others -- you'll find details at Vermicomposting resources.
Reln's three-tray Can-O-Worms
Or you can easily build one yourself. In fact many people advise it, saying that wood is better than plastic -- the commercial models are usually made of plastic, which doesn't "breathe", while wood is porous and allows for better ventilation.
Dimensions
One or two people usually produce about 4 lb of food waste a week: use a 2ft x 2ft box 8" deep. For three people make it 12" deep, for more, 2ft x 3ft x 12" deep -- or two 2-person boxes might be better, because bigger boxes can be too heavy to move when they're full.
Use exterior-grade 1/2" plywood. Don't use chemically-treated wood. Treat the wood with a non-toxic wood preservative, or paint it with vegetable oil, or linseed oil. Use galvanized nails. Drill at least a dozen 1/2" holes in the bottom for aeration, and arrange it so that two opposite sides are half-an-inch deeper so that the bottom stands off the ground. Stand the box in a tray, because it will probably leak a bit.
Once filled, cover the surface with black plastic sheeting (a garbage bag) slightly smaller than the surface area: this will keep the moisture in, and the worms will work right up to the surface. If this makes it too wet, use a couple of newspapers instead. Make a lid for the box. Keep it anywhere convenient.Bedding
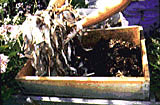
Adding new bedding (Greater Vancouver Regional District)
Any inert, non-toxic, fluffy material that holds moisture and allows air to circulate will do. Don't use anything that will decompose too rapidly when you moisten it and get hot, like manure that's not aged enough or hay, especially alfalfa hay. Mixed bedding is better, but no need to be too complicated: 2/3 corrugated cardboard and 1/3 sphagnum peat moss or coco peat moss is a good mixture, or sphagnum peat moss, shredded leaves and sawdust; or just cardboard and/or newspaper.
Worm bedding and feed can be wetter than compost material: 75%, compared with 65% maximum for compost. Dry bedding usually needs a bit less than three times its weight in water (a pint of water weighs a pound, a litre weighs a kilogram).
Once it's all suitably shredded, mixed and moist, put it in the box and add the worms (about 1lb -- 1,000 worms). Leave it for two or three days to let the worms settle in before adding wastes. Feeding
It's best to collect food scraps in a small bucket with a lid and add them to the worm box every couple of days (or more often in hot weather -- don't let it go rotten). Bury them in the bedding in a corner of the box. Next time, bury the new scraps near the first scraps. You can have about nine burial sites in a 2x2ft box: by the time you've used the ninth one, you can go back to the first site again, the worms will have cleared it.
You'll be surprised how much feed you can put in that box -- the worms and micro-organisms reduce it more than you'd think possible.
The box will need emptying every 3-6 months.
Best tool for burying feed: a three-pronged hand-cultivator (hand-fork).Harvesting
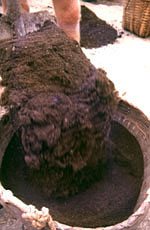
Some hassle -- light separation
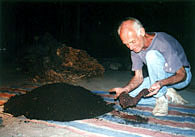
Keith harvests a worm box
Form it into eight or nine mounds. Worms are sensitive to light and immediately burrow beneath the surface. Wait a few minutes, and meanwhile put fresh bedding in the box.
A handbrush and dustpan are useful for this. Lightly brush the top off each mound until the worms are revealed, then wait for them to burrow deeper and do it again. Eventually you're left with a squirming mass of worms all trying to get under each other to avoid the light. Quickly put them in the new bedding in the box with a fresh supply of feed.
This leaves you with a rich harvest of worm castings and a lot of capsules, which you lose (the hatchlings won't survive in garden soil), but the worms in the bin will soon replace them. Store the castings for a week or two before using them in the garden.
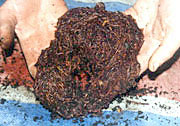
Worm spaghetti!
Kids love this -- if you have any tame children around you can usually talk them into doing it for you.
Less hassle -- sideways separation
Even less hassle -- vertical separation
When the top part is ready for harvesting, use the overlap to lift the screen from the box, vermicompost, worms and all. Set it aside and empty the box -- it will have a very high concentration of worm castings and few if any worms, hatchlings or capsules.
Dump the wormy material that was on top of the screen into the bottom of the box and put the screen back on top of it, with fresh bedding on top of the screen.
Check the condition of the screen each time you empty the box, and replace it before it gets rotten enough to rip just as you're removing it, spilling everything back into the box.No hassle
To make sure there are enough worms for both boxes, you can prepare the second box about a month earlier, adding some worms to it every time you add feed to the first box.Screening
This is also a good way of separating the worms from finished vermicompost, though capsules and hatchlings are lost.Problems
Fruit flies (actually vinegar flies) can get into the box, but they do no harm. Lots of them mean too much feed -- cut down the feeding rate and cover the surface with a damp newspaper.
The bin can also have an influx of soldier fly maggots, up to an inch long (they're a favourite with fishermen). Vinegar fly larvae are much smaller. Actually the maggots benefit the composting process, but if you don't like them, add more bedding and lime and stir as above, or put a chunk of bread soaked in milk on the surface. In a couple of days it will be infested with larvae; take it out and get rid of it (give it to a fisherman or a chicken).
Garden wastes
Fresh garden wastes might get hot, but the worms will have a place to escape to until it gets cool enough for them to handle.
To keep moles away, line the trench with 1/2" chicken wire or wire mesh.
Or make a four-sided wooden box with four 18" by 36" boards (or nail narrower planks together), treat it with vegetable oil or linseed oil, and stand it on a layer of bricks on top of the soil. Put 6" or so of bedding in the bottom and put the worms in it. Add wastes to the corners in succession. Shake the soil off clumped roots. Chop up big bits with the edge of a spade. Add more bedding as necessary. Bury kitchen scraps.
See "Friend Earthworm: Practical Application of a Lifetime Study of Habits of the Most Important Animal in the World" by George Sheffield Oliver for more information -- online at the Journey to Forever Small Farms Library.Using vermicompost
Vermicompost gives seedlings a really good start in life.
In pots and containers, don't use pure vermicompost. About 25% of the growing mixture seems to be about ideal, but experiment -- it might vary according to what you mix it with.
You can also use vermicompost to make "compost tea" liquid fertilizer. Mix two tablespoons of vermicompost with a litre of water and let it stand for a day, shaking it occasionally, then sprinkle under the plants. One-litre drinking water bottles make good sprinklers: drill a few small-diameter holes in the lid, point and squeeze.
For transplants, especially bare-root transplants, spray them with an even more dilute solution of "tea", or stand them in it for awhile -- it'll help to prevent transplant shock. (Liquid seaweed solution is excellent for this.)
Don't let the vermicompost dry out before using it -- it loses a lot of its value and resists wetting. If you store it, don't use an airtight container. It will keep for a year or more.
City farms
Organic gardening
Building a square foot garden
Plant spacing guides
No ground? Use containers
When to sow what
Seeds
Garden pond
Gardening resources
Composting
Making compost
Composting resources
Composting indoors
Vermicomposting
Humanure
Composting for small farms
Small farms
Small farm resources
Community-supported farms
Farming with trees
Farming with animals
Pasture
Pigs for small farms
Poultry for small farms
Aquaculture for small farms
Composting for small farms
Controlling weeds and pests
Small farms library