
![]()
Search the Journey to Forever website – click HERE
|
Journey to Forever: Make a donation |
![]()
Navigation
| Small farms library | |
| City farms | |
| Organic gardening | |
| Composting | |
| Introduction Compost and organics What is compost? |
|
| Making compost | |
| Good compost How not to fail Greens and browns Hints Compost containers Assembling the materials Adding liquids Batches Animal manure Sifting Cold weather |
|
| Composting resources | |
| Virtual composting Core texts General composting |
|
| Composting indoors | |
| Think small Filling the bin Problems Think even smaller Resources |
|
| Vermicomposting | |
| Vermicompost and plants The worms Breeding Worm boxes Dimensions Bedding Feeding Harvesting Problems Garden wastes Using vermicompost |
|
| Vermicomposting resources | |
| Humanure | |
| Foundation work Modern developments Best of all! |
|
| Composting for small farms | |
| Foundation work On-farm composting resources |
|
| Small farms | |
Contact usTo Keith Addison Handmade Projects |
Making compost
Good compost
It's a common mistake to use too much water -- it's probably the most common reason for failures. (Others are not enough nitrogen, and, more rarely, no aeration.) The overall moisture content of the assembled pile should be about 60--65%. They say it should be as moist as a wrung-out sponge, which is a good guide if you've put everything through a shredder so it's homogenized and the particle-size is small, but with the usual rough compost materials it's not very useful. Compost materials are assembled in the correct proportion of "Greens" (nitrogen-rich) and "Browns" (carbon-rich) to achieve an overall carbon/nitrogen ratio of 25-30:1 (Virtual composter, and Compost Calculations from Rodale). Put simply, fresh green matter such as grass clippings, vegetable wastes, fresh leaves, etc, contain a lot of nitrogen. So does manure, bloodmeal, kitchen scraps, alfalfa meal, and hay. Fallen leaves, straw, sawdust, shredded newspaper and cardboard, wood chips -- browns -- contain high proportions of carbon. 1. Not enough water is better than too much water. Too much water is a usually a disaster, but if there's not enough, the pile will heat up and then stop. Empty it out, loosen it all up with the compost fork, add more moisture, and put it back in the box again, no big deal. Soon you'll learn how much water is enough. If your pile is too wet, try emptying it, fluff it out, add more dry stuff, and some dry greens if you have such a thing (bloodmeal, peanut cake, alfalfa meal), and rebuild it. It might work. If you have really big supplies of organic wastes, make windrows, 8ft at the base, 5-6ft high, with sloping sides, and as long as you like. Otherwise prefer boxes or bins to heaps. If you're expert enough you can make a steep-sided heap, even a sheer-sided one, otherwise it degenerates into a mound, which is not efficient -- unless you're making an expert Biodynamic compost heap, that is. It's easier to make good compost if you have enough materials to fill the box at one go. If not, see below, Batches. See HDRA -- How to make compost, for good information on which materials to use and how to use them. Basically, anything that was once alive or part of something alive can be composted. This is the recipe: the assembled pile should have 60--65% moisture content, good aeration, acid-alkaline level about neutral (pH 7) or slightly acid (pH 6-6.5), carbon/nitrogen ration 25-30:1 (Virtual composter, and Compost Calculations from Rodale). The best form of liquid addition for compost is what some composters primly call Household Compost Activator. Other people call it urine. Don't be coy about it -- this is what should happen to urine rather than wasting it by flushing it down the toilet. Develop a self-righteous attitude about not wasting it -- but don't shout about it too loud, modern city people like neighbours and so on can be funny about these things, what they don't know won't hurt them. Smaller gardens won't provide enough material to fill a 15 cub ft compost unit at one go, it comes in dribs and drabs. So do kitchen scraps. You could just throw it all in a compost bin as it comes, but it'll probably be too wet and clog up, or it won't get hot, or only quite hot (mesophilic) rather than very hot (thermophilic), which is better than nothing. It's worth organizing the process by gearing garden wastes to kitchen scraps and then processing it all in batches until the bin is full.
If you've got a shredder, you can shred the materials before you load the box, shred them again a week later, and maybe again a week after that, and then you won't need to sift the compost. Otherwise it'll need screening. A person who said he'd made "lots of compost" wrote: "In northern climes especially, you're more in need of adding heat to the pile some of the year... The problem here in Wisconsin is it just gets too cold in winter. I know, I've tried it, it froze solid in the winter. Somewhere I've seen plans for a solar heated outhouse, and solar heated compost bin, which would probably be the ticket."
It's easy to make good compost. Quite a lot of people make some kind of compost, but you couldn't say it's "good". It's no more trouble making a really good product -- in fact it's less trouble, because good compost reduces almost every other kind of gardening problem. So why not get it right in the first place? This guide is about making GOOD compost.
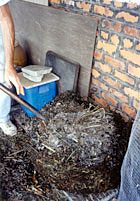
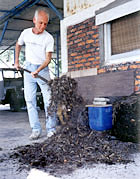
Compost ready for turning
There's a lot of discussion about all the technicalities involved in what constitutes "good" compost, but we reckon good compost is either compost that gets HOT -- 60 degrees Centigrade (140 deg Fahrenheit) or more -- or it's Vermicompost, made for you by special earthworms.
How not to fail
This is typical advice: "Spray the mixed materials with a hose until wet like a sponge but not soggy. Fork it into the bin, spray more water to make sure it is wet enough."
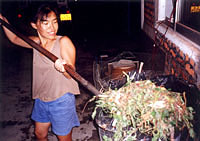
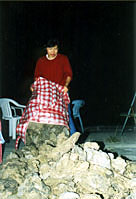
Midori filling a compost bin
Beginners read such things and end up with a disaster. When the stuff starts to decay it disintegrates into a slimy, stinking sludge, like what happens to grass clippings if you leave them in a big pile: it gets very hot, and then it dies into a dark green gunge -- much worse if there's manure and kitchen scraps in it! And it's difficult to repair the damage and get it working properly. That's often the end of that particular beginner's composting efforts.
Compost materials are often much wetter than they look at first. Fresh green leaves can be 95% water, but they don't look wet. Kitchen wastes are usually more than 85% water. Spreading fresh greens out and letting them wilt for a day loses a lot of the water, and probably quite a lot of the nitrogen too, unfortunately. Manure is a lot easier to handle if it's on the dry side, which also loses a bit of the nitrogen.
There's another way of going about this. Greens and browns
Instead of thinking in "greens" and "browns", think in terms of "wets" and dries". In fact wets are usually green, and browns are often dry. You can make sure the browns are dry -- collect fallen leaves when the weather's dry, for instance. Presume your compost materials will always be too wet, and always have lots of dry browns on hand to balance it with. Too much carbon? We'll deal with that in a minute.
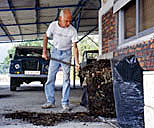
Keith turning compost at the Beach House
The advantage of dry browns is that you can store them indefinitely, unlike wet greens. With a bit of foresight and effort you can always have a few garbage bags filled with dries ready for when you need them. Make a big effort in autumn -- collect enough leaves for the whole year. Hints
2. Too much nitrogen is better than not enough nitrogen. If there's not enough the pile will just sit there forever, nothing happens for a year or two. If there's too much the pile will heat up well and simply blow off the excess with the steam in the form of ammonia gas, until the balance is right. But isn't that a waste of precious nitrogen? No -- nitrogen's only precious if you're dumb enough to buy it from a chemical company (see below, Adding liquids). Again, this way you'll soon learn how much is enough.
3. Roots: shake as much soil as you can off clumped roots before putting them in the compost. Many people put much too much soil in the compost with the roots, and it clogs everything up. But always have some soil sprinkled throughout the pile. It helps to inoculate the compost with the beneficial soil microorganisms that make the process happen, especially if you're not using animal manure, and clay particles in the soil help to spread a thin film of moisture throughout the pile, which is just what you want.
4. Useful additions: Lime, or, better, ground limestone, the finer ground the better. Liquid seaweed emulsion, such as Maxicrop, SM-3 or equivalent -- all the minerals for all the soilbugs, in easily digestible forms. Compost or compost siftings from the previous batch to inoculate the pile. Sprinklings of ground rock powders are useful.
5. Newsprint: Modern printing inks are almost always non-toxic and biodegradeable, particularly black ink, so don't be shy of using shredded newspaper (very "brown"). Compost containers
Boxes and bins have sheer sides, and protect the compost from the elements. There are endless different designs -- see HDRA -- Building a compost bin for instructions on making a simple, flexible box system.
Here's how to make a wire mesh bin.
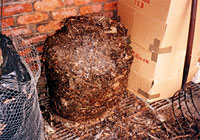
A chickenwire compost bin (Beach House style) on the left. When cooked, you can open the wire mesh and work on the pile (centre). Cardboard boxes (right) also make a good compost bin
Make a "tube" of chickenwire, 3ft in diameter. Leave about 8-10" overlap, and connect the ends with four twists of wire each. You'll need about 10.5ft of 3ft-wide mesh, and two more pieces each 3ft long -- total 16.5ft.
Line the bin with a garbage bag, or two bags, with the bottoms cut off, to keep the moisture in. Have the liner flush with one end, and overlapping the other (that's the top).
Make a 3ft square of four bricks, one at each corner, with a fifth in the middle, and put a 3ft square of tough wire grille such as pig fencing on the bricks. Put one of the two 3ft-square pieces of chickenwire on top of that. Stand the mesh bin on end on top of this aerated base. Now you can fill it with compost material.
When it's full, depending on the weather, you can close it loosely with the garbage bag overlap, again to keep the moisture in; when it starts steaming, open the bag, if it seems to be getting dry, close it again.
Cover the top with the second 3ft-square piece of chickenwire, and clip it on, to dissuade wildlife. If it's in the open, cover the top with a garbage bag to keep the rain out.
You'll need two of these bins -- you always need at least two compost bins/boxes: when one's full, you start filling the next one. By the time that one's full, the first one is finished and can be emptied. Assembling the materials
First, collect all the greens together and mix them thoroughly with a compost fork. If anything's too big to mix, chop it up into 4-6" lengths with the edge of a spade or a chopper.
Up to 10% of the material can be rough material like small sticks and prunings -- they probably won't break down but they'll help with aeration and prevent the material packing down and clogging up too much.

A compost fork -- the perfect tool for composting, 4-tined or 5-tined
Assemble all the ingredients in a sort of big pancake (5-6ft diameter) in front of the open box (leave yourself enough room around it to work).
Put wet greens on top of dry browns. Use a 5-gallon bucket or a basket. Spread out two buckets of browns (pack it in) and then one bucket of greens on top.
Do that twice, then add some sprinklings: a handful of ground limestone or wood ash (sprinkle it like icing sugar on a sponge cake), some bonemeal if you have it, a handful or two of soil, and a couple of handsful of compost (unless you're using the siftings from the previous batch -- mix with the browns if they're dry enough). Scuff over the surface to bury the sprinklings a bit, then add liquid (see below, Adding liquids) -- 1-2 litres, with a sprinkling can. If you must use a hose, set the nozzle to a fine mist.

Mixing the layered material before putting it in the bin
Repeat this whole layering process two or three more times or until you've used all the materials.
Now work from the edge of the layered pancake: rake off about 1ft with the compost fork, mix it up well, and fork it into the box, spreading it evenly and tamping it down firmly (but not too tight). Layering it and then mixing vertical slices this way gets it thoroughly mixed and evenly distributed. Then do the next foot, and continue until it's all in. Sweep up fines as you go, sprinkling them into the box with a shovel.
Aeration
Compost needs air from underneath. You can put the box on the soil, if it's good soil that breathes well. Even then, loosen it well with a fork to a depth of about 12 inches. An advantage of this is that if the pile is too wet some of the excess water might drain off into the soil. (Or it might not.)
Alternatively make a base like that for the wire mesh bin described above: make a 3ft square of four bricks, one at each corner, with a fifth in the middle, and put a 3ft square of tough wire grille such as pig fencing on the bricks. Put a 3ft-square piece of chicken wire on top of that, and stand the box on this base.
Turning the pile aerates and mixes it thoroughly to burn a second time
When filling the box, stand a 5ft length of bamboo or a broomstick upright in the middle until the box is full. Then shake it from side to side a bit (an inch or two) and pull it out. Or make vertical holes every 6" or so across the top with a piece of rebar, push it right down until you hit the wire mesh at the bottom. Now your compost can breathe easily.
Put a lid on the box when it's full, not airtight, but wildlife-proof, and waterproof if it's in the open.
That's it. By the next day the temperature should be above 50 deg C, and it should climb to 60 deg or higher. You can turn it after a week or two when the temperature's fallen to about 40 deg, or just leave it for another couple of weeks instead.
Get a soil thermometer, or any long thermometer that will reach the centre of the pile to monitor the temperature. Or just put your hand in -- if it's too hot to keep it there, it's fine.
Adding liquids
First, urine is sterile. Second, it contains the drainage of every cell in the body -- it's crammed with minerals and vitamins. Third, it contains a lot of nitrogen -- that's one reason that it's silly to buy nitrogen (there are others).
It shouldn't prove too difficult to arrange to have a few litres of Household Compost Activator set by when it's time to make the compost. You can use it neat, or mix it 50-50 with water, and add a capful of seaweed emulsion while you're at it. Use a sprinkling can.
For further information and reassurance on this matter, see: Container Farming -- Organic food production in the slums of Mexico City
More about nitrogen: well-made compost piles often end up containing more nitrogen than they started off with -- up to 25% more. It's provided by free-living nitrogen-fixing bacteria that thrive in a compost pile and "fix" nitrogen from the copious supplies in the air. Batches
Kitchen scraps
Get a smallish (10-12") plastic bucket with a lid, and a tray that it can stand in. Drill some holes in the bottom. Put 3" of dry stuff in the bottom, add your kitchen scraps on top as they're produced. Keep the bucket in the kitchen. No meat/fish etc or cooked food until you're more experienced (eggshells are fine). If you're a big family you might need a bigger bucket.
Don't let it get too wet, don't let it go rotten -- if liquid starts coming out the bottom, empty it (every few days, depending how much you cook).
Meanwhile collect garden wastes and odds and ends of greens -- they'll keep for a while if you spread them out somewhere dry in a layer a few inches deep.
For the first batch, put 4" inches of dry stuff in the bottom of the compost bin. Mix up greens and kitchen wastes, add some manure if you have it. Then mix it up with twice the quantity of browns/dries, add sprinklings of lime or wood ash, bonemeal, some dry compost, as above ("Assembling the pile"), and a bit of liquid if necessary, and dump it in the bin, spreading it evenly. Pack it down quite tightly.
Add an inch or two of browns plus a sprinkling of compost or topsoil on top. The first batch might not have the bulk to get hot, which normally eradicates the smell of the kitchen scraps (and anything else), and a layer of browns on top will help keep flies away. As further batches increase the bulk it should heat up well. Put a lid on the bin.
Once it cools down it should be turned -- empty the bin, fluff everything up thoroughly with the compost fork, add liquid if necessary, and put it back in the bin. If it doesn't get that hot the second time, never mind, just leave it there for a few weeks.
See also What to do with a cardboard carton -- Composting Animal manure
Many people say it's not essential to use animal manure to make good compost, and that's true. Some people actively avoid it. But it's better to use manure, if you can get it. All natural topsoil is derived from a mixture of animal and plant matter -- nature never attempts to raise plants without animals. It's important that some portion of what's recycled into the soil should have passed through animals. This is one of the reasons we recommend using urine as an activator.
Buffalo dung from the local herd
Manure from any animal that's not a carnivore will do, plus poultry. The Biodynamic school of organic growing -- ace compost makers -- swears by cowdung, ascribing special qualities to it. In Hong Kong we used manure from the herd of feral water buffalo who were our neighbours, and it was excellent. A fifth of the total amount of compost material is enough manure, don't use more than a quarter.
Beware of manure from factory-farmed livestock that's fed commercial feed laced with antibiotics. You can use it, it'll probably work okay, and the antibiotics will break down in the heat, but why put stuff in your compost that'll kill the very critters that do all the work for you?
Sifting
There are many different screening systems. Simplest is a 5ft x 3ft-wide piece of 5/8th-inch or 3/4-inch wire screen wire-stapled to a light wooden frame. Stand it at an angle against a wall and throw the compost at it with a shovel (aim high). Or use it horizontal to the ground, supported at each end at a height of 3-4ft, shovel the compost onto it and rub it through the screen with your hands (use gardening gloves) or with the back of a garden rake.
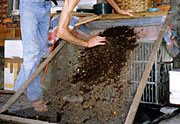
Keith sifting the finished compost
Store what goes through the screen for a few weeks to let it cure before using it in the soil. When applying it to the soil, hoe it lightly into the top few inches where it'll do the most good. The earthworms will do the rest. No earthworms? Don't worry, there soon will be!
You'll be left with up to a quarter of the pile in siftings. It makes a very good mulch, or you can add it to the browns for the next lot, or mix it with kitchen scraps and greens for batch composting.
Cold weather
That's just not how compost works. If it's correctly prepared, the biological activity will heat it up, no matter how cold the weather is. Adding extra heat from outside is no use.
Finally he admitted: "I don't think my compost piles ever heat up much. Not enough nitrogen for one thing, here in town. I suppose if you had a large batch of materials mixed up properly with the correct ratios, it might have a chance, but you can't do that with the daily wastes." Yes you can.
As for not enough nitrogen, a strange statement indeed, he then read this: Container Farming -- Organic food production in the slums of Mexico City. He'll be trying "Household Compost Activator" next year.
Elaine Ingham, President, Soil Foodweb Inc., wrote: "The definition of properly composted material, when applied to thermal compost, is that it has reached temperature throughout the material for long enough that weed seed, human pathogens and most of the plant pathogens and pests have been killed... Many people do not understand that the bacteria and fungi growing in organic matter raise the temperature. If all you do is physically heat compost, you don't get the same reduction in [pathogens]. This is a biological process. Competition with aerobic bacteria and fungi, inhibition by other bacteria and fungi, and consumption of disease-organisms by protozoa and nematodes are all part of the process of making good compost, getting rid of the pathogens. If you just steam heat organic matter, you don't get the same benefits of the growth of the competitive, inhibitory and consuming interactions that happen when the full food web is present." -- Sustainable Agriculture Network Discussion Group, 5 November 2002
http://www.soilfoodweb.com/phpweb/
"Even in Alaska -- in the middle of the winter -- my compost pile reaches 140 degrees or more. If it gets too hot, beneficials, such as worms, simply move (crawl) out of harm's way. Turn pile every 4 or 5 days, folding ouside materials to the inside and versa visa, like kneading bread. Keep it moist, not soggy, and be glad you're making 'post! Nice work!" -- Marion, message to the GardeningOrganically Internet mailing list, 26 September 2002
We've made compost outside in the usual way at temperatures of -15 deg C (5 deg F) with no difficulty, the compost rose to 65 deg C (150 deg F) as usual.
City farms
Organic gardening
Building a square foot garden
Plant spacing guides
No ground? Use containers
When to sow what
Seeds
Garden pond
Gardening resources
Composting
Making compost
Composting resources
Composting indoors
Vermicomposting
Humanure
Composting for small farms
Small farms
Small farm resources
Community-supported farms
Farming with trees
Farming with animals
Pasture
Pigs for small farms
Poultry for small farms
Aquaculture for small farms
Composting for small farms
Controlling weeds and pests
Small farms library