
![]()
Search the Journey to Forever website – click HERE
|
Journey to Forever: Make a donation |
En español
Biocombustibles, biodiesel
Navigation
Contact usTo Keith Addison Handmade Projects |
Rubber
Pure biodiesel will eventually devour any natural or butyl rubber parts in the fuel system (hoses and seals). Check with the vehicle manufacturer and replace the parts with resistant synthetic parts (such as Viton B). See Durability of plastics table, and Identifying plastics. Newer motors don't use rubber. See also Biodiesel and your vehicle.
 New!
New!
The Biodiesel Bible
by Keith Addison, Journey to Forever
This is the only book that thoroughly covers the entire subject of making your own biodiesel – all the information at the Journey to Forever website and very much more.
Learn how to make top-quality biodiesel that will pass all the quality standards requirements every time.
We haven't had a failed batch for 11 years! (But if you do have a failed batch we tell you how to rescue it – and how to improve your processing so it won't happen again.)
Save money! Making your own biodiesel will save you thousands.
Click HERE
New! Build a 3-inch ethanol still – Click HERE
New!Make your own biodiesel (contd.)
Spanish version -- Versión en español
How much methanol?
Ethyl esters -- making ethanol biodiesel
Reclaiming excess methanol
How much lye to use?
More about lye
Basic titration
Better titration
Using KOH
Accurate measurements
Joe Street's titrator
pH meters
Phenolphthalein
pH meters vs phenolphthalein
High FFA levels
Deacidifying WVO
No titration?
The basic lye quantity -- 3.5 grams?
Mixing the methoxide
Stock methoxide solution
Poor man's titration
How much glycerine? Why isn't it solid?
Separating glycerine/FFAs
PET bottle mixers
Viscosity and specific gravity tests
How the process works
Animal fats, tallow and lard
What are Free Fatty Acids?
Iodine Values
-- High Iodine Values
-- Talking about the weather
-- Summary
Hydrogenated oil, shortening, margarine
Oxidation and polymerisation
Which method to use?
Why can't I start with the Foolproof method?
Quality testing
Cetane Numbers
National standards for biodiesel
-- standards and the homebrewer
-- standard testing
Biodiesel in gasoline engines
Storing biodiesel
Home heating
Lamps and stoves
Other uses
Fats and oils -- resources
Diesel information
Identifying plastics
Ethyl esters -- making ethanol biodiesel
Making ethyl-esters biodiesel using ethanol is a tricky process, not as simple as making methyl esters with methanol. It's not for novices -- learn how to make biodiesel with methanol first.
Methods and recipes for ethyl-esters biodiesel are available here, along with a How-To from a master home-brewer who has been making and using his own ethyl-esters biodiesel for years.
See: Ethanol biodiesel
Reclaiming excess methanol
Depending on the kind of oil you're using, it takes from 110-160 millilitres of methanol per litre of oil to form the methyl esters molecule. But you also need to use an excess of methanol to push the conversion process towards completion -- the total amount of methanol used is usually 20% or more of the volume of oil used, 200 ml per litre or more.
Much of the excess methanol can be recovered after the process for re-use, simply by boiling it off in a closed container with an outlet leading to a simple condensor.
Methanol boils at 64.7 deg C, 148.5 deg F, though it starts vaporizing well before it reaches boiling point.
Unlike ethanol, methanol does not form an azeotrope with water and relatively pure methanol can be recovered -- pure enough to re-use in the next batch.
The methanol can be recovered at the end of the process, or just from the glycerine by-product layer, since at least 70% of the excess methanol collects in the by-product and it's that much less material to heat.
Recovering the methanol at the end of the process seems convenient because it's already hot, and you can get the methanol back from both the fuel and the glycerine by-product at the same time. But it can push the reaction into reverse, converting the biodiesel back into glycerides. Prof. Michael Allen says:
Removing methanol from the reactor product is a no-no because it reverses the reaction you have just carried out. Without the excess methanol, the ester and the glycerol react to provide an equilibrium mix which is less than desirable. That excess methanol serves a very real purpose in pushing the equilibrium yield up. But once the glycerol is completely separated, the reverse reaction cannot take place and we can get back the excess methanol.
Some people do it before separating it anyway (they often use a vacuum). We'd rather not risk ending up with anything less than good process completion. It's best to recover the methanol after separating the biodiesel and the glycerine by-product.
The methanol left in the biodiesel can be reclaimed, but it takes more energy than you'll recover and it probably isn't cost-effective. Best to write it off as a loss -- washing the biodiesel removes the methanol, and it does no harm in the wash-water (see Wash-water disposal).
If you're planning to separate the by-product into its components, do so before removing the methanol. Adding phosphoric acid to the by-product separates the soaps from the glycerine and releases the lye catalyst, but it won't separate without the methanol. After separation the methanol is left in the glycerine fraction and can then be removed as below, by boiling and condensing.
To recover the methanol from the by-product, heat the by-product to 65-70 deg C (149-158 deg F) in a closed container fitted with a condensor.
As the methanol evaporates, leaving an ever-lower proportion of methanol in the mixture, the boiling point will increase, so keep the heat on to keep it boiling. The temperature goes up to 100 deg C (212 deg F) or a bit more, and then it starts to froth and you have to stop or you'll get frothy brown by-product in your methanol condensate. But most of the methanol will have been recovered by then.
Rich Clark of Berkeley, California writes:
My theory is that the froth is caused by the dissolved methanol becoming a gas before it can get out of the glycerine by-product. There seems to be a critical frothing temperature depending on the amount of methanol remaining in the glycerine. This critical frothing temperature gradually increases as the methanol cooks off.
The way to avoid the froth and thus avoid getting glycerine contaminating your methanol is to reduce the heat and the rate of temperature increase so you stay just below that critical temperature as the cooking proceeds.
I've cooked glycerine up to 130 deg C (266 deg F) with no froth at all, recovered water-clear methanol, but it took about five hours to complete the process, applying heat very slowly with 15 gallons of glycerine by-product in my kettle.
At that 130 deg C point, I stopped because the methanol flow had become drop-by-drop, but not because of froth.
Another item of interest is that the recovered methanol tests out by hydrometer at around 97% purity at the beginning and drops to 90% at the end. Putting it all into the same bottle gives about 94% purity.
This compares to store-bought methanol at 99.5% and means that when you make your biodiesel with recovered methanol, you need to use more of it and also more catalyst to get the same quality of biodiesel as with commercial methanol.
Rather than using more methanol and more catalyst, mixing 30% recovered methanol with 70% fresh methanol (99.5%) gives good results.
Where does the water in the recovered methanol come from?
- There is probably a little water left in the WVO, even after dewatering;
- Some water is formed during the reaction that produces the methoxide;
- Some water is produced as FFAs are converted to soaps during the reaction process;
- The acid stage of the acid-base two-stage process generates some water;
- Some water is formed when phosphoric acid is used to separate the glycerine by-product prior to methanol recovery (from the glycerine portion).
The biodiesel process can tolerate this small amount of water without loss of production or quality, if everything is done well, but the water content should be kept to a minimum -- use dry chemicals, dewater the WVO as much as possible.
Flash evaporators vaporize the methanol from a thin film of by-product flowing over a hot plate, more efficient than boiling it off.
See Methanol condenser.
See Flash evaporator for methanol recovery
How much lye to use?
It requires 3.5 g of NaOH lye or the equivalent of KOH (see above) per litre of oil as catalyst to transesterify new, unused oil.
This makes standard-quality biodiesel within the usual processing parameters of methanol quantity, agitation, processing duration and processing temperature.
Free Fatty Acids (FFAs) can slow or stop the transesterification process. Fresh cooking oil contains a standardised amount of FFA. The lye is alkaline and neutralises the FFA by turning it into soap, which drops out with the glycerine layer, and with 3.5 grams of NaOH per litre of oil there's enough left over to catalyse the biodiesel reaction.
Used cooking oil (WVO) needs more lye than new oil, not to serve as the catalyst but to neutralise the extra FFAs formed in cooking the oil. The hotter and longer it's cooked, the more FFA it contains, and the more lye is needed to neutralise it.
You have to titrate the oil to determine the FFA content and, from that, how much extra lye will be required. Titration measures the pH of the oil, that is, the acid-alkaline level (pH7 is neutral, lower values are increasingly acidic, higher than 7 is increasingly alkaline, or "base"). From this you can calculate how much extra lye will be needed to neutralize the extra FFA.
Too much lye will make extra soap, with very alkaline biodiesel that's difficult to wash, with loss of production, or it can ruin the reaction when the ratio of soap to biodiesel reaches a point where the whole batch turns into "glop soap".
Too little lye will mean some of the oil is left unreacted. See below:
How the process works
The basic lye quantity -- 3.5 grams?
Good-quality oil that hasn't been cooked too much or overheated is quite forgiving, but with poor-quality WVO with a high Free Fatty Acid (FFA) content, accurate titration is more important. The higher the FFA level, the more sensitive the reaction, the more precise you have to be with titration and everything else, the more reactive agents you'll need -- and the lower will be the production rate.
More about lye
The catalyst used in transesterification of vegetable or animal fats and oils is lye -- either sodium hydroxide (NaOH, caustic soda), or potassium hydroxide (KOH). NaOH might be easier to get and cheaper to use, KOH is easier to use and it mixes with methanol much more easily. KOH does an all-round better job than NaOH. For processing used oil, it's essential to titrate the oil to determine the Free Fatty Acid (FFA) content and calculate how much extra lye will be required to neutralise it. With an electronic pH tester, use the same procedure as above but without the phenolphthalein. Dip the pH tester electrode in the oil-alcohol mixture, add 0.1% sodium hydroxide (NaOH) solution drop by drop while stirring until the pH tester reads 8.5. Unless you have a very accurate scale, it's not easy to measure exactly 1 gram of lye. It's much easier to measure 5 g accurately than 1 g. So mix 5 g of NaOH (or KOH) with 500 millilitres of distilled or de-ionized water to make a stock solution. KOH is not as strong as NaOH -- use 1.4 times as much KOH (actually 1.4025 times). 85% KOH -- 5.8 (5.775) grams To substitute KOH for the 3.1 grams of NaOH per litre of oil used in the acid-base process: 85% KOH -- 5.1 (5.115) grams To convert NaOH quantities for KOH: For 85% KOH use 165% of the NaOH amount (x 1.65). Example: You're using 85% KOH and the titration needed 3 ml of KOH solution to bring the pH to 8.5. Basic amount: 5.8 g KOH (5.775) Using 0.1% NaOH solution for titration and the same WVO as above: the titration result is lower, it only needs 1.8 ml to reach pH8.5. (Actually 1.82 ml, according to the calculation.) Basic amount: 3.5 g NaOH We usually use NaOH solution for titration and convert the result for our 85% KOH, but in practice NaOH solution and KOH solution both work equally well. One reason for preferring NaOH solution is that it's usually the standard used in describing FFA content of different oils -- 2 ml titration WVO or 5 ml titration WVO invariably refers to ml of 0.1% NaOH solution, unless otherwise specified. In the example above, the WVO would be described as 1.8 ml titration WVO. When "newbies" have problems making their first test batches and it doesn't pass the quality tests it's most often because of inaccurate measurements, or they didn't follow the instructions closely enough. Here's some general advice on being more accurate.
It's said you can't reliably use an electronic pH meter for titration, nor to check the pH of biodiesel, because biodiesel is not an aqueous solution. Not quite true -- biodiesel is hygroscopic and will always have about 1,200-1,500 ppm water content absorbed from the atmosphere, if from nowhere else. With titration, you're adding water with the 0.1% NaOH solution. And laboratory-standard titration equipment uses electronic pH meters. Phenolphthalein is often confused with "phenol red" (phenolsulphonephthalein), obtained at pool supply stores and used for checking water. It's not the same thing, and phenol red won't work for titrating WVO, its pH range isn't broad enough. It ranges from about pH 6.6, at which point it's yellow, through orange, to a maximum of pH 8.0, red. It's at its most accurate at pH 7.4. For accurate titration you need to be able to measure pH 8.5. Which is better? There's lots of argument about it. Biofuel mailing list member Jim MacArthur (aka "the skapegoat"), who teaches chemistry at Three Rivers Community College in Poplar Bluff, MO, USA, had this to say about it: I can shed some light on using pH meters vs. phenolphthalien (PHTH) for titration from a chemist's perspective. Most people find their used cooking oil generally gives a titration of 2-3 ml, but some used oils can have much higher FFA levels than this -- we've seen horrific titration levels of 9.6 ml. "Horrific" because FFAs are not good for you -- it's a bad idea to eat food from a restaurant that does that to their cooking oil. Another biodieseler reported restaurant oil with titration levels of 16 ml -- black stuff with the consistency of sump oil. Raw oils straight from the oilseed press commonly have high levels of Free Fatty Acids. Before they can be sold as edible oils, the acid level must be reduced to the food-standards specifications. There are three ways of avoiding titration: Satisfactory results mean that you get a good, clean "split" (ie separation), that it settles well, leaving a clear product with not too much soap formation, a good production rate, and, most important, that it washes easily without frothing. This is the amount of lye (NaOH, sodium hydroxide) required as catalyst to transesterify 1 litre of fresh, uncooked oil. For used oils, titration determines the amount of lye needed to neutralize the Free Fatty Acid (FFA) content, and this quantity is added to the basic figure of 3.5 grams per litre. See Methoxide the easy way. You can use the easy method with 4-gallon HDPE carboys or similar containers with screw-on caps (preferably with bungs as well). First the methanol, then add the lye gradually. Swirl it about from side to side rather than shaking it up and down. Stock methoxide solution is very useful for making test batches, with a series of tests made in a blender using different amounts of lye for each. Rather than measuring tiny amounts of lye for each half-litre (or whatever) test batch, make a stock solution using one litre of methanol and 50 grams of NaOH lye (or equivalent of KOH). Then you can dilute quantities of the stock solution to whatever strength each test batch requires. The "poor man's bracket method" of titration is lining up a half-dozen pint jars (half-litre) of the same type, placing 200 millilitres of heated oil in each, adding methoxide of differing concentration to each and observing the reactions.
"I did my first test batch of wvo biodiesel over the weekend. Although I appear to have formed a layer of glycerine on the bottom of the flask, it is not congealed, but is still liquid at room temperature (24 hours later). Did something go wrong?" "The glycerin I got from my first batch is thinner than molasses at room temp. Why would it remain so thin? The information I have found suggests that it should be solid, or close to it, at room temperature." Others think it "didn't work" because there wasn't "enough" glycerine: "I did a first test batch of 3 litres WVO, adding 600ml methanol and got only 350ml of glycerine. I didn't really know what to expect, but 10% relative to the original stock seemed kind of low to me." "I did a blender test batch of biodiesel last night. I titrated to 2ml, so I used 5.5g of lye and mixed it in with 200ml of methanol. I then heated the oil up (1 litre), and put it in the blender, and mixed for 15-20 minutes. It quickly began to separate and the biodiesel at the very top inch of the blender after the first 15 minutes or so was quite clear. I woke up in the morning and only 125 ml or glycerine settled out. Shouldn't there be at least 200 ml of glycerine settled at the bottom? There are only two layers, the top, light and slightly cloudy, and the dark glycerine. Where is the extra 75 ml of glycerine?" In fact in all four cases the tests worked just fine. "For 'back of the envelope' accuracy, whether fat or oil, to two significant digits one can estimate the molecular weight of the oil to be about 900 (slightly high) and the density is about 0.9 so the fat/oil contains about one mole per liter, therefore one mole of glycerin is present. The molecular weight is 94 so you would get about 94 grams of glycerin from a liter of fat/oil. The density is about 1 so you would get about 94 ml per liter of oil." -- Bob Allen, Biofuel mailing list It's mainly the soaps combined with the glycerine that can cause it to solidify. Soaps made from saturated fats such as stearin are harder than those made from unsaturated fats such as olein, so the type of oil used makes a difference (see How much methanol? for compositions of different oils). See: Glycerine Despite claims to the contrary, this is not a good way of making biodiesel. It is useful if you're doing a demonstration, though it makes it look simpler than it really is. Viscosity levels are a comparative indicator of biodiesel quality. Unfortunately, and despite claims to the contrary, that's all they are, a comparative indicator: this batch is better than that batch. Even at the laboratory or industrial level, viscosity testing alone cannot tell you if the process has gone far enough before reaching equilibrium and that there are not unacceptably high levels of harmful unreacted and partly reacted materials in your fuel. Kinematic viscosity is measured in "Stokes". You cannot measure it at home without a viscosimeter. There is a comparative way, though. Take a liquid with a known viscosity value (petroleum heating oil, look the value up in an engineering manual) and let a known volume flow through an upside-down plastic water bottle with a drinking straw glued in a hole in the screw top. Stop the time with a stopwatch. Do the same with your biodiesel (same volume) and compare the results. Generally a smaller diameter straw will produce more accurate results. If the time of your sample is 1.5 the time of your control sample (petroleum oil), this means its viscosity is roughly 1.6-ish that of the control sample. -- Aleks Kac, 6 Nov 2001 You can use two straws, the second one to let air in for a smooth flow of oil -- see how we do it with small test batches of methoxide: Adding the methoxide First, vegetable or animal fats and oils are triglycerides (TGs), composed of three chains of fatty acids bound together by a glycerine molecule. "Currently I resell commercial manufactured biodiesel in Atlanta, GA. Over the past two years I have seen the quality of this fuel vary greatly. Funny thing about the "commercially manufactured" biodiesel... One of the big arguments against backyard biodiesel (from industry folks) is quality, yet every batch that I have made, and every batch I have seen by a homebrew biodiesel maker has been much better than the "fuel" I am reselling. Individuals with small-scale setups seem to really care, take their time, and craft their fuel... after all, most are using it in their own cars, not selling to the boiler fuel market." For beginners, start off with good practices: follow the instructions carefully, be meticulous with your titration, make sure your measurements are as accurate as you can make them. Learn as much as you can. You'll soon get a feel for it, and then, once you're familiar with the process in all its aspects, you'll be able to decide what's best for you in your situation, with your source of oil, on your budget, and just where you can relax a little and take calculated shortcuts, based on your own experience. Many people make biodiesel from tallow, lard or chicken fat. It makes great fuel, but like the fat it's made from, it has a high melting point -- when the temperature falls below about 15 deg C (60 deg F), the fuel starts to go solid. It's strictly summer fuel. Again, vegetable or animal oils and fats -- what we make biodiesel from -- are triglycerides, composed of three chains of fatty acids bound by a glycerine molecule. (See above, How the process works.) Three main choices, all of them here: The negatives: Even with higher-FFA oils the production rate should be 100% or more by volume (biodiesel has a lower density than the original oil). It says at the top of the Foolproof acid-base process page: "NOTE: The two-stage biodiesel processes are advanced methods, not for beginners -- learn the basics thoroughly first. The single-stage base method is the place to start. Start here." "This is why this isn't a good place to start. If you were more experienced you might have had a better idea of how to translate the mixing instructions for a full-sized batch to the small scale you're using. Maybe it translates direct, maybe not -- I don't know how fast your drill stirs it, nor what rate of agitation it gets with that paint stirrer, but, comparatively, neither do you, and that makes it difficult for you. Starting instead with single-stage base and fresh oil, you begin with fewer variables and they're less critical, and it's a logical progression from there. Now you're facing too many variables and you don't have the experience to assess them -- and you're more likely to make mistakes anyway because you lack a basis of comparison." He relented and went back to the beginning, processing 1 litre of fresh oil by the single-stage base method. "Despite people saying that in different ways, I hadn't heard it until now. All I was hearing was that you have to start with the single-stage process then graduate to the foolproof process. This just seemed like trying to learn something one way then do it in a completely different way, which doesn't make sense." "If everything goes exactly right, nothing. The problem is when something doesn't, and you have NO IDEA what's going on 'cuz you've never seen all the possible quirks of even the basic process. Another answer: "I can mention that from a beginner's perspective, starting with pure vegetable oil and single-stage base is a really valuable learning process. It gives you an idea of what outcomes look like, and the shake test provides feedback on the quality of the process. I am still playing around with variables (processing time, %lye, %methanol, etc.) using pure vegetable oil, before moving to waste vegetable oil. The response: "After reading the links to the discussion groups that you attached I see that the basics is to get a feel of the process and see the correct colors and textures using the process that has the best chance of success, then use that as a baseline for future mini batches using WVO. Then progress to larger scaled processing, then full scaled process, and then finally graduate to the two-stage method, with knowledge that the resultant biodiesel is clean and pure enough to run through my beloved TDI." Right! "I would like to testify that the acid base method on JtF WORKS and it works well. That said you will never get it to work unless you start at the beginning. Keith is not kidding - get to know the oil." -- Jim, Biofuel mailing list, 12 May 06. See: I am interested in biodiesel and used your foolproof method to make biodiesel. Four litres so far... wow eh! However I have since constructed a 200-litre biodiesel reactor out of scrap stainless steel so I can run my VW TDI without modification. My degree is in chemistry but my main forte is a mechanical aptitude. Reply: It says at the top of Aleks's pages: From D.P., some months later -- "Starting from the beginning": Dear Keith: Biodiesel can also be used in gasoline (spark-ignition) engines, but only as an additive. People have had good results with it, but it's still experimental, there are no guarantees. Biodiesel was first used as 2T replacement in the Philippines by a group who added a viscosifier and sold it as 2T replacement for tricycle taxi use at several places outside Manila. Biodiesel in 4-stroke gasoline engines: List member Gregg Davidson wrote: In June of this year, I posed a question about "Biodiesel in gasoline engines". I received a reply from list member JC in Taipei. He advised me that he had mixed biodiesel with gasoline for his car, using no more than a 15% mix. I have had success following his example and had no engine problems. One of the three vehicles I tested this in is a Chrysler Town & Country mini van with a 3.3 L V-6 Flex Fuel Engine, the other two are Jeep Grand Cherokees with 4.0 L I-6 engines. Even though the van can run on E-85, I do not use ethanol blends because E-85 is not available in my home state of Georgia. -- Gregg Davidson, October 2004 Franklin Del Rosario wrote: I'm please to inform our group about using a biodiesel blend with gasoline fuel to power a 4-stroke gasoline engine. The company I work with has a fleet of service cars, most of them are Japanese Nissan, Toyota and Honda. I persuaded one of our company drivers to try biodiesel in a gasoline engine at 200-300 ml of biodiesel to 50 litres of gasoline mixed together in the fuel tank. Frequently asked question: "I read somewhere that biodiesel has a short shelf life. Does biodiesel have an expiry date or a use-by date?" "A study on the stability of the methyl and ethyl esters of sunflower oil reports that ester fuels (biodiesel) should be stored in airtight containers, the storage temperature should be < 30 C, that mild steel (rust-free) containers could be used, and that tert.-butylhydroquinone (TBHQ), an oxidation inhibitor, has a beneficial effect on oxidation stability (166). Methyl esters were slightly more stable than ethyl esters." Lamps that work with biodiesel. Wood treatment. Biodiesel is very useful stuff. "We must be crazy to burn it!" Mike Pelly once said, only half-jokingly. He's a carpenter and had just finished refitting his house with wooden interiors. He and his wife treated all the wood with biodiesel, floors included. The smell was soon gone (and it's a pleasant enough smell anyway), and the results were fine. We also use it for wood treatment, nice! (But we found it can attract mould, especially in wet weather.) What is this "HDPE" plastic that people use for mixing chemicals, and how do you identify it? What sorts of plastics can withstand what sorts of chemicals?
See also Making lye from wood ash
Keep it dry
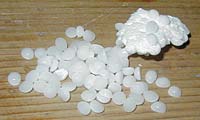
From a faulty batch of lye (rare) -- the semi-translucent half-pearls are fresh, but the chalky white lump on the right is carbonated. After only a second or two exposed to the air the fresh half-pearls are already absorbing a sheen of moisture.
Lye is hygroscopic -- it absorbs water from the atmosphere. So make sure you get fresh lye, and keep the container tightly sealed.
When weighing it out, don't leave it exposed to the air for any longer than necessary. In humid weather we weigh it out into plastic bags, one on either side of the scale to equalise the extra weight of the bag. As soon as it's weighed out, close the container, close the bag, and add the lye to the methanol as quickly as possible.
If the weather's really damp, you can do the whole weighing process entirely inside a big clear plastic bag. If you feel it still might be too moist even inside the bag, put some lye in an open container inside the bag to absorb the moisture first.
We buy 85% KOH in 20 kg lots, 44 lb, and transfer it from it's tough airtight clear plastic bag this way:
Everything goes inside a large clear plastic bag -- the sealed bag of KOH, 10 empty 500 g HDPE plastic containers with wide mouths, bungs and tight-fitting lids, a little KOH in another 500 g HDPE container with the lid off to absorb moisture, some tough cord, and a pair of scissors. Then use two knots of cord to seal the large bag closed.
We cut two holes in the side of the large bag and taped a resistant plastic glove into each of them. With your hands in the gloves, it's easy to work efficiently and safely transferring the KOH inside the large bag, with no water present.
When it's done, press all the air out of the KOH bag and tie it closed with two knots of the cord. Make sure all the filled HDPE containers are properly closed. Take your hands out of the gloves, cut the knots closing the big bag, take out all the HDPE bottles, the scissors and the remaining cord. Press all the air out of the big bag, and tie it closed with two knots of cord.
Lye also absorbs carbon dioxide from the atmosphere and becomes carbonated if not stored properly. Carbonated lye is chalky white, fresh lye is almost translucent. You can still use carbonated lye if it's not too severe, but you'll have to use a bit more. Add about 25%, or better, check it against a titration with fresh lye.
Where to get it
You can get both NaOH and KOH from soapmakers' suppliers and from chemicals suppliers. You can buy high-quality KOH and NaOH online from Duda's Alternative Energy Store: http://dudadiesel.com/.
Lye usually comes in flakes and 5mm pearls or half-pearls, or small pearls (1-2 mm), which with NaOH are usually 99%+, but might be more expensive. Any of these will do if the purity is about 96% or better for NaOH.
The Red Devil-brand NaOH lye drain-cleaner previously sold in the US is no longer made. Don't use Drano or ZEP drain-cleaners or equivalents with blue or purple granules or any-coloured granules, it's only about half NaOH and it contains aluminium -- it won't work for biodiesel. It's best to get high-quality lye from soapmakers or chemicals suppliers.
Basic titration
An electronic pH tester is best, but you can also use phenolphthalein solution (from a chemicals supplier).
Dissolve 1 gram of pure sodium hydroxide lye (NaOH) in 1 litre of distilled or de-ionized water (0.1% w/v NaOH solution) (weight to volume).
In a smaller beaker, dissolve 1 ml of dewatered WVO in 10 ml of pure isopropyl alcohol (isopropanol).
Warm the beaker gently by standing it in some hot water, stir until all the oil dissolves in the alcohol and the mixture turns clear. If you're using phenolphthalein, add 2 drops of phenolphthalein solution.
Using a graduated syringe, add the 0.1% NaOH solution drop by drop to the oil-alcohol-phenolphthalein solution, stirring all the time. It might turn a bit cloudy, keep stirring. Keep on carefully adding the lye solution until the solution stays pink (actually magenta) for 15 seconds.
Take the number of millilitres of 0.1% lye solution you used and add 3.5 (the basic amount of lye needed for fresh oil). This is the number of grams of lye you'll need per litre of oil to process the WVO.
Potassium hydroxide (KOH) can also be used for titration, see Using KOH, below.
Duda's Alternative Energy Online Store supplies phenolphthalein solution in convenient 18-ml dropper bottles, enough for about 180 titrations, as well as a variety of syringes, beakers, chemicals for titration, and gloves, sold separately and as part of their WVO Titration Kit, buy online: http://dudadiesel.com/Electronic pH testers
Take the number of millilitres of NaOH solution you used and add 3.5 (the basic amount of lye needed for fresh oil). This is the number of grams of lye you'll need per litre of oil to process the WVO. For potassium hydroxide, see Using KOH, below.
Do a few practice runs first to get used to the pH tester. Sometimes they can be a little slow to register. Stop adding the NaOH solution and stirring the mixture for half a minute or so to see if the tester needs time to catch up.
To be accurate, pH testers need regular calibration using buffer solutions, normally supplied with the tester, along with directions for use. See:
pH meters
pH testing > TechtipsBetter titration
Before titration measure out 5 ml of the stock solution, add 45 ml of distilled or de-ionized water. This makes a 0.1% w/v lye solution (weight/volume).
It's also not easy to measure exactly 1 millilitre of oil. Instead of the usual 1 ml of oil and 10 ml of isopropyl alcohol, mix 4 ml of oil in 40 ml of isopropyl alcohol in a glass beaker.
Warm the mixture gently by standing the beaker in hot water, stir until all the oil disperses and it becomes a clear mixture.
If you're using phenolphthalein, add 2 drops as usual -- no need to add four times as much, 8 drops gives the same result as 2 drops.
Titrate as usual, measuring millilitres of 0.1% lye solution used. When it reaches pH8.5 count up the number of millilitres used as usual and divide by 4. This will give a much more precise measurement.
To save on isopropyl alcohol, use 2 ml of oil in 20 ml of isopropyl and divide the results by two -- still twice as accurate.Using KOH
Titration is basically the same.
You can use either KOH solution or NaOH solution for titration. Unlike NaOH, your KOH probably won't be pure, but as long as you use the same strength of KOH for both the titration solution and the reaction it won't make any difference.
Mix the KOH solution the same as for NaOH: add 1 g of KOH to 1 litre of distilled water to make 0.1% KOH solution. Or do it the Better titration way. For each 1 millilitre of solution used in the titration add 1 g of KOH to the basic amount.
You can also use the usual 0.1% w/v NaOH solution and convert the end result for KOH, see below.
Instead of the basic 3.5 grams of NaOH per litre of oil, use 3.5 x 1.4 = 4.9 grams of KOH (4.90875). So, if your titration was 3 ml of 0.1% KOH solution, use 3 + 4.9 = 7.9 g KOH per litre of oil.
One more complication: KOH is generally not as pure as NaOH. KOH is usually 92%, 90% or 85% pure -- check the label. We use half-pearls assayed at 85%, with good and reliable results. KOH is available at 99% strength, but it's hard to find and it's expensive, and anyway 92% or 85% work just fine.
Adjust the basic lye quantity according to the strength of the KOH: the basic 4.9 grams of KOH at 100% strength would be:
90% KOH -- 5.5 (5.454) grams
92% KOH -- 5.3 (5.336) grams
90% KOH -- 4.8 (4.831) grams
92% KOH -- 4.7 (4.726) grams
For 90% KOH use 155.83% of the NaOH amount (x 1.56).
For 92% KOH use 152.45% of the NaOH amount (x 1.52).
Number of grams of KOH required for the reaction:
Titration result: 3 ml
Add: 3 g KOH
Total: 8.8 g (8.775) of 85% KOH required per litre of WVO.
Titration result: 1.8 ml (1.82)
Add: 1.8 g NaOH (1.82)
Total: 5.3 g NaOH (5.32)
Convert for 85% KOH:
5.3 (5.32) x 1.65 = 8.8 g (8.778) of 85% KOH per litre of WVO.
KOH dissolves in methanol much faster and more easily than NaOH does, and doesn't "clump" together as NaOH can do. When you use KOH the glycerine by-product is liquid and won't solidify.
KOH is easier to use than NaOH. It's more flexible and adaptible and it gives generally better results -- all round it's a better catalyst than NaOH. We seldom use NaOH (except for titration).
Note Don't mix KOH and NaOH in the same batch. If you use KOH as the catalyst, you must also use KOH if you make soap from the glycerin by-product, and again you must use KOH if you deacidify the WVO as a pre-processing step.Accurate measurements
Weights
Truly accurate scales are expensive, unless you can pick up a second-hand set in good condition. Even then, it pays to check your scales for accuracy.
A good way of doing this is with new coins. Find out from your bank, or the Central Bank, what the weight is (in grams) of the coins in your country. If you get a full set of new coins you can use them in combination to check the accuracy of a wide range of weights.
With a balance-type scale (two sides with a fulcrum between them), get two full sets of coins, and figure out different combinations to put on each side; you should also be able to use this to achieve smaller gradations than your scale allows: aim to measure a tenth of a gram, 0.1 grams, preferably less -- 0.01 grams is best.
At 0.1-gram accuracy, with a one-litre test batch, measuring the 3.5 grams of NaOH required might give you 3.4 grams or 3.6 grams instead, or anything in between the two. With fresh oil this margin of error or even more won't matter, if you get everything else right you'll have good results.
That margin of error won't matter with test batches of used cooking oil (WVO) either, IF you heed the advice to avoid oils with titration levels higher than about 3 ml of 0.1% NaOH solution for your first test batches.
WVO with higher titration levels and higher levels of Free Fatty Acids will not be so forgiving, there's much less margin for error -- leave them for later when you're more experienced.
Small test-batches of high-FFA oils with titration levels higher than 6 or 7 ml will be easier with scales accurate to 0.01 grams and might need bracket tests as well, and you'll probably do better with the two-stage acid-base process, which is also not for novices.
Volumes
If you have a standard millilitre measure that you know is accurate, use it to check all your various measuring flasks, syringes, pipettes, etc. Otherwise, check them against each other. With syringes or pipettes, or whatever you use to add the 1 ml of oil and the 0.1% lye solution to the titration mixture, you should be able to measure 0.1 ml accurately or better.
Smaller syringes are more accurate for titration, 5 ml syringes are a bit big, 2.5 ml will do. We use 1 ml clear plastic syringes, long and narrow, marked in tenths and hundredths of 1 ml -- 0.01 ml. The measurement scale is 2-1/4" long (5.5 cm) so it's easy to read. They're cheap, you can get them from hobby shops or laboratory equipment suppliers.
Duda's Alternative Energy Store supplies 1 ml clear plastic syringes, both separately and as part of their WVO Titration Kit, which includes a variety of syringes, beakers, the titration chemicals and gloves, buy online: http://dudadiesel.com/
When doing titration work with good lighting and on a white surface. First draw the syringe plunger back about 1/8" (2 mm) to take in some air. Then insert the end into the oil or NaOH/KOH solution and fill the syringe. Hold it up level with your eye, preferably with a well-lit white wall in the background, keep it vertical, and carefully empty a few drops, drop by drop, until the bottom of the surface meniscus is level with the 1 ml mark. When emptying the syringe into the titration vessel, don't empty it completely -- the one millilitre volume ends at the end of the scale, which leaves a little extra in the spout. Empty the syringe only to the end of the scale, with the bottom of the surface meniscus level with the 0 mark.
Use measuring flasks the same way. When filling them hold them vertical, with a well-lit white wall in the background, and with the gradation mark for the quantity you want level with your eye. Measure from the bottom of the surface meniscus.
Always keep your glassware and other measuring equipment meticulously clean. Barely visible smears of dried caustic residue or other chemicals can upset your results.Joe Street's titrator
Joe Street of Ontario, Canada, made a titrator kit that he says makes the process easy and repeatable even in the field, by incorporating a small heater and magnetic stirrer in a small portable low-cost unit.
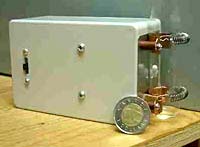
Constant heat, constant agitation of the titration sample (note the test tube at the right end of the box)
"What I needed was a way of warming the mixture of test oil and isopropyl alcohol, which is required for an accurate titration, and I thought it would be nice if agitation was included so that it would not be necessary to stop and shake or stir the solution with a stick while simultaneously trying to carefully control the flow of 0.1% caustic solution used in the titration. A laboratory grade stirring hotplate would be really nice but I could not justify the cost of $500.00 to $1000.00. Necessity is the mother of invention..."
Joe's titrator only cost him a few dollars. "It was quite simple to put together and was done in less than a day," he says. "Now I have both hands free and can dribble the solution smoothly without interruption just watching for the indicator to go off. I made my life easier by fixing two of the variables: the heat is always consistent, and so is the agitation."
How-to instructions:
http://www.nonprofitfuel.ca/Titrator.html
pH meters
We have three pH meters, one of them rather expensive, and we did some comparisons, with phenolphthalein, fresh from a laboratory supplies company in Tokyo, and with various test strips. We used WVO from several sources, and fresh oil as a check. The results were checked with test batches. In each case, the three pH meters agreed with each other and produced good test-batch results. Phenolphthalein results were consistently slightly higher, but the test-batch results were still good. The test-strips came a poor third -- not as precise as pH meters and phenolphthalein. People do use them with apparent success, but we don't think test strips are precise enough for titration -- why risk compromising the quality of your fuel?
Cheap testers can be a false economy. Good instruments are available for a reasonable price. It's worthwhile to spend a bit extra and get one with a replaceable electrode (sensor), and with Automatic Temperature Compensation (ATC). Resolution should be 0.01, accuracy should be ±0.1 or better, preferably ±0.05 or ±0.01.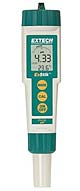
Extech PH100 ExStik Waterproof pH Meter -- pH: 0.00 to 14.00pH, Temperature: 23 to 194 deg F (-5 to 90 deg C), Resolution: 0.01pH,0.1 deg, Accuracy: ±0.01pH, ±1.8 deg F/±1 deg C, Automatic Temperature Compensation, replaceable electrode. Buy at Amazon.com: ExStik Waterproof pH Meter
 PH-200 Waterproof pH Meter, from HM Digital -- Waterproof, pH Range 0-14, Temperature Range 0-80 deg C (32-176 deg F), Resolution 0.01 pH, Temperature resolution 0.1 deg C/F, Accuracy +/- 0.02 pH, Digital automatic calibration, Replaceable electrode. Buy at Amazon.com: PH-200 Waterproof pH Meter
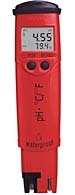
Hanna Instruments pHep4 Digital pH Tester -- Waterproof, pH Range 0.0 to 14.0, Accuracy:±0.1 pH, Temperature Range 0-60 deg C/32-140 deg F, replaceable electrode. Buy at Amazon.com: Hanna pHep4 Digital pH Tester
Techtips on pH from Eutech -- useful FAQs on using and maintaining pH meters:
http://www.eutechinst.com/tech-tips.htm
Technical Tips -- pH
http://www.eutechinst.com/sup-technical-tips.html
See Technical tips for advice on using and maintaining pH meters.Phenolphthalein
Phenolphthalein is colourless up to pH 8.3, then it turns pink (magenta), and red at its maximum of pH 10.4. When it just starts turning pink and stays that way for 15 seconds, it's measuring pH 8.5.
With good-quality oil with low FFA levels you might just get away with using phenol red for titration, but for higher FFA levels it isn't accurate enough. Use phenolphthalein -- specifically, 1% phenolphthalein solution (1.0w/v%) with 95% ethanol.
Phenolphthalein lasts about a year. It's sensitive to light, store it in a cool, dark place.
You can buy phenolphthalein solution online from Duda's Alternative Energy Store, in convenient 18-ml dropper bottles, enough for about 180 titrations, buy online: http://dudadiesel.com/pH meters vs phenolphthalein
As acids become weaker, it is important to become more careful in the selection of a chemical indicator (such as PHTH), as the change in pH is much slower than it is for a strong acid titration. PHTH is the most commonly used indicator for strong acid titrations because it has such a clear color change. Fortunately it appears to change color over the same range as the equivalence point for FFAs (Free Fatty Acids).
The difficulty in either method is knowing what the equivalence point is going to be. This will vary based on the type of oil and the degree of hydrogenation. I don't suspect it will vary much, but it will vary. If your goal is a pH of 8 or 9, then using PHTH is going to be as good as a pH meter. If you have a better idea of what the equivalence point is going to be, then a pH meter works better.
The point is there are a number of reasons why PHTH may not work as well as a pH meter in some cases yet works fine in other cases. This is something I think everyone will have to decide for themselves. -- the skapegoat, Jun 2005High FFA levels
We did succeed in making biodiesel with our 9.6 ml oil. It's not easy to process oil like this with the usual single-stage base process. You're likely to end up with about 50% production half the time, and maybe not a very good product, and glop the rest of the time. If you're really precise with everything you can do it -- we managed to get a consistent 75% production with the single-stage base process, good product, easy wash.
The oil has to be thoroughly dried first -- traces of water make a bigger difference with high FFA levels, because there's more lye for the water to react with. And the reaction itself releases traces of water, especially with high levels of lye.
The better answer is to use the Foolproof two-stage acid-base method, which handles high FFA levels effectively and still produces high production rates with low levels of reactants and easy washing.
You can also deacidify the oil. Deacidifying WVO
In commercial oil refining this is done with lye (sodium hydroxide, NaOH) and water, which saponifies the Free Fatty Acids, converting them to soaps which can then be removed, but it takes a centrifuge to separate it.
This is an easier way, no need for a centrifuge -- but it needs care, you have to be gentle!
Use the titration amount of lye -- eg, 9.6 grams NaOH per litre of oil for our 9.6 ml WVO (see above). Mix the NaOH with 40 ml of water per litre of oil (same for KOH). It gets hot. Use a stainless steel container, mix it outside (by stirring it a few times), and take care! This is very corrosive stuff, take full safety precautions, have running water handy.
When the lye is fully dissolved add the solution to the oil (room temperature), stir gently by hand until thoroughly mixed. Be gentle!
Settle overnight. This leaves soapstock at the bottom. The water stays with the soapstock.
Filter to remove the soapstock -- no need for fine filtering, fine steel mesh will do (like a fine tea strainer). Again, do it gently!
Now process the filtered WVO as usual for fresh oil, with 3.5 grams NaOH (or equivalent KOH) per litre of oil, but use 25% methanol, process at 55 deg C (130 deg F), with good and prolonged agitation as usual.
As ever, make a small, 1-litre test batch first. If you have difficulties, you might try titrating the WVO again, but to get an accurate result you'll have to wash it, and then dry it. If you've been careful, it should work with 3.5 grams NaOH or the equivalent amount of KOH.
In our tests deacidifying 9.6 ml 0.1% NaOH titration WVO the biodiesel was good quality, the production rate was 80% (with two by-products, the soapstock and the usual glycerine cocktail).
If you use KOH (potassium hydroxide) for the deacidifying process, then KOH, not NaOH, must also be used to process the deacidified WVO into biodiesel, see Using KOH, above, and KOH must also be used if you saponify the glycerine by-product, see Soap.
This method is easier than using the normal single-stage base process with high-FFA oil, and it's nice not to have to make such strong methoxide as a straight single-stage process would require with this oil, 13.1 grams of lye per litre oil, or more like 13.6 grams (it needs a bit of excess lye).
It's an alternative -- better than straight single-stage base for high-FFA oil, and while it won't get as a high a production rate as the acid-base method, and it uses more catalyst and gives you more co-products, it's quick and simple.
It's also useful if you're making ethyl esters biodiesel, using ethanol rather than methanol: the ethyl esters process doesn't work well with oils with more than about 2 ml titration.
As always with a new process, try it first with a small sample, say 1 litre of oil. Be gentle when mixing it -- if you agitate it too much it won't separate easily. If that happens, try heating it, let it settle again, and be more gentle next time.
You can add the soapstock to the glycerine layer after separation and neutralize as usual to separate catalyst, glycerine and FFAs.
The soapstock can be used for producing soap, or turned into calcium soap, which is something like Dubbin and has an extremely low water solubility. Useful stuff. "Thus an equimolar amount of calcium chloride may be directly added to the soapstock and prompt separation of the calcium soap by precipitation from a relatively pure saline (NaCl) solution will ensue. Calcium soaps are useful industrial ingredients, for instance as demoulding agents." -- Chemical Reactions of Oil, Fat and Fat Based Products -- Neutralization (chemical processing)
http://alfa.ist.utl.pt/~fidel/creac/sec34b.html
Mix some calcium chloride in a little water (careful, it gets hot, don't splash) and add it to the soapstock a little at a time, stirring it in, until it separates. No titration?
See also Stock methoxide solution and Poor man's titration, below.
There are people who claim titration isn't necessary, just use 6 or 6.5 g per litre and you'll be fine. Don't listen to them! They might have always done it that way and they've driven 20,000 miles already in their diesel without any problems, but 20,000 miles is nothing in the life of a diesel motor. Oils vary considerably from place to place -- even the fabled "stable source of supply" can't be all that stable, unless it's a food processing factory with a standardized operation. If it's the usual restaurant or canteen, that would mean they cooked exactly the same number of identical meals in exactly the same way, every day. It just ain't so.
Sometimes the "no titration" folks point to Aleks Kac's two-stage methods, neither of which use titration, though they're both based on an "average" lye requirement of 6.25 g/litre. But two-stage processes work in a different way, and this cannot be applied to a single-stage process. In fact even with two-stage processes we do a titration, just to know what sort of oil we're working with.
They also point to Mike Pelly's statement that he usually needs between 6 and 7 g of lye -- but Mike also says titration is the "most critical" step in the process: "Make your titration as accurate as possible." And: "It's a good idea to do this entire process [titration] more than once to ensure that your number is correct." In fact Mike has a stable source of supply for his WVO, but he checks it regularly just the same, by titration and/or with test batches.
Titration won't tell you everything about your oil, but it will tell you more than anything else will (short of Gas Chromatograph analysis), and the more you know about your oil the easier your life will be. It is a basic technique in making biodiesel, not to be avoided. The basic lye quantity -- 3.5 grams?
In fact 3.5 grams is an empirical measure -- an average. Different oils have slightly different requirements, and even the same type of oil varies according to how and where it's grown. Other estimates are 3.1 g, 3.4 g, and some people have set it as high as 5 g.
Here is what we've found. For most fresh oils and low-FFA used oils (with titration levels less than 2-3 ml), 3.5 grams works just fine. For high-FFA used oils, use more lye -- up to about 4.5 g instead of 3.5 g. Do small test batches to see what works best.
Different oils also require different amounts of methanol -- see How much methanol? For oils and fats requiring more methanol -- coconut, palm kernel, as well as tallow, lard, butter -- again, use more lye, up to 4.5 g, even with new oils, and especially when it's used. Once again, do small test batches first. Mixing the methoxide
If you shake it a lot, and often, it can be ready a lot sooner than 24 hours -- in just a few hours or even as little as half an hour, some people say. But DON'T use it until ALL the lye is thoroughly dissolved. If you use a white translucent HDPE container you can see any undissolved lye at the bottom of the container.
KOH -- potassium hydroxide -- dissolves in methanol much faster than NaOH, sodium hydroxide. It can be ready in as little as 10 minutes.
We use HDPE carboys with two screw-on caps and an aquarium air-pump to transfer the mixed methoxide to the reactor vessel via plastic tubing (the braided translucent type), with no exposure at all. Clean, safe and simple. See Methoxide transfer. We transfer the methanol from its tank to the carboys the same way.
For HDPE, see below, Identifying plasticsStock methoxide solution
Actually it needs a little more lye to be accurate: mix one litre of methanol and 51.25 grams of NaOH. The extra 1.25 grams makes up for the volume of the NaOH (about 2 grams per cc), giving the required concentration of 0.05 grams of NaOH per millilitre of methanol.
If you're making half-litre test batches and using 20% methanol, measure out the methoxide this way:
If titration was, say, 3 ml, you'll need 3 + 3.5 grams of NaOH (the basic amount) for the reaction -- that's 6.5 grams per litre of oil. For half a litre of oil, that would be 3.25 grams and 100 ml of methanol at 20%.
It's easy to calculate that 65 ml of the stock methoxide solution will contain 3.25 grams of lye. So measure out 65 ml of the stock, and top it up with 35 ml of pure methanol to make 100 ml (20%).
For a test of 6 grams per litre of oil, you'll need 60 ml of the stock, top it up with 40 ml of pure methanol to make 100 ml. For a 7 grams per litre test, measure out 70 ml of the stock, top up with 30 ml of pure methanol. And so on.
Didn't figure the calculation? For a half-litre test at the rate of 6.5 grams of NaOH per litre of oil, divide 6.5 by 2 = 3.25 grams. To calculate the amount of stock solution needed, multiply 1000 (1000 ml per litre) by 3.25 divided by 50 = 65 ml. For 20% methanol, 20% of 500 ml (half a litre) = 100 ml. 100 ml minus 65 ml = 35, so add 35 ml of pure methanol to the 65 ml of stock to make up 100 ml containing 3.25 grams of lye, equivalent to 6.5 grams of lye per litre of oil with 20% methanol.
Once mixed, methoxide won't last forever, but it's good for a few weeks. Don't make large amounts -- one litre is good for a dozen or more tests. If in any doubt, make up a fresh batch. Include what's left of the old mixture in the methoxide for your next full-sized batch of biodiesel. (With thanks to Todd Swearingen of Appal Energy.)Poor man's titration
The easiest way to alter the methoxide concentration is to prepare a stock solution of methoxide. Mix a stock solution of 20.5 grams of NaOH (or equivalent measure of KOH) with 400 ml of methanol for a concentration of 0.05 grams of NaOH per millilitre of methanol.
Your oil volume of 200 ml is 1/5th of one litre, meaning that you should reduce the usual 20% methanol volume proportionately, to 40 ml. However, we suggest you reduce it only to 50 ml to ensure that there is no shortage of alcohol.
For instance, if you want to see what 6.5 grams of NaOH per litre of oil will achieve in the way of a reaction, you need 1.3 grams of NaOH for a 200 ml test batch (6.5 divided by 5 = 1.3).
It's easy to calculate that 26 mls of stock methoxide will contain 1.3 grams of NaOH (400 x 1.3 / 20 = 26). Combine 26 mls of the stock methoxide with 24 mls of pure methanol (26 + 24 = 50). With 1/5-litre samples, that amount is exactly what you want, the same ratio as 6.5 grams of NaOH and 200 ml of methanol to one litre of oil.
Number your six identical test jars from 1 to 6. For this example, they'll contain the equivalent of 5.0 grams, 5.5 grams, 6.0 grams, 6.5 grams, 7.0 grams and 7.5 grams of NaOH per litre of oil processed. You'll have 1/5th of one litre of oil in each jar (200 ml), with 50 ml of methanol, however, each jar will have a different concentration of lye, ranging from 5.0 grams to 7.5 grams. Calculate the proportions of stock methoxide solution and pure methanol for each of the samples as in the paragraph above.
Add the following to each sample:
1) 20 ml stock solution + 30 ml pure methanol (5.0 grams/litre of oil)
2) 22 ml stock solution + 28 ml pure methanol (5.5 grams/litre of oil)
3) 24 ml stock solution + 26 ml pure methanol (6.0 grams/litre of oil)
4) 26 ml stock solution + 24 ml pure methanol (6.5 grams/litre of oil)
5) 28 ml stock solution + 22 ml pure methanol (7.0 grams/litre of oil)
6) 30 ml stock solution + 20 ml pure methanol (7.5 grams/litre of oil)
When all of the methoxide portions are prepared, add them to their respective jars of heated oil. Seal all lids tightly. Vigorously shake each jar 50 times. Repeat the agitation several times over 10 minutes.
Let all the samples settle. If you can settle the samples in a shallow water bath at 120 deg F (49 deg C) all the better.
The reason for using jars of the exact same type is for more accurate visual comparison and conclusions. You can also transfer the contents of the jars to a 250-500 ml graduated cylinder for a more precise comparison. The correct amount of lye required can be judged by the volume of glycerin by-product that settles out in each sample.
To fine-tune the result, try one test batch with 0.25 g on each side of the batch that had the most glycerin by-product. Say that was with the 5.5 gram sample, do three more tests, for 5.25 grams, 5.5 grams and 5.75 grams. (With thanks to Todd Swearingen of Appal Energy.)How much glycerine? Why isn't it solid?
Newcomers to biodiesel making their first batches sometimes think it all went wrong because the glycerine didn't go solid.

Just made 20 minutes earlier, and still settling.
Messages sent to the Biofuel mailing list:
There is no "set" amount of by-product, such as 200ml per litre, and there is no rule that the by-product must be solid at room temperature.
What's much more important is that in each of the cases above, the test batch produced a good "split" -- the glycerine separated and settled to the bottom, and, if they'd followed the directions carefully, the rest would have been good biodiesel, needing no more than settling and washing. It "worked", it's just fine, move on to bigger and better things!How much glycerine?
But the so-called "glycerine layer" is not just glycerine, it's a variable mixture of glycerine, soaps, excess methanol, and the catalyst (lye). Better to call it the by-product layer.
The overall amount varies according to the oil used (more soap with heavily-used oil), the process used (less soap with the acid-base two-stage method), the amount of excess methanol used (most of the excess methanol ends up in the by-product layer).Why isn't it solid?
More important is how much soap there is -- the more soap, the more likely the by-product layer will solidify, no matter what oil you used.
Other factors:
PET bottle mixers
PET bottles are transparent plastic soft-drinks bottles, generally 1/2 or 1 or 2 litres. "PET" stands for Polyethylene Terephthalate -- see below, Identifying plastics
Here's how the PET bottle fans do it: warm up the oil (or maybe not), funnel it into the PET bottle, add the (pre-mixed) sodium methoxide, screw on the cap, shake the bottle up and down 10 times or maybe 40 times, leave it for an hour, and it's done.
Well, maybe. Or maybe not -- it's a good recipe for an incomplete reaction.
For test batches, here's a better way: warm the oil to 55 deg C (131 deg F). Pour it into the PET bottle, add the methoxide, screw on the cap, shake vigorously up and down 40 times or more. Then stand the bottle in a bath of hot water to maintain the temperature -- keep the water in the bath at around 55 deg C. Shake again every 5 minutes, for up to two hours, maintaining the heat all the time. This will have a much better chance of not leaving unreacted and partly reacted material in the mix. See below: How the process works.
Better still, make one of these instead: Test-batch mini-processor
Biodieseler Greg Yohn, who developed this technique in the first place, along with Steve Spence and other seasoned biodieselers who've used it for years, all say it's useful ONLY for demonstration purposes, and so do we. Use new oil, and best do it in private first so you don't risk making a fool of yourself. The value of the "method" for demonstrations is that it doesn't matter much if the reaction is incomplete and leaves unreacted material in the mix, just as long as you get separation and the glycerine drops out -- you're demonstrating the process, NOT making fuel, and in a transparent PET bottle you can clearly see it all happening. And it's non-messy. Viscosity and specific gravity tests
Unconverted monoglycerides (MGs) and diglycerides (DGs) are fuel contaminants that can cause injector coking and engine damage. MGs and DGs are very similar in viscosity to biodiesel and stay in solution with it after an incomplete reaction, they can't be washed out. The allowed maximums are low: less than 0.8% by mass for MGs and less than 0.2% for DGs. Viscosity tests might get you within 5% accuracy, not nearly close enough for a useful quality check.
The same goes for density -- specific gravity measures (SG). Even both viscosity and density together can't assure you that the reaction has gone far enough towards completion. About the only sure way to know that is with a Gas Chromatograph or expensive laboratory tests which few biodieselers can afford. Short of a Gas Chromatograph the best indicator of reaction completion is to use the Wash test and the Methanol test -- see Quality tests. See also How the process works, below.
Nonetheless, viscosity can be a useful indicator, when comparing test batches. You can check viscosity with a 100 ml pipette and a stopwatch -- time exactly how long it takes 100 ml of your fuel to empty from the pipette. Or use a viscosity meter. Excess methanol in the fuel will render the results meaningless, so you must wash the biodiesel first. Measure some petro-diesel for a comparison. Remember that viscosity is sensitive to temperature -- try it at two or three different temperatures. See the various quality-specification tables here for some guidance.
Aleks Kac offered this advice to a Biofuel mailing list member struggling to get his home furnace working with biodiesel:
Measure specific gravity (SG) by weighing a specific volume of the fuel. Remember that volume is also sensitive to temperature. A litre of biodiesel should weigh 860 to 890 g at 15.5 deg C. You can also use a hydrometer.
Biodieselers using the Wash test and the Methanol test to maintain high quality seldom find any use for viscosity or SG tests.
See Quality testingHow the process works
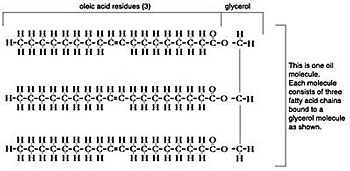
Oil molecule -- graphic by Jeff Welter
Triglycerides are esters. Esters are acids, such as fatty acids, combined with an alcohol, and glycerine (glycerol) is a heavy alcohol.
The transesterification process converts triglyceride esters into mono-alkyl esters (biodiesel) by means of a catalyst (lye) and an alcohol reagent, usually methanol, which yields methyl esters biodiesel -- the methanol replaces the glycerine.
In transesterification the triglyceride molecule is broken into three separate methyl ester molecules plus glycerine as a by-product. The lye catalyst breaks the bond holding the fatty acid chains to the glycerine, the glycerine falls away, and each fatty acid chain then bonds with a methanol molecule.
It happens in three stages (this has nothing to do with the single-stage or two-stage processes). First, one fatty acid chain is broken off the triglyceride molecule and bonds with methanol to form a methyl ester molecule, leaving a diglyceride molecule (DG) -- two chains of fatty acids bound by glycerine. Then a second fatty acid chain is broken off the diglyceride molecule and bonded with methanol to form another methyl ester molecule, leaving a monoglyceride molecule (MG). Finally the monoglycerides are converted to methyl esters -- completion.
However, the process can run out of reagent or catalyst before it gets as far as completion, or the agitation, temperature or processing time may not be adequate.
The result is some unconverted or partly converted material remaining in the biodiesel.
Well, so what if the process isn't completed? SVO (straight vegetable oil) is a good fuel anyway, so what's it matter if some of it is unreacted? But it's not just unreacted material that's the problem so much as the partly-reacted stuff. Diglycerides and monoglycerides are fuel pollutants: diglycerides don't combust well and lead to coking problems, monoglycerides can lead to corrosion and other problems -- bad fuel.
"The level of glycerol, mono- and diglycerides at levels of 0.1% (a factor of 1/1000 or less of the main ester components) or lower appears necessary for optimum engine performance." (International Conference on Standardization and Analysis of Biodiesel, Session 2, "Interaction Between Engine and Fuel", Vienna, November 6-7, 1995 -- to be published.) -- From "Analytical Methodologies for the Determination of Biodiesel Ester Purity -- Determination of Total Methyl Esters", NBB Contract #:520320-l, Richard W. Heiden, Ph.D., R. W. Heiden Associates, February 27, 1996
http://www.biodiesel.org/resources/reportsdatabase/
reports/gen/19960227_gen-221.pdf
So, either don't process it at all and use SVO (which can have its own problems), or process it PROPERLY.
In fact the process never reaches 100% completion, it always reaches equilibrium first, so there will always be some unreacted glycerides left. The various national biodiesel standards stipulate just how much is allowable, and it's not very much: diglycerides range from less than 0.4% to less than 0.1% by mass, monoglycerides less than 0.8% by mass.
The first part of the process happens rapidly, which is why some people think it only needs a few shakes and that's it. Not so. If it takes X minutes to convert half the TGs to DGs, it takes almost as long, another X minutes, to convert half the remaining TGs, then a further X minutes for the remaining half, and so on. So the process goes more and more slowly, and never quite arrives -- there's always half left. Finally comes a point when the remaining half is insignificant, and, indeed, within the limitations set by the various quality standards. But it's very easy to fall short of that point and end up with nasties in your beautiful clean eco-friendly nice-smelling home-brewed fuel, and in your motor.
See Kinetics of Palm Oil Transesterification in a Batch Reactor, by D. Darnoko and Munir Cheryan, University of Illinois, for what actually happens during the biodiesel process reaction. (Acrobat file, 72Kb)
You CAN make high-quality biodiesel, all it takes is a little care. On analysis, biodiesel made by home-brewers with no qualifications and no special equipment using the methods detailed at this website has proved the equal of professionally made commercial fuel or better. Professional mechanics checking their motors have been amazed by the lack of wear and corrosion. You can do it too. See Quality
Message to the Biofuel mailing list from a biodiesel dealer in the US:
NOTE: It's a common misconception that biodiesel has lower viscosity than SVO or WVO because the transesterification process shortens the carbon chain length of the fatty acid molecules in the oil.
This is not so. The biodiesel molecule is indeed smaller and less complex. Transesterification converts the triple-chain triglyceride vegetable oil molecule to three single-chain methyl ester molecules, but the chain lengths of the fatty acids themselves remain the same. The fatty acid composition of biodiesel depends on the feedstock and is not changed by transesterification.Animal fats, tallow and lard
Some people have difficulty processing animal fat.
Frequently asked question: "I have access to a source of animal fat that is used for deep frying. I have tried to make biodiesel from it but only succeed in producing a very soapy gloop. Is there a difference between using animal fat and waste veggie oil? Help!" -- Leo, Biofuel mailing list, 26 Apr 2006
Answers: "No real difference between the two, at least not relative to making fuel. The suggestion would be to use KOH instead of NaOH for starters. That should help end your thickening/soap issue. Don't jump the gun with large batches until you get the small stuff right if you're still having problems." -- Todd
"Animal fat (tallow) has a different chemical make-up than vegetable oil. You need to do much more purification. You get soap (glycerin) like results with vegetable oil, just not as much. I think that if you use a stronger caustic agent to separate mixture components, you may have more success." -- Randall
"You're aware that saturated fats and oils tend to make harder soaps? Combining factors such as the greater ratio of saturated glycerides and the common practice of overdosing caustic as 'insurance' by new initiates to biodiesel and the groupies of others who prescribe the method as a guaranteed cure-all, there will be inevitable and needless occurences of failed reactions due to the formation of 'glop soap.' Animal fats do need to be rendered thoroughly to remove as much proteinaceous material as possible prior to processing. But the 'chemical make-up' is essentially no different than any other triglyceride, other than the ratio of saturated acids to unsaturated acids. It's the ratio of fatty acids to each other that defines an oil or fat, giving each its general properties." -- Todd
"Tallow, lard, butter, vege oil, etc. are all the same chemically save very, very minor differences which don't impact the transesterification reaction. Fats and oils are treated the same as to volume of methanol, reaction time, and amount of catalyst. Impurities, mainly water present, will impact yields, and soap production, but starting with relatively pure oils and fats requires no different treatment." - Bob A.
"I stand corrected." -- Randall
"I have processed 100% virgin beef tallow fat with the 2 stage base - base process with great sucess. I used 200 ml methanol / liter fat and 6.7 g NaOH Processed for 2 x 2hours at 58 - 60 deg C. That batch washed better and easier then any other WVO I had dealt with. The only drawback is cold weather, it will crystalize around 15 deg C (59 deg F). Otherwise it is great fuel with a light yellow color like the fuel from virgin rapeseed oil. Good luck with it." -- Andrew
"I have also had excellent results from beef tallow using the acid/base two stage process. Although when washing, I thought I was getting loads of soap out even on the third or fourth washes. It turned out that my water was too cold, I was bringing the temperature of the biodiesel down to below 15 deg C and forming waxes. I then washed with lukewarm water and got perfect results, crystal clear wash water on the third wash." -- Bob C.
"Last time we rendered deer tallow and made biodiesel from it we were stonewalled after an overnight temp of 56 deg F (13 deg C)." -- ToddWhat are Free Fatty Acids?
Free fatty acids (FFAs) are fatty acids that have become separated from the triglycerides, leaving diglycerides, monoglycerides and free glycerine. This is caused by heat, water in the foods cooked in the oil, or oxidation. The hotter the oil gets and the longer it's cooked, the more FFAs it will contain.
As glycerine is an alcohol (glycerol), a fatty acid attached to it (a glyceride) forms an ester. A "transesterification" is the conversion (switching) of one ester into another -- a glyceride ester into an alkyl ester in the case of biodiesel, where methanol (or ethanol) replaces the glycerine.
An "esterification" is the conversion of a non-ester into an ester. FFAs are non-esters. FFAs are converted into esters by acid esterification in the first stage of the two-stage acid-base biodiesel process, but cannot be converted by the more common single-stage base transesterification process. Here the FFAs must be removed from the process, or they will dissolve in the biodiesel being formed, yielding an acidic, poor-quality fuel that will not meet quality standards.
In transesterification, extra lye is used to neutralize the FFA content of the oil, turning it into soaps. These soaps drop out of the process as a by-product, joining the so-called "glycerine layer" at the bottom -- often more of a "soap layer" as it may contain more soap than glycerine.
The basic lye quantity used in transesterification acts as a catalyst, not a neutralizer. Lye attacks ester bonds, breaking the bond, and the alcohol drops off, leaving an open-ended fatty acid chain. With glycerides the alcohol that drops off is glycerine. The affinity of the replacement methanol or ethanol for the resulting open bond is strong enough to prevent the glycerine reattaching to the fatty acid.
This is also why it is critical that a minimal amount of lye is used, as lye will continue to attack ester bonds, even those of biodiesel. Too much lye will break the biodiesel ester bonds; some of the broken bonds will mate with the lye and form excess soap, and others will match up with a water molecule to form FFAs, which dissolve back into the biodiesel. It is this excessive formation of FFAs that the "acid number" in the US ASTM and other national quality standards refers to.
While it is unavoidable that some FFAs are formed by biodiesel ester bonds being broken, excess lye increases the proportion.
According to the Fuel Injection Equipment (FIE) Manufacturers (Delphi, Stanadyne, Denso, Bosch), FFAs can corrode fuel injection equipment, cause filter plugging and the build-up of sediments on fuel injection parts.
-- With information from Todd Swearingen of Appal Energy, and DieselNet/Ecopoint Inc.
http://www.dieselnet.com/
Which method to use?
Single-stage base -- Mike Pelly;
Two-stage base-base -- Aleks Kac;
Two-stage acid-base "Foolproof" method -- Aleks Kac.
What's the difference?
The single-stage base method is the place to start. The two-stage processes are advanced methods, not for novices -- learn the basics thoroughly first. Single-stage base is the original method, and still the most widely used, tried and trusted. It's the simplest method, especially for new oils which don't need titration.
A lot of beginners want to use WVO but they're put off by the titration, thinking it's too complex. Actually it's simple enough -- just follow the directions. However, the single-stage process produces more and more uncertain results the higher the FFA content gets in WVO, with lower production levels even when it works well.
The two-stage base-base method avoids the need for titration and produces good results even with higher FFA levels. It's the method-of-choice for animal fats.
Growing numbers of biodieselers are now turning to the "Foolproof" two-stage acid-base method, especially with high-FFA oils. Here are some of the reasons:
In fact the same advantages apply to new oil, although to a lesser extent. Many biodieselers who turn to the "Foolproof" method for high-FFA oils soon make it their method-of-choice for all oils.
Here's some advice from Aleks Kac on using the Foolproof method: "Stick to the recipe, to the letter. There's two years of trial and error research in this. Do not change, simplify or speed up anything. It will take care of all sorts veg fats, even heavily used. The 'solid' portion must be reduced to less than 50% because of the much lower acid-stage temperature. Animal fats content is best at less than 25% for pork or chicken and less than 10% for bovine. These fats at greater concentration should be processed with the two-stage base-base method."
Still, if your oil is quite good and usually titrates at 3 ml or less, you might well be satisfied with the single-stage process. Why can't I start with the Foolproof method?
Here being here:
Where do I start?
But novices sometimes take no notice and plough ahead with the acid-base process anyway. Sometimes they also take no notice of the advice on Test batches: "Whenever you're trying a new method, it's always a good idea to make small test batches of a litre or less first to familiarize yourself with the process before moving on to bigger batches."
All too often it results in a highly discouraging 40 gallons of glop. "It doesn't work!" they wail. It works. It also works to heed the advice of the many who've gone before you. "DO AS THEY RECOMMEND and bio will come," said a recent novice at the Biofuel list.
"But it doesn't sound difficult at all, in fact it sounds easier since there is no need to titrate. So what am I missing?"
Quite a lot. First, we think it's worthwhile titrating your oil anyway -- the more you know about it the better, and titration will tell you more than anything else does.
Avoiding learning how to do titration is a VERY BAD reason for using the acid-base process! Titration is a basic skill needed for making biodiesel, no matter which process you use. Anyway, it's easy enough:
Basic titration
Better titration
Second, it's not just a question of whether or not novices can get it to work. Some do -- mostly they seem to get away with it. But that's a pity just the same, because it's doubtful that they'll get the best out of it. The acid-base method is very flexible, people bend it and twist it every which way in adapting it to their preferences and needs, and you just can't do that unless you have a good overall feel of the process as a whole, not just of this one method.
Another novice at the Biofuel list said he had good chemistry knowledge so he could afford to skip the "newbie" stuff. But: "Well, my first test batch is done, and the end result is less than spectacular..."
Suddenly he found himself facing an ocean of variables, and since he had no "feel" for what was supposed to be happening he had no way of finding out what he'd done wrong. Several things, as it turned out.
One answer:
"... so what am I missing?"
One answer:
"...What's all this white stuff?... Nothing seems to be happening... There's this weird layer, and I'm wondering if it's biodiesel... etc etc."
"As many people continue to emphasize, process quality is really important, and that seems to be best learned in small steps. My game plan is also to get to the 2-stage acid/base with waste vegetable oil, but I still have a lot to learn before getting there. I think what the experienced folks are cautioning is that troubleshooting a more complex process is extremely difficult (and perhaps frustrating) if you don't have a solid grounding in the basics. I hope this helps. Good luck with your experiments!"
http://snipurl.com/pie8
[Biofuel] Biodiesel test results
11 Apr 2006
D.P. wrote:
The main question I do have about your foolproof method of making biodiesel is during the acid catylized process. I have tried four times to get separation... I have 100 litres in my new reactor and I do not want to have a goopy mess.
"NOTE: The two-stage biodiesel processes are advanced methods, not for beginners -- learn the basics thoroughly first. The single-stage base method is the place to start. Start here."
Please don't take offence, but while you may have a background in chemistry, you wouldn't be the first chemist who had to go back to the beginning with this and got it right in the end. With only four litres behind you (four failures apparently) you're a beginner, you have to get a feel for it first, and you're not starting at the beginning.
You're not ready for 100-litre batches yet, stick to one-litre tests. Even if you can get it to work at that level, transferring the process from a one-litre batch to a 100-litre reactor that you've never used before might not be as simple as you think. The only good advice is to go back to the beginning, with small batch tests of new oil using the standard single-stage base method.
-- Keith Addison
Just a short note to thank you for such an excellent website for biodiesel. I took your advice and went back to the basics. I am now making quality biodiesel with excellent seperation and water washing is easy. Test batches thru my home-made reactor are a must. Keep up the good work and keep encouraging anyone who wishes to make a difference.
Sincerely...Biodiesel in gasoline engines
Biodiesel in 2-stroke gasoline engines: Many people have used biodiesel as replacement 2T lube oil in two-stroke gasoline (petrol) engines. Biofuel mailing list member Martin R. of Australia uses it in his chain saw, at a mix of 1 to 20 with gasoline. "It works fine," he says. "After using the saw for 2.5 hours in one go on dead Australian hardwood with no hiccups I was very impressed to say the least."
List member Franklin Del Rosario, biodiesel maker in Manila in the Philippines, uses it in his motorcycle:
The biodiesel, pure or blended with oil additive, performed better than 2T mineral oil as lube oil, according to the testimony of the tricycle drivers who tried it. Their motors ran smoother and quieter than before, the engine block did not heat up, others experienced better engine performance, no more carbon build-up inside the cylinder and muffler, no oil dripping on the exhaust pipe and most of all no more smoke.
I use B100 biodiesel as lube oil for my 1983 Yamaha 125 cc two-stroke motorcycle instead of Shell 2T lube oil which I previously used. I mix biodiesel with gasoline at a ratio of 1:20. I replaced all rubber fuel lines, carburetor gasket etc., cleaned the fuel tank, and changed to a new spark plug. The motor is running smoothly on city driving, the smoke has improved because no more 2T lube oil.
The Yamaha was retired before because of the smoke it produces using mineral 2T oil. With biodiesel as a lube oil it runs better than before and with less smoke at the exhaust pipe. I took my motorcycle to the emission test center and it passed the gas standard limit with better results than a new motorcycle which used mineral 2T oil.
The results were as follows:
Data reading
CO2 -- 2.90%
CO -- 3.39%
HC -- 5396ppm
O2 -- 13.29%
AFVR -- 20.95
LAMBDA -- 1.44
Standard Gas Limit
CO2 -- 20.00%
CO -- 6.00%
HC -- 10000PPM
LAMBDA -- 1.00 +/- 0.99
Result -- Passed
The main property of the lube oil is not the viscosity but rather the ability to mix well with gasoline while maintaining its lubricity (ability to provide a film of oil at the metal surface) to prevent wear of the crank shaft, connecting rod & piston pin and cylinder wall. Biodiesel's lubricity is enough to do the job and it can be improved by adding compatible oil additives to increase the film strength of of the biodiesel.
BD is a fuel with 11% of oxygen by weight, this property alone can help gasoline to burn well reducing smoke emission and leaving no trace of oil at exhaust muffler. -- Franklin Del Rosario, January 2004
We choose a Nissan Cefiro because it emitted a foul odor of unburned hydrocarbons irritating to the eyes and nose during engine warm up and idling. I poured 200 ml of biodiesel into the tank, shook the body for a while and started the engine. After 5 to 7 minutes of idling speed, the exhaust odor improved dramatically and at the end of the day of driving the odor of unburned hydrocarbon was gone and engine purred better than before because biodiesel lubricates the fuel system, the upper combustion chamber, as well as the valve ports. Because of this other drivers tried it in Honda cars. The immediate result was no more odor of unburned hydrocarbons and visible trace of water condensation at the exhaust tail pipe as if the car was new.
I tried using biodiesel as an anti-wear additive for a four-stroke gasoline motorcycle engine and the result was the same.
My friend owns a surplus service car, a gasoline engine Toyota. His car was due for the yearly renewal of LTO registration, and he had a problem because his old car smoked badly and one of the requirement for LTO registration is to test the car at the emission test center. Cars must pass the Emission Standard set by the government before renewal of LTO registration. I challenged him to try biodiesel as a fuel additive, without any engine modification, changing of oil or cleaning of air filter except cleaning of exhaust pipe by water hose to remove carbon particle clinging to the pipe wall. He did so and took the car to the emission test center. The result was very promising
Emission Standard
CO % (V) -- 3.5
HC (ppm) -- 600
Running condition gradual increase of rpm
Gas analyzer final result of service car were the following
CO % -- 1.25
HC (ppm) -- 278
PASSED
Biodiesel as an anti-wear and smog additive for gasoline fuel is very encouraging. -- Franklin Del Rosario, January 2004Storing biodiesel
Answer: We have some biodiesel we made six years ago that hasn't degraded. It's been kept sealed in an HDPE plastic container with a bung and a lid. Others report 4-year-old biodiesel still being usable.
-- Philip S. Okey, Biofuel mailing list, 28 Jul 2004
-- Doug Memering, Biofuel mailing list, 11 Sep 2005
-- From: Storage stability, Biodiesel: The Use of Vegetable Oils and Their Derivatives as Alternative Diesel Fuels, G. Knothe, R.O. Dunn, and M.O. Bagby, in Fuels and Chemicals from Biomass. Washington, D.C.: American Chemical Society. Download full-text article:
Acrobat file, 912kb
MS Word file, 212kb
The US industry group, the National Biodiesel Board (NBB), recommends using biodiesel within six months, but they're being overcautious as usual. Or maybe it's not overcautious if the fuel is to be subjected to the existing petro-diesel infrastructure (dirty and wet). But homebrewers don't have that problem.
Frequently asked question: What is the shelf life of biodiesel? Can I make 6 months of fuel at a time?
Answer: Yes, if you store it properly.
See also:
Oxidation and polymerisation
Iodine ValuesLamps and stoves
Stoves that work with biodiesel. Other uses
It's an excellent lubricant, very slippery. It's better than household lubricating oils, and it's non-obnoxious and non-toxic -- it won't matter much if the kids swallow some by mistake. Great for gardeners, especially organic gardeners, nothing better for lubricating your tools and keeping them clean and rust-free, and non-toxic. Great in the workshop too. Great if you live in an old Japanese farmhouse with wooden sliding doors!
Biodiesel is used as a lubricating additive for low-sulphur petroleum diesel fuels. With diesel engines, upper engine parts are lubricated by the fuel itself. Diesel motors are not lasting as long as they did because of the lack of lubrication with low-sulphur fuel (500ppm), let alone the new ULSD ultra-low-sulphur fuel (15 ppm), and biodiesel solves the problem. Adding just 1% biodiesel improves the lubricity up to 65%. Research suggests that just 0.4% to 0.5% is enough. In France it's compulsory, biodiesel is added to all diesel fuel at between 3% and 5%; other countries are following suit.
Better than detergent
"A couple of weeks ago, while doing laundry, I opened up the dryer and found all the clothes and the inside of the dryer coated in a multitude of colors. A box of crayons had made the trip through the wash and disintigrated in the heat of the dryer. I tried using regular liquid detergent on a rag to remove the crayon stains and got almost nowhere with a lot of vigorous scrubbing. Well, I saturated a cloth with some homebrew biodiesel and started on the stains, with very little scrubbing, all the crayon was easily removed in seconds. totally took everything that was stained off the dryer drum, in seconds, no work at all!!!
"So, I sat down with a toothbrush and bowl of BD and started in on the 8 pairs of khakis, the scrubbing starting freeing up the chunks of crayon imbedded in the material, it didn't take it totally out but seemed to break it up greatly. After the pants were all scrubbed and saturated with BD, I put back into the wash on hot with normal liquid detergent and everything came out perfectly clean after the first wash, really impressive!!
"So I had a shirt with a deep ink stain in the pocket, poured some BD in the pocket and scrubbed with a toothbrush, went through a normal wash and the ink stain was gone in one wash, again, impressive!
"I do have one pair of white khakis that I haven't attempted to clean yet. I'm trying to "force" my son to wear them to school as an attempt to teach him a lesson about checking his pockets before washing the clothes. What I want to do is just soak them in BD and see if that would work instead of all the toothbrushing that was involved in cleaning his other clothes.
"Anyway, sometimes it pays to 'look outside the box', in this case, the detergent box." -- k5farms, Biofuel mailing list, 15 Mar 2003
"Found the same thing in 'dissolving' Ohio crude oil and crude/grime out of work clothes. Lay the clothing in a bathtub, 'saturate' the stain with a homemade liquid veg oil soap, brush a few seconds with a warm-water soaked scrub brush, apply biodiesel from a dish soap squeeze bottle. Scrub to your heart's content.
"The soap/water suspension pulls a good bit of the surface grunge off first, with the biodiesel removing the balance of the oil embedded and soaked into the fibers. The suspension also seems to keep the oily effect of the biodiesel from getting locked into the fiber, which can give the look of wet spots (oil soaked spots) even when the garment is dry.
"Prior to figuring this out the alternative was lacquer thinner, soap and water --- home 'dry cleaning' and toxic as hell." -- Todd Swearingen, Biofuel mailing list, 15 Mar 2003
Oil spill remediation -- CytoCulture's CytoSol Process
http://www.cytoculture.com/process.html
"Cleaning Oiled Shorelines with a Vegetable Oil Biosolvent", Port Technology International, 1998, London, UK
http://www.cytoculture.com/cytosolarticle.htm
Appropriate transport
>> **Renewable Energy Online Newsletter**
>> August 24, 2001
>> Environment News Service:
>> European Government Support Growing for Biofuels
>
> <snip>
>> Since biofuels release none of the greenhouse gas carbon dioxide,
>
> Interesting... Perhaps a silicon-based fuel? With sand for exhaust?
> Tom
> New Mexico, USA
Silicon and sand? Whatever makes you think that? Bit primitive aren't you? We do it this way. Of course we use only the most advanced techniques to make our biodiesel, from whatever feedstock, and then use it in the normal way, giving a thorough application to all the exposed woodwork on the wagon, the wheel hubs, the front axle steering bolt, the canvas tarp cover, and all the leatherwork, harnesses, etc. Then we add the glycerine to the yak-dung in the biogas generator, which powers a small motor with an elbow crank connected to a long forward-mounted bamboo shaft on an offset fulcrum, causing it to waggle, shaking the carrot tied to the end of the shaft enticingly at some suitable point between the yaks' noses and our destination. No carbon emissions, just a bit of odd methane escaping when the yaks fart, but you get used to it. We only use organically grown carrots, of course.
Keith Addison
Journey to Forever
For an explanation of "carbon neutral" fuels, see Greenhouse gases and global warmingIdentifying plastics
 HDPE is High-Density Polyethylene, a tough, translucent, highly resistant plastic used for bottling chemicals, among other things -- #2 plastic, usually marked with the symbol on the right.
 PET bottles are the transparent plastic bottles that soft-drinks and bottled water usually come in, generally holding 1/4, 1/2, 1 or 2 litres. PET stands for Polyethylene terephthalate, a tough, light, resistant plastic that's easily recycled. The recycling code on the bottle is #1.
Identifying different kinds of plastic and their properties, American Plastics Council (120kb pdf):
http://www.americanchemistry.com/s_plastics/
bin.asp?CID=1102&DID=4645&DOC=FILE.PDF
Plastics Identification -- from the Society of Plastics Engineers, Mid-Michigan Section -- 28kb pdf file, download here.
Chemical compatability -- Chemical Resistance Database, Cole-Parmer:
To search, select at least one of three criteria to search on, Chemical, Material, Compatibility Level. If you wish to search by compatability level, you must specify a chemical or material.
http://www.coleparmer.com/techinfo/ChemComp.asp
Back to top
Biofuels
En español -- Biocombustibles, biodiesel
Biofuels Library
Biofuels supplies and suppliers
Biodiesel
Make your own biodiesel
Mike Pelly's recipe
Two-stage biodiesel process
FOOLPROOF biodiesel process
Biodiesel processors
Biodiesel in Hong Kong
Nitrogen Oxide emissions
Glycerine
Biodiesel resources on the Web
Do diesels have a future?
Vegetable oil yields and characteristics
Washing
Biodiesel and your vehicle
Food or fuel?
Straight vegetable oil as diesel fuel
Ethanol
Ethanol resources on the Web
Is ethanol energy-efficient?w/