 Test-batch mini-processorTest-batch mini-processor
Spanish version -- Versión en español
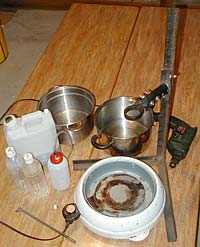
This mini-processor is easy to make from not very much, mostly kitchenware, along with an electric drill, some scrap iron and a few bits and pieces.
It's effective and safe, closed and virtually air-tight, with no splashing or leaking of hot fumes, and it has full temperature control.
It makes one- or two-litre batches, for tests or for demonstrations. It's suitable for the single-stage and two-stage processes. And you can take it anywhere.
It's the ideal processor for beginners. Unlike kitchen blenders, it closely mimics the processing action of full-scale reactors in miniature -- it's much easier to scale up when you're ready for full-sized batches.
There's no need to follow this prescription exactly -- use what's to hand, improvise. For instance, if you don't have a plastic drill-grip that will fit a plug spanner to use for the drill-stand as described below, we made a second stand using a piece of angle iron and a strip of 3/32" steel half an inch wide bent to fit round the drill and clamped in place with bolts. If you don't have a welder or can't make a steel stand, make a stand out of bits of wood bolted together and grip the drill in a portable vice clamped to the vertical. Or something. A crock-pot might do instead of a spaghetti cooker and a portable gas ring. Our gas ring died so now we use a hot-plate instead. You might find a way of using a sealed bearing in the lid rather than a wooden bush. And so on. Let us know!
Materials
- Three-litre HDPE container, preferably with two lids;
- Electric hotplate (with thermostat) or a crock pot;
- Pasta cooker -- the bottom and sides of the inner pot are full of holes like a collander;
- Electric drill;
- Stirrer;
- Two half-litre PET bottles;
- Thermometer;
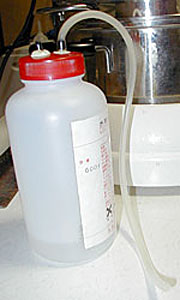
- Half-litre translucent white HDPE (#2 plastic) container with bung and screw-on cap, with a second, spare cap (for mixing the methoxide);
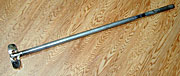
- Scrap 1-1/4" (3cm) angle iron for the drill stand.
Cost -- in our case, zero: this was all discarded junk, including the drill, and all in working order.
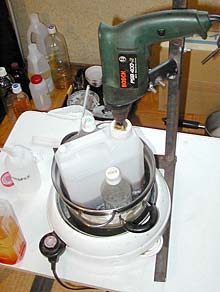
The drill stand is rigged from scrap angle iron and welded together, but it could just as easily be bolted. The bit that holds the drill consists of the tough plastic grip that came with the drill, a plug spanner, which conveniently fits inside the grip, held in place by two bolts (extra holes mean you can move the drill in and out from the stand), and the plug spanner is welded to an extra bit of angle iron bolted inside the vertical section, again with extra holes above and below for adjustment.
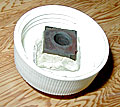
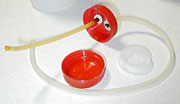
The lid (right) is fitted with a wooden bush cut from hardwood with a 6mm hole drilled through it to take the stirrer shaft. Make it a tight-fitting hole, then heat a piece of the same steel rod as the stirrer and push it carefully through the hole -- not too hot, just enough to scorch the surface of the wood inside the hole, not char it. Add a few drops of biodiesel for lubrication. The stirrer is a length of 6mm steel rod with a slot cut in the end and a piece of flat steel brazed into the slot, cut to size so it fits through the larger of the two HDPE container lids.
Cut a square hole in the lid the exact size and shape of the bush; cut another hole in the lid insert. Saw two shallow grooves on all four side of the bush, immediately above and below where it will fit the lid. Push the bush into the hole in the lid; push the insert into the lid around the bush. Secure with epoxy resin -- push the resin firmly into the grooves to hold the bush in position. Some silicon round the seams helps.
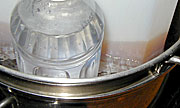
Heat up the oil in a saucepan on the gas cooker and pour it into the mini-processor.
Slide the business end of the stirrer inside the processor and slide the bush in the lid over the other end; screw the lid on firmly. Fill the two half-litre PET bottles with water at or above the processing temperature. Put the processor into the spaghetti cooker; wedge in position with a PET bottle on either side. Add hot water to the cooker to just below the height of the oil -- as much water as it will take before the processor begins to float. Use the gas flame to adjust the water temperature to the processing temperature, then turn off the gas.
Attach the drill to the stand, tighten the stirrer in the chuck, switch on and start stirring.
Adding the methoxide
See Methoxide the easy way.
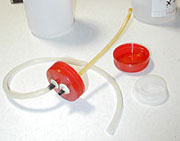
We mix methoxide for test batches in HDPE chemical bottles, which have a strong lid and a bung. Drill two holes in a lid and fit two short sections of plastic or 1/8" (4mm) copper piping, fix on both sides with strong epoxy resin. To one, on the inside, fix a length of rigid 1/4 (6mm) plastic tubing that will reach almost to the bottom of the bottle. To the other, on the outside, fit a length of flexible 1/4 plastic tubing. Fit a third section of copper piping to the small lid of the processor.
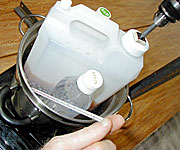
To add the methoxide, remove the lid and bung from the bottle of pre-mixed (cool) methoxide and screw on the transfer lid tightly.Fit the other end of the length of flexible 1/4 plastic tubing to the inlet pipe in the small lid of the processor. Now, carefully, lift the methoxide bottle above the processor and turn it upside down. Air goes into the open pipe to the bottom (now the top) of the bottle, methoxide drains out of the second pipe through the processor lid into the oil to be mixed.
When all the methoxide has drained, turn the bottle right way up and put it down on the table beside the processor. Any stray methanol fumes that don't condense inside the processor will vent into the methoxide bottle and condense there.
Monitor the temperature with a thermometer, turning on the heat when necessary -- this is quite safe, even with gas, as is running the drill motor, as no methanol fumes escape during processing. The temperature only needs adjustment twice in an hour at normal room temperature. The HDPE container is translucent rather than fully transparent but it's clear enough to see the reaction going on inside, and the changing colour and viscosity of the oil.
When the process is finished, disconnect the drill, remove the container and stand it on its side to settle, small lid down; later, to drain off the by-product, simply tip it up, hold it over a container and loosen the small lid, tightening again when you hit the yellow biodiesel.
Biodiesel processors
Introduction
Scaling up
Hazards
Test-batch mini-processor
Simple 5-gallon processor
Journey to Forever 90-litre processor
The 'Deepthort 100B' Batch Reactor
Ian's vacuum biodiesel processor
Chuck Ranum's biodiesel processor
"Foolproof" method processors
The touchless processor
Joe Street's processor
Continuous reactors
How to make a cone-bottomed processor
Biodiesel technology
Biofuels at Journey to Forever
Biofuels
En español -- Biocombustibles, biodiesel
Biofuels Library
Biofuels supplies and suppliers
Biodiesel
Make your own biodiesel
Mike Pelly's recipe
Two-stage biodiesel process
FOOLPROOF biodiesel process
Biodiesel processors
Biodiesel in Hong Kong
Nitrogen Oxide emissions
Glycerine
Biodiesel resources on the Web
Do diesels have a future?
Vegetable oil yields and characteristics
Washing
Biodiesel and your vehicle
Food or fuel?
Straight vegetable oil as diesel fuel
Ethanol
Ethanol resources on the Web
Is ethanol energy-efficient?

Community development | Rural development
City farms | Organic gardening | Composting | Small farms | Biofuel | Solar box cookers
Trees, soil and water | Seeds of the world | Appropriate technology | Project vehicles
Home | What people are saying about us | About Handmade Projects
Projects | Internet | Schools projects | Sitemap | Site Search | Donations | Contact us
![]()
© Copyright of all original material on this website is the property of Keith Addison, unless otherwise stated. It may not be copied or distributed without the explicit permission of the copyright holder. All material is provided "as is" without guarantees or warranty of any kind, either expressed or implied.