 Simple 5-gallon processorSimple 5-gallon processor
Spanish version -- Versión en español
Use it once a week and this 5-gallon (20-litre) processor will make you 200 gallons of quality biodiesel a year. We made hundreds of gallons with it before scaling up to bigger batches, and we still use it for small batches and demonstrations. Like our test-batch processor, it's easy to make from not very much, mostly scrap and junk.
It's effective and safe, closed and air-tight, with no splashing or leaking of hot fumes. It's suitable for single-stage or two-stage processes. And you can take it anywhere.
The big oil companies do have their uses... but we prefer their nice oil cans when they're empty. And free.
The only thing that cost money was the immersion heater, which we already had. This one is 1.5 kw, more than enough -- probably a 500-watt unit would do. You could fit a thermostat or a rheostat (better) to maintain constant heat, but we didn't bother -- we found you only need to switch it on for a couple of minutes once or at most twice during the process, easy enough.
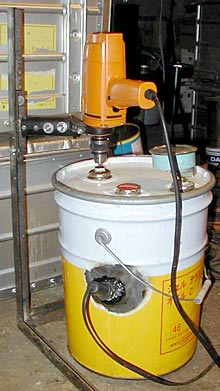
There's no need to follow this prescription exactly -- use what's to hand, improvise. For instance, if you don't have a welder or can't make a steel stand, make a stand out of bits of wood bolted together and grip the drill in a portable vice clamped to the vertical. Steel can also be drilled and bolted together. You could also use a small pump instead of the drill. And so on.Materials
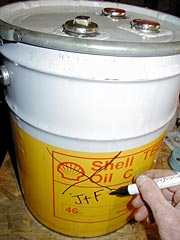
- 5-gallon (20-litre) oil drum, with a clamp-on steel "cinch ring" rim to secure the top (in the US, they're available from army surplus)
- immersion heater
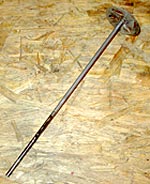
- electric drill (this one was discarded junk, it works perfectly)
- drill stand -- welded together from scrap 1-1/4" (3cm) angle iron (or similar) -- or a proper drill stand, if you're lucky enough to have one
- temperature gauge (this one also came from a junk yard)
- paint stirrer to fit the drill
- female threaded fitting for the immersion heater
- Teflon plumbing tape (to seal the immersion heater fitting)
- 3/4" hardwood -- just a small piece, for the stirrer bush
- two 1-gallon (4-litre) oil cans
- 2- or 3-gallon container made of tough HDPE with two lids, for the methoxide
- aquarium air pump (this one was also junk -- Japanese junk is wonderful/appalling!)
- length of braided 1/2" vinyl hose
- length of 1/4 plastic tubing for the aquarium pump
- short length of 1/8" (4mm) copper piping
- tough epoxy resin
- silicon
Cost -- little or nothing, depending on what you can salvage, scavenge or scrounge, but even if you buy everything you'll soon get your money back in saved fuel costs.
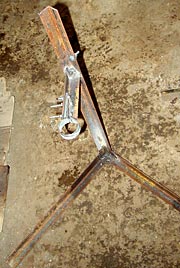
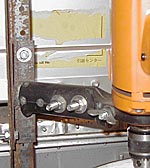
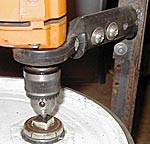
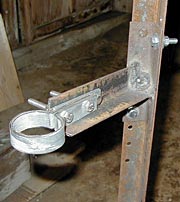
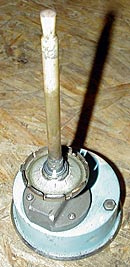
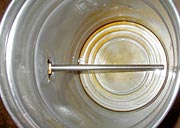
The drill stand
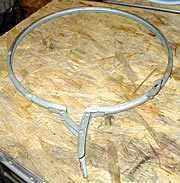
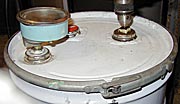
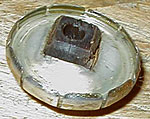
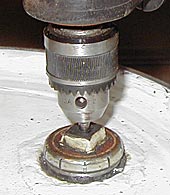
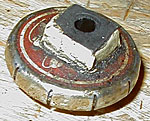
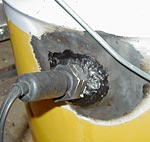
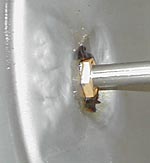
The drill stand is rigged from scrap 1-1/4" (3cm) angle iron and welded together, but it could just as easily be bolted (add 45-degree struts for strength). We made two of them. The one in action with the processor uses the tough plastic grip that came with the drill (see below). We used a plug spanner to hold it in place, but any steel piping that fits snugly into the handle will do. Secure with two bolts, extra holes in the plug spanner/piping mean you can move the drill in and out from the stand. The plug spanner is welded to a 5" (13cm) piece of angle iron that's bolted to the inside of the stand upright -- one bolt on one side at the top, another on the other side at the bottom. Drill extra holes in the stand upright so the height of the drill can be adjusted.Above and above right: Plastic drill grip adapted to the drill stand -- it's bolted to a length of steel piping (a plug spanner) that's welded to a short length of angle iron bolted to the stand's upright. The cinch ring A clamp-on steel "cinch ring" rim secures the top. Replace the silicon seal inside the rim of the lid with fresh silicon if needed. Apply the silicon and leave overnight until it's dry but still soft. Place the lid in position on top of the processor and clamp the cinch ring in place: under pressure the silicon will take the right shape and form a perfect seal. Leave for a day. The clip-on cap in the top of the processor is fitted with a wooden bush cut from hardwood with a 6mm hole drilled through it to take the stirrer shaft. Make it a tight-fitting hole, then heat a piece of the same steel rod as the stirrer and push it carefully through the hole -- not too hot, just enough to scorch the surface of the wood inside the hole, not char it. Add a few drops of biodiesel for lubrication. Stirrer bush These clip-on oil can caps fit well, they're strong and air-tight. Cut a square hole in the cap the same size as the wooden bush. Saw two shallow grooves on all four side of the bush, immediately above and below where it will fit the cap. Plug the bush into the square hole. Secure on both sides with strong epoxy resin. Push the resin firmly into the grooves. When dry cover the resin with silicon. Cut a hole in the inside plastic seal so that it fits snugly around the bush. In action, the bush is immediately lubricated by splash oil, and the fit is tight enough to prevent fumes escaping from the processor. The bush should last quite a long time, when it starts to get worn it is easily replaced. Extra lids
The 5-gallon oil can top comes with a single lid. We added two more. Cut the lids from the two 1-gallon (4-litre) oil cans, leaving about half an inch of metal all around the lid. Cut two holes in the 5-gallon oil can top, slightly bigger than the lids. Fasten the new lids in place in the top with pop rivets or self-threading screws: fit the new lids from the underside; sandwich a thin layer of epoxy resin between the upper surface of the metal around the lid and the under surface of the top around the hole; seal both sides with silicon.Fitting the heater
The heater is not only more powerful than necessary, it's also too long to fit across the 5-gallon can. So we put it in at an angle -- it starts at about two-thirds the height of the can and angles down towards the bottom of the opposite side, fitting nicely. This meant making an angled hole for the fitting -- save yourself the trouble, get a heater that fits! The fitting is silver-soldered in place and sealed with epoxy putty. It's strong and it doesn't leak.The immersion heater element must always be completely immersed -- any uncovered portion could overheat and cause a fire. The temperature gauge is fitted to a clip-on oil can cap in similar fashion to the stirrer bush. Adding the methoxide
See Methoxide the easy way. You can use the easy method with HDPE carboys or similar containers with screw-on caps (preferably with bungs as well). First add the methanol, then gradually add the lye. Swirl it about from side to side rather than shaking it up and down. Don't use it until all the lye is thoroughly dissolved. If you use a white translucent HDPE container you can see any undissolved lye at the bottom of the container.
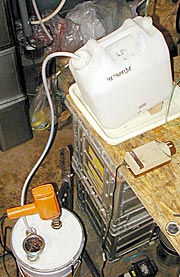
For the 5-gallon processor we use a 3-gallon HDPE container with two screw-on caps and an aquarium air-pump to transfer the mixed methoxide to the reactor vessel via a hose, with no exposure at all. Clean, safe and simple. We transfer the methanol to the HDPE container the same way.
The braided 1/2" vinyl hose goes through a tight-fitting hole in the larger cap, sealed with epoxy resin on both sides, and down to the bottom of the container. The other end fits through a hole in a clip-on oilcan cap, also sealed both sides with epoxy resin. This fits the third lid in the processor top.
The smaller cap on the HDPE container has a 1-1/2" (4cm) length of 1/8" (4mm) copper piping set into it to fit the other end of 1/4 plastic tubing from the aquarium pump.
When the pump is switched on (with the processor running) air fills the HDPE container, forcing the methoxide up the 1/2" hose and down into the processor. Once it starts flowing a syphon action takes over and the pump doesn't have to do much. It takes about two minutes.
Using the processor
Use about 15 litres (4 US gallons) of WVO -- this leaves enough room for the methanol with some space on top. If electricity is expensive for you, pre-heat the WVO in a separate container with a propane burner (we use a 20-litre stainless steel soup pot) and just use the electric element to maintain the heat. Insulating the whole processor with several layers of bubble-wrap keeps the heat in and saves on heating costs.
If you do use the immersion heater to heat the oil, stir while heating to ensure that the oil doesn't get burned.
The 5-gallon processor doesn't have a bottom drain, and doesn't really need one -- 4-5 gallons isn't heavy, instead of draining the settled glycerine by-product and then the biodiesel from the bottom, it's easy enough to pour the biodiesel off from the top into another container (another 5-gallon oil can). It might also be better -- the biodiesel doesn't take in any residual by-product still sticking to the sides, which it might do if bottom-draining. Also, the "girth rib" about an inch from the top makes top draining quite precise -- pour slowly as you get down towards the by-product, the first bit of by-product gathers in the rib and the remaining biodiesel flows over it. You can get nearly all the biodiesel out this way without any by-product coming with it.
There's no exposure to methanol fumes doing it this way unless the weather's really hot. At normal room temperature the excess methanol doesn't fume, vapour isn't a problem. If you're worried about it, make another clip-on lid assembly, like the one shown for transferring the methoxide, with only a short stub of piping inside the lid, just enough to secure it tightly; use translucent hose and pour the biodiesel out via the hose. The other end of the hose can be fixed to another clip-on cap fitted to whatever you're pouring it into. You'll see the dark glycerine by-product starting to enter the pipe and be able to stop pouring in time. Pour the rest -- glycerine by-product and some residual biodiesel -- into a by-product holding tank with a bottom drain and a tight lid. When it's nearly full drain off the glycerine and add the biodiesel floating on top to the next wash.
Biodiesel processors
Introduction
Scaling up
Hazards
Test-batch mini-processor
Simple 5-gallon processor
Journey to Forever 90-litre processor
The 'Deepthort 100B' Batch Reactor
Ian's vacuum biodiesel processor
Chuck Ranum's biodiesel processor
"Foolproof" method processors
The touchless processor
Joe Street's processor
Continuous reactors
How to make a cone-bottomed processor
Biodiesel technology
Biofuels at Journey to Forever
Biofuels
En español -- Biocombustibles, biodiesel
Biofuels Library
Biofuels supplies and suppliers
Biodiesel
Make your own biodiesel
Mike Pelly's recipe
Two-stage biodiesel process
FOOLPROOF biodiesel process
Biodiesel processors
Biodiesel in Hong Kong
Nitrogen Oxide emissions
Glycerine
Biodiesel resources on the Web
Do diesels have a future?
Vegetable oil yields and characteristics
Washing
Biodiesel and your vehicle
Food or fuel?
Straight vegetable oil as diesel fuel
Ethanol
Ethanol resources on the Web
Is ethanol energy-efficient?

Community development | Rural development
City farms | Organic gardening | Composting | Small farms | Biofuel | Solar box cookers
Trees, soil and water | Seeds of the world | Appropriate technology | Project vehicles
Home | What people are saying about us | About Handmade Projects
Projects | Internet | Schools projects | Sitemap | Site Search | Donations | Contact us
![]()
© Copyright of all original material on this website is the property of Keith Addison, unless otherwise stated. It may not be copied or distributed without the explicit permission of the copyright holder. All material is provided "as is" without guarantees or warranty of any kind, either expressed or implied.