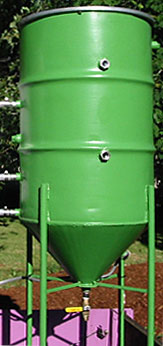
Mike Pelly's cone-bottomed 55-gal drum reactor
|
Spanish version -- Versión en español
Spreadsheet for calculating cone-bottomed tank dimensions
Maybe the best thing (the only good thing?) about fossil-fuel petroleum is that it comes in 55-gallon oil drums, which duly become empty, and magically transform themselves into the worldwide mainstay of appropriate technology and do-it-yourself tinkering. And of backyard biodiesel-making -- the perfect mixing vessel.
Well, almost perfect. They need a bottom drain, and for perfection the drain should be at the end of a cone, replacing the flat bottom of the drum.
Here's how to make a cone bottom for your 55-gal oil drum biodiesel mixer.
You need cutting gear to cut out the drum bottom and cut the cone to shape from a piece of flat steel sheeting, and welding equipment to join up the cone and weld it to the bottom edge of the drum.
The problems tend to arise when drawing out the shape of the cone-to-be on flat steel. Trial-and-error doesn't work very well, usually leading to a lot of annoying grinding to make it fit, or a botched job, wasted steel and wasted time and effort. This is how to get it right.
You'll also need a calculator and a big compass.
If you don't have a compass big enough to draw the circle you'll need, you can improvise one from a steel nail, a felt-tip marker pen and some cord that won't stretch, or better, thin wire. Coil the wire tightly round the nail at one end and round the pen at the other, close to the point in both cases, with the length of wire between them equal to the radius of the circle you're going to draw. Take some trouble trying to get it precisely the right length -- holding it all in place then turning the pen so that you coil a little more or a little less wire round it works well. Make a little dent with a centre-punch in the centre of the steel sheeting for the point of the nail, then carefully draw your circle, holding both pen and nail firmly vertical.
Use 16- or 18-gauge flat steel for the cone. A 3/4", 7/8" or 1" valve will be fine.

(Drawing not to scale.)
You can adapt this method to any size of drum just by changing the measurements and calculating accordingly.
The outer-edge diameter of a standard 55-gallon drum is 22-3/4 inches -- check it, this is the critical measurement.
How deep do you want your cone? The deeper the better, because the deeper it is the steeper will be the sides, and the better it will drain. If it's 12" deep, the sides of the cone will have a slope of just over 45 degrees, not very steep. At 15" deep the slope is about 52 degrees, steeper. But deeper and steeper also means the whole contraption will be higher. The drum is nearly 3ft high, plus 15" for the cone, plus another couple of inches for the valve, a couple more for a hose connection, and you need enough space to put a bucket underneath -- another 12" at least... that's 65" already, up to your chin if you're a six-footer.
So we've taken a 12"-deep cone as an example. That's the second critical measurement.
In the diagram, "r" is the radius of the oil drum bottom, measured to the outer edge -- that's half the diameter, 22.75 ÷ 2 = 11.375".
h = 12" -- "h" is the height (depth) of the cone.
sh = 16.535" -- "sh" is the "slant height" of the cone, the length of the sloping side.
You calculate this by Pythagoras's theorem, which states that the square on the hypotenuse of a right-angled triangle is equal to the sum of the squares on the other two sides.
If you're among the math-challenged, relax, it's easy -- your calculator will do the work for you.
The red triangle in the diagram is a right-angled triangle -- the angle between the two sides "r" and "h" is a right-angle, 90 degrees. The side opposite the right angle is "sh", the slant height of the cone, and that's the hypotenuse. To calculate its length, square the other two sides. That means multiply 12 x 12 = 144; multiply 11.375 x 11.375 = 129.390625. Add the two answers together: 144 + 129.390625 = 273.390625. That's the "sum of the squares on the other two sides", which equals the square on the hypotenuse. So the square root --  on the calculator -- of 273.390625 is the length of the hypotenuse: 273.390625 = 16.53452827. Shorten it to three decimal places (add one if the fourth figure is 5 or more) = 16.535". That's the slant height of your 12" deep cone -- the third critical measurement.
To make a cone all you have to do is draw a circle on something flat, cut a pie-slice out of it and join up the two straight edges. But if you want the bottom of the cone to fit something specific, and for it to be a particular height, you have to know how big to draw the circle, and how big to make the pie-slice.
The radius of the cone circle you have to draw is the same as the slant height of the cone -- sh, 16.535".
So now you know the size of the piece of flat steel sheeting you'll need: 16.535 x 2 = 33.07" square. So make it 3ft square.
Take a long rule, or anything with a straight edge that's long enough, and draw a line across the plate from one corner to the opposite corner, and a second line joining the other two corners. Where they cross is the centre of the plate. Draw your circle from that point, radius 16.535". Okay, so you can't measure .535" on your ruler. It comes to 17/32", but 9/16" will do; 5/8" will also do, or make it 16-11/16", which will give you a small margin of error.
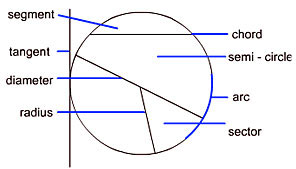
Parts of a circle
|
Now you need to know how big to make the pie-slice cut-out.
The edge of the cone must fit the drum. So the cone circle minus the pie-slice must match the circumference of the outer edge of the bottom of the drum. Circumference = diameter x pie -- that's  on your calculator, or just multiply by 22 and divide the answer by 7.
The diameter of the drum is 22.75", circumference is 22.75 x = 71.5".
The diameter of the cone circle is 16.535 x 2 = 33.07, circumference is 33.07 x = 103.934".
The arc (a section of the circumference) of the cut-out pie-slice sector is 103.934 - 71.5 = 32.434".
Now you need to know the angle of the cut-out sector so you can measure it off with a protractor. Divide the arc by the circumference and multiply by 360: 32.434 ÷ 103.934 x 360 = 112.34 degrees. Make it 112-1/3 degrees.
Now you can draw in your pie-slice that you're going to cut out. Here's a protractor you can print out if you don't have one.
Useful to know: the volume of a cone is 1/3r2h. For a 12" cone on a 55-gal drum, that's 7 gallons (US).
Two more things to consider: first, you might want to leave a tab for some overlap when welding the two edges of the cone together, as marked by the dotted line on one edge of the pie-slice in the diagram.
Second, you might want to pre-cut a hole for the valve, as in the diagram. Or just saw off the point of the cone at the right height after it's assembled. Depending on what kind of valve you get, you'll either weld the valve on direct, or it will screw onto a short length of steel pipe, and you'll weld the steel pipe on. Whichever, stand the valve or pipe on top of the cone, straight up, and draw a line under it around the top of the cone where you'll make the cut. Make sure the hole is narrower than the outside diameter of the pipe/valve so you'll have something to weld it onto.
If you'd rather pre-cut the hole, measure the ID (inside diameter) of the pipe or valve, add half the thickness of the pipe or valve wall. Say the answer is 7/8". All the angles are the same as for calculating the cone, so you can do it proportionately: 7/8" is the diameter of the hole, divide by 2 for the radius: 7/16 = 0.4375. It's the slant height you want: 16.535 x 0.4375 ÷ 11.375 = 0.636", which is slightly more than 5/8", so make it 5/8". Draw the circle for the pre-cut hole for the valve with a radius of 5/8".
Before you start cutting and welding, double-check all your calculations and measurements. When you're satisfied, make your cuts, then weld it all up and you're done. You'll find it a lot easier to bend the cone evenly to shape if you use a roller of some kind. This is actually a good reason for pre-cutting the valve hole because the roller can fit through the hole while you're rolling it. Try a piece of 7/8" steel waterpipe about two feet long or more.
You'll also need a stand for it. Steel piping or angle iron will do, four legs, firmly welded to the sides of the oil drum and joined by cross-struts just above the level of the valve. Make it strong -- a full processor will weigh more than 400 lbs.
A useful refinement is a sight-tube, leading from near the bottom of the cone vertically up the side to near the top of the drum. Use translucent PEX tubing (crosslinked polyethylene) or high-density polyethylene (HDPE), thin-walled for better visibility, both of which are heat- and chemical-resistant; 1/2" or more ID, preferably more. Get right-angled plumbing fittings, drill holes for them and weld them in. Use strong stainless-steel gem clips to connect the hose to the fittings, a good idea to use two clips at each end, with heat- and chemical-proof silicon sealer as a gasket compound.
Peter Scales sent us this Excel spreadsheet for calculating cone-bottomed tank dimensions. Just enter the diameter of the tank base, the desired depth (height) of the cone, and the O.D. of the bottom hole if required, and you're given all the measurements you need to construct the cone.
Biodiesel processors
Introduction
Scaling up
Hazards
Test-batch mini-processor
Simple 5-gallon processor
Journey to Forever 90-litre processor
The 'Deepthort 100B' Batch Reactor
Ian's vacuum biodiesel processor
Chuck Ranum's biodiesel processor
"Foolproof" method processors
The touchless processor
Joe Street's processor
Continuous reactors
How to make a cone-bottomed processor
Biodiesel technology
Biofuels at Journey to Forever
Biofuels
En español -- Biocombustibles, biodiesel
Biofuels Library
Biofuels supplies and suppliers
Biodiesel
Make your own biodiesel
Mike Pelly's recipe
Two-stage biodiesel process
FOOLPROOF biodiesel process
Biodiesel processors
Biodiesel in Hong Kong
Nitrogen Oxide emissions
Glycerine
Biodiesel resources on the Web
Do diesels have a future?
Vegetable oil yields and characteristics
Washing
Biodiesel and your vehicle
Food or fuel?
Straight vegetable oil as diesel fuel
Ethanol
Ethanol resources on the Web
Is ethanol energy-efficient?