10 Building an Inner Tube Digester
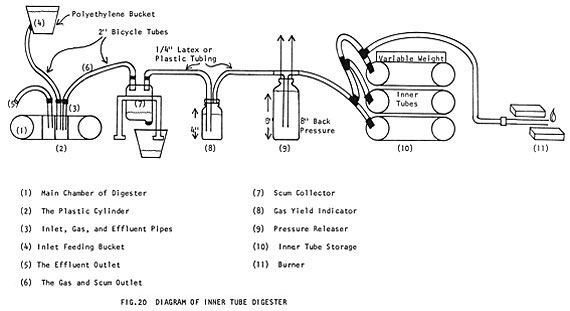
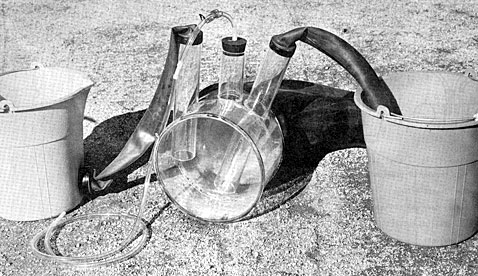
Fig. 21 Attachment of pipes and buckets
Fig. 21 Attachment of pipes and buckets
I hope that in these times of ever increasing pressures in the energy crisis, that this inner tube unit will be made available to the millions on millions of people around the world who could benefit from it. To those on the land eking out an existence, I dedicate this unit. As a morsel of technology, it might well benefit them more than a man standing on the moon.
-- L. John Fry
Inner Tube Digester Parts List
1. Main Chamber of the Digester
2. The Plastic Insert
A. The Plastic Cylinder
B. The Inlet, Gas and Effluent Pipes
-- Inlet Pipe
-- Gas Outlet Pipe
-- Effluent Pipe
3. Attaching the Cylinder to the Inner Tube
4. Inlet Fittings and Attachment of the Slurry (Feeding) Bucket
-- Attachment of Bucket
5. Fitting the Effluent Pipe
6. Fitting the Gas Outlet
7. The Scum Collector
-- Gas Outlet Continuation
8. Gas Yield Indicator
9. Pressure Release Bottle
10. Inner Tube Storage
11. Burner
12. Temperature
13. The Bacterial Brew
14. Feeding
15. Removing Scum and Effluent
A. Scum
B. Effluent
16. Safety Precautions
-- Precautions In Gas Usage
17. Lighting the Flame
18. pH
The following inner tube unit was made at a cost of about $20. If it could be produced in quantity, the cost might be as low as $2 using cheaper material.
The unit has no working parts and should last the normal life of the materials used.
This inner tube digester has been tested out in Santa Barbara for over 18 months, during which all the "bugs" have been eliminated. It is a thoroughly reliable device.
NOTE: Read "Safety Precautions" (#16 below) and "Starting The Bacterial Brew" (Sump Digester) before beginning construction.
Inner Tube Digester Parts List
- Truck or tractor sized inner tube
- Plexiglass (1/8" thick) 7" x 28" (or circumference of inner tube). Plexiglass 10" x 10".
- Methyl chloride liquid (hobby shop)
- Plexiglass tubes (2" x 3')
- 2 x 2-inch diameter bicycle inner tubes
- Polyvinylchloride (PVC) tape
- 3 x 5-gallon polyethylene buckets
- 5-gallon container -- metal or plastic -- for scum collector
- Epoxy resin
- Rubber sealing compound
- Rubber cement
- Wire
- Pipe adapter (kind that goes from steel to plastic)
- 1/4" rubber or latex hose
- 1 gallon jug with cork with two 1/4-inch holes
- Bottle
- T pieces
- Truck inner tubes (storage)
- Screw type pinch clamp.
1. Main Chamber of the Digester
This consists of a discarded truck-sized (or better still, a tractor-sized) inner tube.
- Test carefully for leaks. (Bear in mind that every part going into the digester should be carefully tested for leaks. Any gas escaping, out of even a pinhole, is a potential cause of explosion.)
- Patch over, if necessary. If there is a large gash or hole, cut that portion completely out of the tube.
- Make a clean cut at right angles to the long circumference of the tube. This is where the plastic cylinder will be inserted (Fig. 21).
- Thoroughly wash and dry the inside of the tube. The inner tube is now ready for the plastic insert.
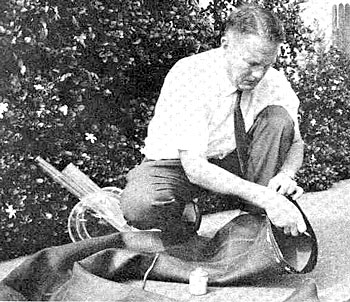
Fig. 22: Preparation of the inner tube
2. The Plastic Insert
A. The Plastic Cylinder
- Heat a 1/8" thick x 7" wide x about 28" long (length should be the circumference around the opening of the inner tube, picture 2) piece of plexiglass in a 400°F (200°C) oven, until it will bend (about 5 minutes).
- Bend it around a saucepan or other cylindrical object which has the same circumference as your inner tube. Make the ends of the plexiglass meet to form a cylinder.
- Glue the ends together by generously applying methyl-chloride glue. The glue can be made by melting some acrylic scraps in methyl-chloride.
- Cut a round flat piece of plexiglass to fit inside the cylinder, and glue this plate with methyl-chloride glue midway inside the cylinder (Fig. 23, 24). This will make a central dividing wall to keep the manure from circling around and around the inner tube.
- The lip. Heat a 1/4" x 29" strip in a 400°F (200°C) oven for 5 or 10 minutes. Wrap around the outside edge of the plastic cylinder to form a rim. (This will help keep the inner tube from sliding off the cylinder.) Hold the hot plastic strip in place with clothespins until cold. Eyedrop straight methyl-chloride between the two surfaces. Keep the clothespins on until surfaces are securely stuck together. Repeat for other cylinder edge.
B. The Inlet, Gas and Effluent Pipes
These are constructed of 2" diameter, heavy-duty plexiglass tubes. The inlet pipe will be inserted on one side of the central dividing wall of the cylinder and the gas and effluent tubes on the other side, as follows (Fig. 23, 24).
1. Make three 2" diameter holes, one on one side of the center divider, two on the other side (Fig. 23, 24). Exact placement is not important, but must be so close to the baffle as to touch it and in the general area shown in Fig. 24. Apply a little glue at the touching point for added strength. Allow at least 1" between the tubes to the lip of the cylinder (Fig. 23). We made the holes by burning around the outside edge of the hole with a simple soldering iron. A FRET saw would do a better job.
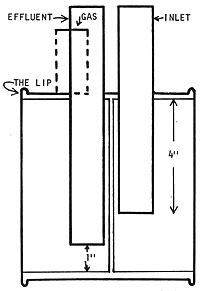
Fig. 23 Cross section of the plastic insert
Inlet Pipe:
2. Ream out the inlet pipe hole to allow the inlet pipe to go in at a slight angle (Fig. 24). This angle helps the mixing in the inner tube, by tending to make the incoming raw slurry revolve in the tube.
3. Insert the pipe in at an angle, 4" down into the cylinder (Fig. 23). The distance the pipe sticks out the top of the cylinder is not important.
4. To eliminate leaks, seal the seam around the pipe and hole with: (1) a layer of melted plexiglass and methyl-chloride and then (2) a layer of rubber sealing compound available in hardware stores.
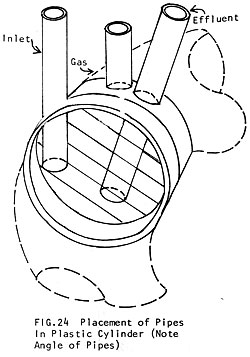
Gas Outlet Pipe:
5. This pipe is glued to the top of the cylinder (Fig. 23). Again, the length of the pipe sticking out the top of the cylinder should be about 6 inches. Length in Fig. 23 is about right.
6. Seal as above.
Effluent Pipe:
7. Insert the effluent pipe straight down into the cylinder to 1" from the bottom. (Fig. 23.) Again 6" above top.
8. Seal seams as above. Where the inlet and outlet pipes touch the center baffle, apply a little glue to give added strength to them, as mentioned above.
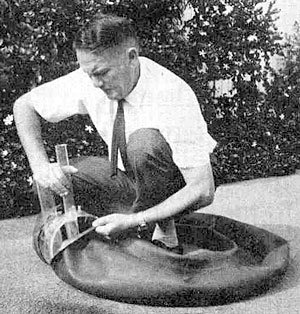
Fig. 25 Placing the cylinder in the inner tube
3. Attaching the Cylinder to the Inner Tube
- Paint the inside of each open end of the inner tube to a depth of about 2" with any kind of rubber cement (Fig. 22).
- Insert the cylinder into the inner tube, past the lip, to a distance far enough to ensure a good seal (Fig. 25).
- Tape in place with polyvinylchloride (PVC) tape to hold cylinder and inner tube securely in position (Fig. 26).
- Then wind wire twice around on the tape. Twist the ends of the wire to make a very tight hold. (The wire and the tape are never removed.)
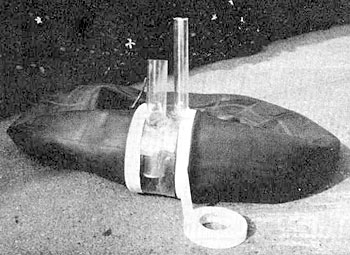
Fig. 26 Fastening tube to plexiglass cylinder
4. Inlet Fittings and Attachment of the Slurry (Feeding) Bucket
1. Cut a 2" diameter balloon bicycle inner tube to a length of about 3', after checking for leaks.
2. Place it on the inlet pipe (Fig. 21).
3. Tape with PVC tape which is adhesive on one side only, by stretching the tape very tightly around the pipe and inner tube. Make sure it is taped firmly.
Attachment of Bucket:
4. Burn a hole in the polyethylene slurry bucket, 1" from the bottom of the bucket. (Fig. 20 and 22.) When the hose is attached to this hole off the bottom, it will allow sand, feathers and other heavy indigestible material to settle to the bottom of the bucket and be left behind when feeding the slurry to the digester.
5. Attach an adapter in the hole of the type used to go between steel and plastic pipe.
6. Attach a length of 2" bicycle inner tube to the adapter in the slurry bucket with PVC tape. The tube should be long enough to allow the bucket to be held up for gravity feeding the slurry into the digester (Fig. 20).
5. Fitting the Effluent Pipe
- Simply tape another length of 2" bicycle inner tube to the effluent pipe (Fig. 21) .
- Hang the tube in a bucket.
6. Fitting the Gas Outlet
- Attach a 2' or 3' length of the 2" bicycle tire tubing to the gas outlet with PVC tape.
- Lead it to the scum collector.
7. The Scum Collector
If you remember, scum is a mixture of (1) floating material (bedding, straw, feathers, etc.) and (2) liquid interspersed with (3) gas bubbles. Scum rises up with the gas out of the gas outlet. Scum formation is a major problem in any sized digester. On this scale, though, it is simple to eliminate.
1. Select a metal or firm polyethylene container with at least a 2" wide filler cap. We used a 5 gallon, plastic milk container. It is much easier to attach the pipes to a metal container, though.
2. Turn the container upside-down (filler cap underneath) and make a 2" hole in the top. Solder or weld a short length of 2" wide metal pipe to the top (this was the bottom of the container originally) (Fig. 27).
3. Firmly tape the inner tube coming from the gas outlet to the short length of pipe. Scum will be forced through the gas outlet, through the cycle tube and drop in the container. Gas will continue on its way to storage via:
Gas Outlet Continuation:
4. Solder or weld a second pipe at another point on the top of the container. The hole should be 1/4" in diameter (Fig. 27).
5. Tape a length of 1/4" rubber or latex hose to the 1/4" pipe. This will go to the gas yield indicator bottle (Fig. 20).
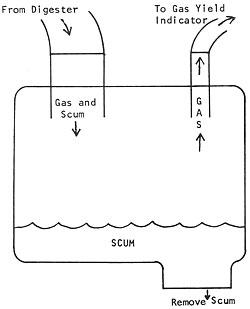
Fig. 27 Scum collector
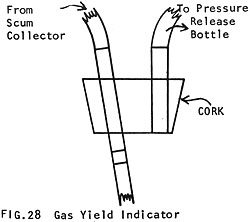
8. Gas Yield Indicator
This is a jug of water, through which the gas from the digester bubbles. It is a nice way to see that your digester is producing gas. (Also, if the water is changed frequently, it will filter out some of the carbon dioxide in the gas.)
- Take a 1 gallon jug and place a cork with two 1/4" holes in the bottle's mouth (Fig. 28).
- Place between the scum accumulator and pressure release bottle (Fig. 20).
- Fill the jug with about 6" of water.
- Run the hose from the scum accumulator, through one cork hole and to 4" below the level of water in the bottle.
- Run another piece of 1/4" rubber or latex tubing out of the other cork hole, to the pressure release (overflow) bottle.
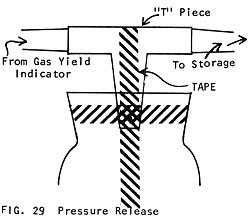
9. Pressure Release Bottle
This bottle is placed between the gas yield indicator and inner tube storage (Fig. 20). It allows the release of extra pressure in the inner tube storage, or overflow of gas to escape through the water in the bottle, rise to the atmosphere, and disperse harmlessly.
- A 12" or so deep bottle is fitted with a "T" piece (Fig. 29).
- The tubing from the gas yield indicator is attached to one arm of the "T" and a tubing to storage is attached to the other arm.
- A plastic tubing is attached to the leg of the "T" piece and immersed in 8" of water.
- In the event that the gas pressure is more than 8" water gauge, the gas will escape through the water, to the atmosphere.
10. Inner Tube Storage
- Gas can be stored in one or a number of truck inner tubes, stacked on each other and interconnected with "T" pieces (Fig. 20). Check for leaks and patch if necessary.
- A weight, such as pieces of lumber, are placed on the topmost tube to create pressure.
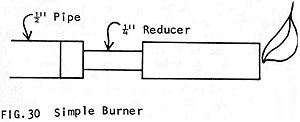
11. Burner
The gas produced by this digester is about 700 BTU per cubic foot at sea level (585 BTU at 6000 ft. altitude). The average daily production of this system is 5 cubic feet; enough to bring 1/2 gallon of water to the boil and keep it there 20 minutes. THIS IS ENOUGH TO COOK A MEAL.
- The simplest burner can be a piece of 1/2" metal pipe 18" to 2' long.
- Place on a reducer to 1/4"to fit the tubing from storage.
- Place some sort of on/off clamp on the tubing, plus a pinch screw to regulate the amount of gas (Fig. 30).
- The 1/2" pipe is laid between 2 bricks and a third brick is placed on the pipe to hold it in position.
12. Temperature
Methane bacteria only work their best when kept warm. The best temperature is 95°F (35°C). Without artificial heating the only areas in which a digester will function is in or near the tropics. Thus, without supplemental heat, this unit is limited to the tropics. Alternatively, if placed in an insulated box and heated by two 100 watt light bulbs in series (this takes very little electricity and the bulbs last a long time), with a thermostat set to 95°F in the circuit, it can be operated almost anywhere.
13. The Bacterial Brew
Add to Manure Contents (See 9 Building a Sump Digester -- Making Starter Brew)
14. Feeding
- The daily routine consists of collecting three 1-pound coffee cans full of dry chicken manure. (Almost any kind of manure is suitable, but to avoid excessive scum formation, a finer texture manure is better. Chicken or pig manure is probably the most suitable.)
- Stir in the slurry bucket with 3/4 gallon of water or urine to form a slurry. If you can use urine instead of water, it will aid fermentation and make the effluent a better fertilizer after digestion.
- Now raise the bucket high so that the slurry will gravity feed into the digester. It will mix with yesterday's load, which by now has been "seeded" with active, hungry bacteria. The inlet pipe (set at an angle) helps the mixing, by tending to make the incoming raw slurry revolve in the inner tube.
- Dispose of the feathers, fiber, sand, etc., left in the bottom of the bucket.
The action inside the digester is the same on any scale. The raw material, heavily seeded, tends to skulk along the floor of the digester but as the bacteria work on it, gas is formed and lightens it in relation to surrounding material. Vertical motion begins, throwing up chunks of dung and bubbles of gas. Each load displaces the last, around the circuit round the inner tube. At some stage each and every particle has to pass a point of maximum fermentation where the whole mass seethes and bubbles furiously. Up and down currents mix the contents thoroughly. From there the fermentation slows and stratification begins into the layers of gas, scum, supernatant and sludge... the spent portion of the original solids. Through digestion this sludge will have contracted considerably from the original raw state.
Failure of the bacterial "brew" will occur if excessive loads of manure are used. Keep to three 1-pound coffee cans daily. If not fed daily for one reason or another and the unit is left without "food" for a week for instance, start it up again with four and one-half coffee cans full the first day and continue as usual afterwards. Do not feed in back coffee cans full for each missed day (21 cans for 7 missed days).
A second reason of failure of the brew is an excess of water, particularly cold water.
15. Removing Scum and Effluent
A. Scum
1. When the scum collector container feels heavy, remove the filler cap from the bottom of the scum container and let the scum out.
2. Care must be taken that air is not allowed to enter the container at this point.
B. Effluent
3. Effluent is drawn off daily or so to the extent of approximately half of volume of daily input at feeding. The other half of daily input is accounted for as (1) gas and (2) contraction during fermentation.
4. The superior fertilizing value of the effluent is discussed elsewhere. This inner tube digester will produce enough to improve growth of plants on an area of 2,152 sq. ft. per year -- a good sized vegetable patch.
16. Safety Precautions
Precautions In Gas Usage
Gas will burn with a hot flame when ignited as it leaves the burner (in contact with air). But if gas and air are mixed together in proportions of 1 part in 4 to 1 in 14 and then ignited in a closed area or container, a violent explosion will ensue.
To avoid any possibility of explosion in this sized unit, the first time the digester produces enough gas to fill the pipes, scum accumulator and storage tanks, this gas should be allowed to disperse to the atmosphere. The second time it fills up will be relatively -- almost certainly -- safe to light. The flame is so clean and blue that it will be difficult to see in sunlight but clearly visible at night.
The second safety factor is to keep a positive (however slight) pressure of gas in the pipelines and storage, so that air is never drawn into any part of the unit. (Weights on the storage inner tubes, pressure on the main tube when emptying the scum, so the pipes won't collapse).
The third safety factor is to check the unit daily for leaks; there will be a discoloration of the tubing in places where the gas has leaked out.
Finally, smell is important in safety handling. Never light a match in a room with a strong smell of gas -- or even a slight smell. Air out the room first.
17. Lighting the Flame
A small gas flame can be lit at the open end, provided the gas flow is held low. If the flow is too strong, the flame will burn inches away from the open end and be difficult to control The adapter on the burner decreases the flow.
18. pH
To keep track of pH values, narrow range litmus paper with a range from 6.5 to 8.5 or 9 can be used to check effluent. In my experience of digesting animal manures, a healthy brew, working at top efficiency will have an effluent pH of around 8.5. This is in contrast to all published literature on digestion of sewage plant solids in which a working range of 7 to 7.6 is considered average. If it should drop to 7.6 or so in this unit, reduce feeding to miss the first day, then half feed until the pH of the effluent rises to 8 at least.
Should the pH drop as low as 7 or 7.2, add a cup of ammonia (the ordinary ammonia bought in a store) to the raw slurry at the next feed in. Reduce the feed in (or loading) slightly from then on.
When organic material decays it yields useful by-products. The kind of by-product depends on the conditions under which decay takes place. Decay can be aerobic (with oxygen) or anaerobic (without oxygen). Any kind of organic matter can be broken down either way, but the end products will be quite different (Fig. 1).
Next: 11 Necessity is the Mother of Invention
12 References
Back to Table of Contents
Back to the Biofuels Library
Back to the Small Farms Library
Biofuels
Biofuels Library
Biofuels supplies and suppliers
Biodiesel
Make your own biodiesel
Mike Pelly's recipe
Two-stage biodiesel process
FOOLPROOF biodiesel process
Biodiesel processors
Biodiesel in Hong Kong
Nitrogen Oxide emissions
Glycerine
Biodiesel resources on the Web
Do diesels have a future?
Vegetable oil yields and characteristics
Washing
Biodiesel and your vehicle
Food or fuel?
Straight vegetable oil as diesel fuel
Ethanol
Ethanol resources on the Web
Is ethanol energy-efficient?