9 Building a Sump Digester
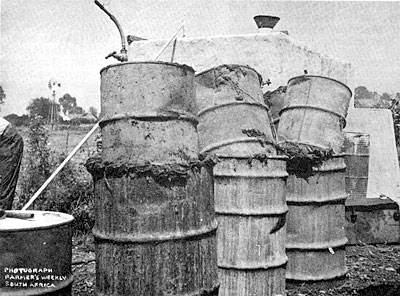
Fig. 18 Original sump digester. Upper drums have been forced up by methane
This is the simplest type of methane digester, since gas is stored in a cover floating over the digester. It can be made very cheaply and it demonstrates that manure does decompose anaerobically (without air), and that it generates a surprising amount of gas.
Sump digesters can be made of any two cylinders where one fits inside the other, such as drums, buckets, coffee cans, etc. The sump digester described below is made of a 30 gallon drum fitted into a 50 gallon drum.
Making Starter Brew
Before starting, read the Safety Precautions Warning (#11 below).
One of the first steps in the construction of any sized unit is the brewing up of a batch of starter material. (Unless you're lucky enough to have an operating digester in your area, from which you can get some bacteria.)
It takes weeks and even months to cultivate the strain of bacteria that functions best on the manure being used locally. Once you have your starter going, though, like a sourdough bread or yogurt culture, you can have it for a long time.
Starter brew can be generated in a 1 or 5 gallon glass bottle. Care must be taken to fill the bottle only about 1/4 full with either (a) active supernatant from a local sewage works or (b) the runoff from the low point on the land of any intensive stock farm in your district. Fill 1/4 more with fresh dung. Leave the other % of the bottle for fresh manure additions at weekly intervals. Never fill to near the screw cap, since foaming could block off the opening and burst the bottle. Of course, the screw cap must be left loose to keep the bottle from exploding, except when agitating the bottle. It is a pecularity of methane brews that a slight agitation when adding material is beneficial, but that continuous agitation has an adverse effect.
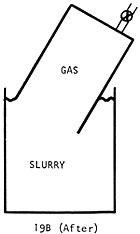
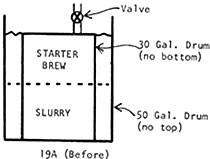
Fig. 19A & B: Sump digester before and after methane Production
1) Get two metal drums, one 30 gallon with an outlet on top and one 50 gallon. (Fig. 19a.)
2) Remove the top of the 50 gallon drum and the bottom of the 30 gallon drum.
3) Fit a valve into the small outlet in the top of the 30 gallon drum. Solder or weld it securely. This will be the gas outlet.
4) Firmly tape a hose to the outlet pipe with polyvinyl chloride tape (adhesive on one side only).
5) The hose can be led to an inner tube to be filled with gas for storage (10 Building an Inner Tube Digester, #10 Inner Tube Storage); or led directly to a simple burner (10 Building an Inner Tube Digester, #11 Burner).
6) The 50 gallon drum is ready to be filled. It should be filled only to the height of the 30 gallon drum with a mixture of half slurry and half starter "brew," Fig. 19a.
7) Make a slurry the thickness of cream by mixing fresh, raw manure with warm or hot water, 90-95°F (32-35°C).
8) To this, add an equal amount of starter "brew."
9) With the valve open, sink the 30 gallon drum all the way down into the slurry and starter mixture (Fig. 19). This must exclude all the air from the 30 gallon drum. Then close the valve.
10) In cool climates, active compost can be packed around the outer drum, to maintain a steady temperature of between 80° and 95°F (27-35°C). After about three weeks, gas should begin to generate. The smaller drum will fill slowly with gas and rise above the surface of the slurry (Fig. 18, 19b).
11) Safety Precautions: A Note of Warning. When the small drum rises the first time, do not attempt to burn the gas. Rather, let it escape to the atmosphere, push the 30 gallon gas holder completely down into the slurry again, shut off the valve and allow it to rise a second time. This is to insure that no air is mixed with the gas. A gas and air mixture is highly explosive between the range of 1 part in 4, to 1 in 14. Even outside this range it could be dangerous. Also, the first gas yield probably will not light anyway due to a high proportion of carbon dioxide when fermentation first starts. When burning the gas, open the valve only slightly, press down lightly on the 30 gallon drum to create a positive pressure on the gas. Close the valve before releasing the pressure. In rare cases there occurs an abundance of gray foamy bubbles at about the time when fermentation starts. If this happens leave the digester alone for a few days. Do not feed any raw material. If the digester is heated, reduce the heat.
12) Periodic supplies of fresh raw material should be "fed" in to keep the digestion going. This can vary from daily to once every three months depending on the requirements of the user and the digester design. To feed this digester it is necessary to remove the 30 gallon drum, take out about 5 gallons of material and replace it with fresh slurry. Again press down the small drum to exclude air.
Sump designs are particularly good units to learn from since they are so easy to build and maintain.
Next: 10 Building an Inner Tube Digester
12 References
Back to Table of Contents
Back to the Biofuels Library
Back to the Small Farms Library
Biofuels
Biofuels Library
Biofuels supplies and suppliers
Biodiesel
Make your own biodiesel
Mike Pelly's recipe
Two-stage biodiesel process
FOOLPROOF biodiesel process
Biodiesel processors
Biodiesel in Hong Kong
Nitrogen Oxide emissions
Glycerine
Biodiesel resources on the Web
Do diesels have a future?
Vegetable oil yields and characteristics
Washing
Biodiesel and your vehicle
Food or fuel?
Straight vegetable oil as diesel fuel
Ethanol
Ethanol resources on the Web
Is ethanol energy-efficient?