 Roger Sanders' Waste Oil Heater
Second Edition
 Roger Sanders has updated his popular improved version of the Mother Earth News waste oil heater with a great deal of new information and options.
This waste oil heater solves all the problems that made the original MEN version difficult to use. It can save you thousands of dollars in heating bills.
Roger's design is simple, reliable, easy to build and easy to use – it's quiet and uses no electricity – it has reliable oil flow and a wide heat range – it's easy to light and easy to clean.
"It is a practical design that you can use day in and day out for seriously heating your dwelling or workshop without costing you a lot of time and frustration," he says.
The Second Edition has far more detail and information, based on practical experience. It answers all the questions readers ask.
There are new sections on:
Construction
Theory of operation
Practical points of operation
Automation
Hot water and home heating
Wood stove conversions
Heating a greenhouse
Burning vegetable oil
And more – with complete DIY instructions, photographs, design drawings.
The Second Edition is available as a downloadable pdf e-book, price $22.50.
To download the book, CLICK HERE
Journey to Forever's forced-air heater
|
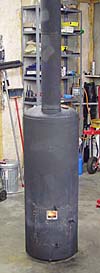
Bruce Woodford in Canada and a network of experimenters from several countries, including Journey to Forever in Japan, achieved much higher burner temperatures and clean combustion using electric blowers to provide a forced-air supply.
See Journey to Forever's forced-air biofuel heater (pictured right)
Says Bruce Woodford:
“Compared with the original Mother Earth News heater, we have come up with an even simpler design, a more efficient burner, much higher burn temperatures and far more heat output from the same amount of waste motor oil.
With all the modifications below, I have achieved stove-top temperatures of over 1,100 degrees F (593 deg C)!
I hope the following descriptions will be helpful.
Bigger image
A much simpler burner design
I use a 6" length of 6" diameter steel pipe (1/4" wall) (15.2 x 15.2mm, 6-7mm thick). A piece of 1/4" steel plate (6-7mm) is welded on the bottom so it is totally sealed.
We have tried a number of designs for "burner plates" or "igniters" which (once hot) vaporize and ignite the oil as it drips into the burner. Each design had one major drawback, i.e. the need for continual and time-consuming cleaning of ash buildup. We have concluded that some sort of ash buildup is an unavoidable consequence of burning waste oil, but a simple and time-saving solution is to use about 20 4" x 1/2" bolts (10cm x 13mm). Half of them are laid in the burner running parallel to each other (alternate the direction of the heads) and the other half are laid on top of the first at right angles to the first layer. Once the burner is running the bolts become red hot so the oil vaporizes and ignites instantly on contact.
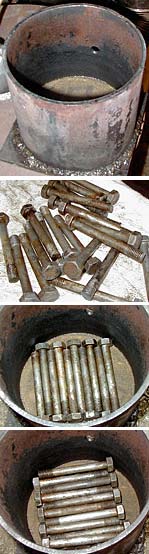 Cleaning is a very simple procedure: remove the burner from your heater/furnace and shake it up and down for about 30 seconds. The bolts tumble over each other and ash deposits are broken and knocked loosed. Then turn the burner over, dumping the bolts and dust into another container, replace the bolts in the burner and you are ready for another burn.
I have tried a number of designs with holes drilled in the sides of the burner so flames would radiate out from it, but have found that the flames coming from such holes are not nearly as hot and smoke-free as the flames shooting out the top (right where the air is forced in). I recommend that just one 1/2" hole (13mm) be drilled 3" (7.6cm) from the bottom of the burner to be used for initial lighting of the burner.
Your aim is a flame in your burner that is as bright and smoke-free as possible. Deep orange-colored flames are very smokey and will create lots of soot in your stove and stove pipes. Yellow flames are better and bright white flames are hotter and much cleaner.
We have also tried using square 6" pipe for the burner. Although I can't explain why, I have never been able to get a square pipe burner to burn nearly as hot as a round one. So I stick to round pipe.
Air supply
We have used a variety of blowers: blowers from high efficency gas furnaces, 12v blowers from cars, bathroom exhaust fans and a variety of squirrel cage blowers.
A "rule of thumb" to keep in mind when selecting a blower for your burner is this: Try to get a burner with the highest possible ratio between rpm and impeller diameter. A blower which runs at 3100 rpm and has a 6-1/2" (16.5cm) diameter impeller will have a 476:1 ratio of rpm to impeller diameter. A blower which runs at 1725 rpm and has a 5" diameter impeller will have a 373:1 ratio of rpm to impeller diameter. So if you have a choice, the first one would be better.
Another rule of thumb, for designing your air-supply line from the blower to the burner. Efficiency of your burner will decrease dramatically in proportion to any decrease or reduction of the air supply diameter from the diameter of the blower's designed output port. Use an air-supply pipe as close as possible to the size of your blower's designed output port. Improving this boosted my stove-top temperatures 300 degrees F, from 800 to 1100 degrees F (427 to 593 deg C)). That is too hot so I cut the oil supply way back and now get 800 degrees F on the stove top with much less oil.
I originally thought that the closer the air-supply pipe was to the point of combustion, the more efficient the burner would be. I discovered quite by accident that I was wrong! My burns kept getting hotter and hotter even though I was making no changes to the system. I discovered that the end of the air-supply pipe in the burner was slowly eroding away with the heat and the higher it got above the bottom of the burner the hotter the oil burned. So now the end of my air-supply pipe is 9-10" (23-25cm) above the bottom of the burner, 3-4" (8-10cm) above the top of the burner.
The air-supply is 1-1/2" steel pipe (3.8cm) which runs horizontally from the blower to the top of the stove, where it connects to a tee. A threaded plug is placed in the top of the tee and a second 1-1/2" pipe extends from the tee down into the stove to a few inches above the burner. The plug is drilled to accept a 3/8" (1cm) copper oil line and a set screw put in to clamp the copper line in place.
Oil supply
The oil supply system can take many forms -- inside or outside tanks, with an inline filter, a water/particle trap, or no filter at all -- but keep the following in mind. For a gravity-fed burner such as this one, plan to have the bottom of the supply tank at least a foot above the valve that controls the flow of oil to the burner. I have an outside tank which I fill with oil which I get free from local service stations.
To avoid the need for an inline filter, which drastically reduces oil flow in the line, I filter the oil through two layers of panty hose before it goes into my storage tank. A 1" steel line (2.5cm) brings the oil from my tank into the house where it connects to a 3/8" copper line. This passes into a canister 4" in diameter and about 8" long (10 x 20cm). A tap is fitted into the bottom for draining off any water, antifreeze or particles which come through the line.
Another 3/8" copper line continues from the top of the cannister to a brass needle valve just above the stove. The copper line then takes a 90 degree bend downwards where it is hose clamped to a short length of 3/4" clear plastic tubing (1.9cm). This provides a "sight glass" which allows you to see and adjust the flow of the oil. I usually open the valve just enough so the dripping turns to a steady stream of oil. The bottom of the clear plastic tube is hose-clamped to a straight length of 3/8" copper which passes through the plug in the tee of the air line, down inside the air-supply pipe to within an inch or two of the end of the air-supply pipe (2.5-5cm). Ensure that the oil line is this much shorter to keep the oil from boiling and burning and eventually stopping up the oil-supply line.
Since installing a water and particle trap in my oil line, I've had no problems with clogging in my oil line.
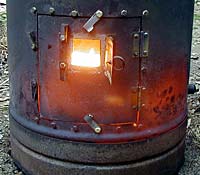
Lighting the burner
Since this burner is small and light, it is easily removeable through the stove door and easily prepared for lighting. Place a handful of small wood chips or split kindling wood in the bottom of the burner, place three small balls of crumpled paper on top of the wood and then lay the bolts (described above) on top of the paper. Pour 2 oz. of kerosene into the burner and replace the burner in the stove. Make sure it is centered under the air-supply line and the hole in the side of the burner is toward you.
Light the burner with a match, lighter or propane torch. Close the stove door, turn on the blower, start the oil flow and in a minute or two the stove should start throwing lots of heat! The heat from the wood, paper and kerosene heats up the bolts on top of them and they in turn heat and ignite the oil.
NOTE: Never try to restart a hot burner with kerosene! The resulting vapor will almost certainly cause an explosion.
To
MOTHER's Waste Oil Heater -- original version
Modifications:
Biofuels
En español -- Biocombustibles, biodiesel
Biofuels Library
Biofuels supplies and suppliers
Biodiesel
Make your own biodiesel
Mike Pelly's recipe
Two-stage biodiesel process
FOOLPROOF biodiesel process
Biodiesel processors
Biodiesel in Hong Kong
Nitrogen Oxide emissions
Glycerine
Biodiesel resources on the Web
Do diesels have a future?
Vegetable oil yields and characteristics
Washing
Biodiesel and your vehicle
Food or fuel?
Straight vegetable oil as diesel fuel
Ethanol
Ethanol resources on the Web
Is ethanol energy-efficient?