You say the skyrocketing cost of oil, electricity, coal, and other fuels has you scratching for a less expensive way to heat your shop, garage, or home this coming winter?
Well scratch no further! Because MOTHER is here to tell you about a dandy little furnace that her researchers have developed -- which costs next to nothing to build and is even less expensive to operate (since it burns the used motor oil that tens of thousands of service stations across the country will still give away free to anyone who'll haul it off).
It's Cheap, Clean, and Environmentally Sound!
Yep. We're sure that you've probably already cringed at the idea of burning "dirty old" crankcase oil in a space heater set up right there in, say, your nice clean living room. But extensive tests conducted by MOTHER's research department have confirmed two things:
- drain oil -- when used as a fuel -- can produce a considerable amount of heat, and
- if fed to a properly designed burner, crankcase oil burns both clean and without any detectable odor.
And you certainly can't beat the price! Old motor oil is still available (by the 55-gallon drum) for the asking from at least three out of four of the service stations on the North American Continent. And while it is true that a sprinkling of automotive garages and filling stations now charge a few cents a gallon for their waste oil, it's just as true that an equal sprinkling will pay to have you tote the crankcase drainings away. It all averages out.
Furthermore, as nearly as MOTHER's environmentally oriented researchers can determine, even the planet benefits when old motor oil is burned in the furnace you see here, for at least two reasons:
- Every gallon of used drain oil that gets recycled "one more once" as a fuel roughly equals just one less gallon of fresh petroleum which must be pumped out of the ground and processed, and
- Recycling the spent motor oil this way creates far less pollution than -- as is customarily done -- "disposing of" the liquid by pouring it into a landfill, river, lake, or ocean.
How to Build a $500 Oil Burner ... For $36!
 Bigger image
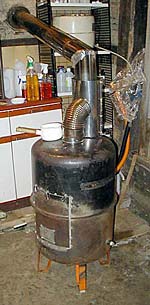
MOTHER's waste oil stove (which throws out more heat than some $500 oil furnaces we've seen) can be constructed so inexpensively (for around $36) largely because its major "raw materials" are scavenged from a junked electric water heater. Such heaters are available "free for the hauling" from the alleys behind appliance or plumbing and heating stores all over the U.S. and Canada all the time. Or, if you want a real selection of the units to choose from, take a short "shopping" trip out to your friendly neighborhood or small town dump.
Just make certain that the discarded water heater you pick up is an electrically fired model (a gas-burning heater has a vent running up through its middle that makes it too difficult to convert). And take care NOT to choose a heater with a galvanized tank (very easily identified by its silver-colored coating) since galvanized metal gives off toxic fumes when heated. (Water heater manufacturers tell us that only about 10% of the units ever made here in the United States have galvanized tanks. So look a little. The odds are nine-to-one in your favor.)
Above all, do NOT try to substitute a 55-gallon drum for the electric water heater tank shown here. The tank we've specified is the only way to go for at least four reasons:
- The metal walls of a junked water heater reservoir are at least twice as thick as the walls of a 55-gallon barrel. And that heavier mass of metal will [a] store and radiate heat more efficiently and [b] withstand burnout far more effectively than the lighter-weight skin of a drum. Our experiments, in fact, indicate that the life expectancy of a stove or furnace made from a good junked water heater tank can be up to five times as long as a comparable stove or furnace constructed from a 55-gailon drum. With care, the water heater tank should even last a lifetime.
- Standard 55-gallon barrels have "girth ribs" which are ugly and do nothing but get in the way when the drums are drilled and cut during their conversion into stoves. Water heater tanks have no ribs ... hence, none of the problems associated with them.
- Thanks to its thin skin and ribs, it's almost impossible to turn a 55-gallon drum into an airtight, "controlled combustion" stove. The heavy walls and superior construction of a water heater tank, on the other hand, practically guarantee an airtight finished product.
- There's such a lively market for recycled barrels these days that the drums now sometimes cost as much as $7.00 each. Discarded water heaters, however, can be picked up for free by anyone who'll haul 'em away. And when you can get a better product for less money ... well, why not?
Pick and Choose and Plan Ahead
Almost any electric water heater tank with a capacity of 30 to 50 gallons should work just fine when converted into a waste oil-burning space heater. Our personal favorite, though, is a 40-gallon unit (measuring 20 inches in diameter and 32 inches high): it's easy to handle, makes a good-looking stove or furnace, and generally comes housed in a square sheet metal cabinet which can be cannibalized quite deftly for some of the oil burner's internal parts.
Needless to say, any junked water heater that you're thinking of recycling should be stripped (of its sheet metal covering and insulation) "in the field" and its tank checked for excessive corrosion or leaks (look for splotches or streaks of rust, usually running from a seam or weld). There's no use hauling a defective container home ... and then right back to the dump again.
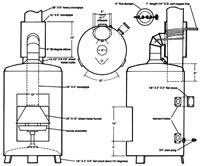
OK. Got a good, sound tank that you like? Fine. Set it up on end and -- while referring to the drawings with this article -- picture in your mind's eye what it'll look like after it's converted into a furnace. Remember that you'll want the finished product's access door opposite (or as nearly opposite as possible) the tank's seam and all unsightly fittings and element holes.
Bear in mind, too, that there are a great many differences in junked water heater tanks. Some just naturally seem to have all their fittings in the right places ... and others don't. Which may mean that you'll have to wander a little from the design shown here to make any particular recycled container do the job. (This "wandering", of course, can work to your advantage. For instance: thanks to an "odd" pipe fitting already on the tank we used when we found it, the only way we could mount a round six-inch-diameter flue stack on our finished furnace was by squeezing the vent pipe until it had a 5 x 7-inch oval cross section. Sure, that was a little more work ... but it certainly gave our stove a custom-built, "store-bought" look!)
MOTHER Makes It Easy!
 Bigger image
MOTHER's research team has purposely designed this waste oil heater as a simple, bolt-together unit that anyone even reasonably familiar with hand (or power) tools should be able to assemble.
TIP: If you have -- or have access to -- a cutting torch and know how to use it, you'll probably find that "burning 'em out" is the fastest and easiest way to make the metal cuts this project calls for. Otherwise, an electric saber saw -- preferably an industrial-duty model -- is a mighty handy tool to have (even if you have to rent one a few hours for the going rate of $12 a day).
Start your stove's construction by chalking out all the holes that the accompanying three-view drawings show you'll have to cut in the walls of your salvaged water heater tank, lay the container on its side, and torch or saw out the access door. Then stand the tank upright and cut the holes for the intake and chimney stacks.
CAUTION: Do not make the intake and chimney stack holes any bigger than absolutely necessary (if you cut them too large, they'll leak air and you'll only have to come back later and fill in around the stacks with furnace cement). In fact, it's better to hold the openings a mite on the small side (just to be safe), and then spend a few minutes filing them on out to size. Actually, there's no "wasted" time involved in such a procedure at all, since you'll want to file and smooth off every sawed or torched metal edge on your finished stove anyway.
Now turn the tank over onto its top and drill the holes in the container's bottom for the pipe stand which will support the furnace's burner assembly. Then form the stove's legs in a vise, position them on the bottom of the stove, drill through the legs and furnace bottom, and bolt the legs in place. The pipe stand should also be bolted in place while the tank is still upside down.
Next, turn the old water heater tank right-side up (so that it's standing on its new "feet") and use standard 3/4-inch pipe plugs to cap all the pipe openings that were in the container when you found it. While you're at it, seal off the heating element holes with 1/8xX 3-inch square steel plates bolted to both sides of the tank's wall to form "sandwiches".
See! We told you this is a bolt-together project!
The Heart of the Matter
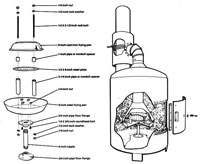
The heart of MOTHER's waste oil space heater is its burner assembly. This consists of a perforated, six-inch, cast-iron frying pan, a six-inches-in-diameter round piece of perforated 1/4-inch-thick steel plate, and an eight-inch steel frying pan bolted together into a sandwich (with pipe spacers between the major components). Perforations in the top frying pan and the plate are 1/4-inch holes set about an inch apart. The assembly is supported by a four-inch nipple of 3/4-inch pipe and two 3/4-inch floor flanges.
Every burner, of course, must have a vent. In this case a chimney stack (or flue) of 6-inch stovepipe, which extends at least six inches down into the heating chamber. This flue can be equipped with a damper, if you desire (although we haven't found such an addition necessary).
Once the chimney stack is secured in place (we used bolts and 3/4-inch-wide angle iron tabs), wrap 1/4-inch O.D. soft copper tubing around it three times, lead the lower end of the line over to a position directly above the center of the furnace's burner assembly, and form a feeder spout in the tubing as shown.
When the copper tubing which is wrapped around the vent stack is covered with 12 inches of larger (8-inch) stovepipe and a 90-degree elbow of 4-inch stovepipe is mounted to the side of the 8-inch pipe so that it fits down over the copper tubing's lower end -- a pre-heater (one of the reasons that MOTHER's waste oil furnace burns so efficiently and with such a clean flame) is formed.
An 18-inch length of 4-inch stovepipe is then attached to the lower end of the 4-inch elbow and a sheet metal (from the salvaged water heater's "skin") funnel or cone -- with a diameter across its bottom opening roughly equal to the diameter of the stove's burner assembly -- is attached to the bottom of the pipe.
As you can imagine, this whole "pre-heater, 4-inch stovepipe, funnel" assembly -- once completed -- is pretty much free to move up or down as it sees fit ... unless you lock it into its optimum operating position (the mouth of the funnel should be just about an inch above the top rim of the 8-inch steel frying pan). No problem. A small sheet metal collar -- which rests on top of the furnace and which can be clamped tightly around the 4-inch stovepipe after it has been raised or lowered as necessary -- fills the bill nicely as the only locking mechanism you'll need.
The Finishing Touches
The oil burner's door rests against a frame bolted to the inside of its opening and is secured by a lip bolted to the inside of one of its edges and a window latch bolted to the outside of the opposite edge. A short piece of angle iron attached to the door for a handle makes the whole assembly a trifle easier to remove and replace on the rare occasions when you'll want to take it off. And a half-inch hole drilled through the center of the door and covered with a little flap of sheet metal hinged on a small bolt serves as a peephole (through which you can check on your furnace's flame if you ever have questions about its color, height, etc.).
Paint your finished stove with Thurmalox 270 flat black paint (or equivalent), set the unit in place and bolt it down, fill its burner assembly with crushed asbestos (or, better yet, Insblock ... an asbestos brick manufactured by the E.P. Green Company and sold all over the country), and fill the bottom of the furnace with sand.
NOTE: Don't use asbestos, try something safer, such as perlite or ceramic fiber insulation. -- Journey to Forever
Basic Facts about perlite:
http://www.perlite.net/redco/basic.htm
You can even add a decorative metal eagle to the new heater, if you want to really spruce it up for the living room! Then hook up a gravity-feed oil line in and the chimney stack out according to approved fuel and vent practices ... light up, sit back, and enjoy the warmth!
Yep! It Really Does Work!
If MOTHER's extensive testing of this furnace is any indication, you're going to have to go a long, long way to beat the unit for both economy and heat output. The prototype you see here cost us the grand total of $36.14 to construct ... and we bought almost everything that went into the stove except the scrounged water heater tank that makes up its guts. You can probably cut that figure in half quite easily if you have even a halfway decent selection of stovepipe, scrap metal, screws, bolts, etc., lying around the shop. Either way, though, it shouldn't take you much longer than one good day to put this whole project together ... and any time you can add one long day to $36.14 or less and come up with a $500 stove, you ain't doin' bad!
But, of course, that's only the beginning! Because the only thing less expensive than constructing MOTHER's incredibly low-priced waste oil burner is operating the unit once it's put together!
In the first place, the furnace throws out an awful lot of BTUs (no, we don't really have any way to accurately measure its heat output directly -- but, as near as we can calculate, the burner produces 21,000 usable BTUs an hour, which is enough to heat a well-insulated small house).
In the second, MOTHER's furnace pours out all that heat while merely sipping its fuel -- when adjusted for maximum efficiency, the unit consumes less than one quart of oil an hour ... as opposed to the one-third gallon (or more!) that a comparably sized (and very expensive!) commercial fuel oil burner drank when our researchers tested it against MOTHER's stove.
And in the third place, MOTHER's furnace was designed to operate on "free for the hauling" waste crankcase oil! It's little wonder, then, that we figure our little gem can pay back its modest initial cost in less than two weeks. And, after that, it operates absolutely free!
There's A Reason For This Efficiency
It's not easy to come up with that kind of economy, of course, in this day and age ... unless you really work at it. Which is exactly what MOTHER's researchers have done.
MOTHER's waste oil burner has been under development for months, and the stove you see here is a "sixth generation" of our original design. Quite frankly: if there's a simpler, easier to build, more economical, or more efficient way to recycle used motor oil into free heat for the coming winter ... we'd like to know about it. There may well be, of course ... but until someone shows it to us, we believe that MOTHER's "bolt it together in one day from $36 worth of materials and then run it on no-cost fuel" furnace is just about the ultimate way you're going to find to keep warm during the cold months ahead.
How to Light and Use Your Waste Oil Stove
Saturate the asbestos [use perlite] in the lower frying pan with kerosene. Then loosely crumple several feet of toilet paper and place it on the sand in the back (under the flue) of the burner's main chamber. Light the paper and the soaked asbestos and lock the access door in place.
Now wait until the rapidly burning paper has started a draft for the blazing kerosene and the kerosene has thoroughly heated the burner assembly. Then open the valve on your waste oil line (which has been plumbed up according to good fuel line practice) so that anywhere from 3/4 to one quart of the oil (if you want maximum heat) can drip into the burner each hour.
That's it! As long as you keep feeding used oil to this stove it'll keep burning it with as clean and as non-polluting a flame as those costly furnaces which consume that expensive "real" fuel oil.
One light-up can last for weeks ... even keep you going all winter!
WARNING:
Never attempt to relight a hot stove with kerosene, do not open the access door while the stove is in operation, and never use gasoline or other highly flammable fuel to start your stove!
Bill of Materials
|
Component
|
Quantity
|
Price
|
Item
|
| Heater |
(1)
|
—
|
Discarded electric water heater, nongalvanized, 30-50-gallon |
| Intake duct |
(1) |
$3.00 |
12" X 8" stovepipe |
|
(1) |
1.25 |
18" X 4" stovepipe |
|
(1) |
.80 |
4" 90-degree elbow |
|
(1) |
1.00 |
10' roll hanger strap |
|
(1) |
— |
12-1/2" X 6-1/4" piece of sheet metal |
|
(1) |
— |
23" X 12" piece of sheet metal |
| Exhaust flue |
(1) |
4.75 |
36" X 6" heavy stovepipe |
|
(1) |
1.00 |
6" reversible steel spindle (flue damper) |
| Burner assembly |
(1) |
4.00 |
6" cast-iron frying pan |
|
(1) |
3.00 |
8" steel frying pan |
|
(1) |
3.00 |
1/4" X 6" steel plate |
|
(1) |
.60 |
1/4" X 12" redi-bolt |
|
(1) |
.20 |
1" X 9" length E.M.T. (Electrical Metallic Tubing) |
|
(1) |
.40 |
3/4" X 4" nipple (threaded pipe) |
|
(2) |
1.20 |
3/4" floor flange |
| Fuel feed assembly |
(1) |
3.00 |
7' length 1/4" O.D. soft copper line |
|
(1) |
30.00 |
roll 3/8" O.D. soft copper line |
|
(2) |
8.50 |
2" male to female street elbows |
|
(2) |
6.20 |
2" male vented filler caps |
|
(2) |
1.25 |
3/4" male to 1/2" female reducers |
|
(2) |
.80 |
1/2" male nipples, close |
|
(2) |
5.60 |
1/2" female to 1/2" female shut-off valves |
|
(2) |
.85 |
1/2" male to 3/8" O.D. male flares, w/flare nuts |
|
(2) |
.75 |
1/4" male to 3/8" O.D. male flares, w/flare nuts |
|
(2) |
5.20 |
1/4" needle valves, female |
|
(2) |
.4 |
1/4" male nipples, close |
|
(1) |
.90 |
1/4" female T |
|
(1) |
.70 |
1/4" male to 1/4" O.D. male flare, w/flare nut |
| Legs, door and supports |
(1) |
1.14 |
1/8" X 3" X 36" flat stock |
|
(1) |
1.20 |
3/32" X 1/12" X 60" flat stock |
|
(1) |
.60 |
1 " X 1 " X 8" angle iron |
|
(1) |
1.05 |
window latch |
|
(1) |
— |
2" X 2" scrap of sheet metal |
|
(45) |
Total for these 7 items
2.50 |
10-32 roundhead bolts w/nuts, 3/4" |
|
(21) |
1/4" roundhead bolts w/nuts, 3/4" |
|
(3) |
No. 10 sheet metal screws, 1/2" |
|
(8) |
3/16" flat washers |
|
(6) |
3/16" lock washers |
|
(13) |
1/4" lock washers |
|
(4) |
1/4" nuts |
|
(1) |
2.00 |
100-lb. bag fine sand |
|
(1) |
.45 |
3/4" pipe plug |
|
(1) |
2.00 |
13-oz. can high temperature paint (Thurmalox 270, $5.98) |
|
(1) |
7.00 |
decorative eagle |
|
(1) |
— |
panful of asbestos (Insblock: $37.92 per box—6,912 cu. in.) |
| Accessories |
(1) |
.25 |
alligator clip |
|
(1) |
.60 |
3/4" male nipple, 2" |
|
(1) |
2.95 |
3/4" female to 3/4" female shut-off valve |
|
(1) |
1.05 |
3/4" male to female street elbow |
| Total cost for basic stove without external plumbing: $36.14 |
Tool Needs
Power drill
1/8", 13/64", 1/4", 13/32", and 1/2" drill bits
Industrial saber saw (rental $12 per day) or cutting torch
Aviation snips
Screwdriver
Vise
Hacksaw
Tape measure
Chalk or pencil
Hammer
Vise grips or pliers
Four C-clamps
Flat or half-round file
Level
Square
Tubing cutter
Flaring tool
End wrench assortment
Pipe wrench
MOTHER's Waste Oil Heater -- original version
Modifications:
To Mother Earth Alcohol Fuel, Table of Contents
Biofuels
En español -- Biocombustibles, biodiesel
Biofuels Library
Biofuels supplies and suppliers
Biodiesel
Make your own biodiesel
Mike Pelly's recipe
Two-stage biodiesel process
FOOLPROOF biodiesel process
Biodiesel processors
Biodiesel in Hong Kong
Nitrogen Oxide emissions
Glycerine
Biodiesel resources on the Web
Do diesels have a future?
Vegetable oil yields and characteristics
Washing
Biodiesel and your vehicle
Food or fuel?
Straight vegetable oil as diesel fuel
Ethanol
Ethanol resources on the Web
Is ethanol energy-efficient?
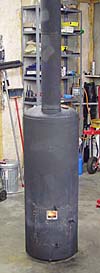 Roger Sanders' Waste Oil Heater
 Roger Sanders has updated his popular improved version of the Mother Earth News waste oil heater with a great deal of new information and options.
 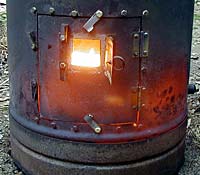 Bruce Woodford in Canada and a group of online collaborators have been working on adaptations using a powered fan and a modified burner design. See Modifications. They' found this powered version burns used motor oil cleanly and at high temperatures. This was Bruce's comment on Richard Freudenberger's disclaimer:
 Mother’s Alcohol Fuel Seminar