by Hannu Virtanen
Copyleft: Anyone may use this material just like she/he wants.
Hannu Virtanen;
Lievestuoreen asema;
FIN-41400 Lievestuore; Finland
- 1. General Remarks
- 2. The General Principle: How Does it Work?
- 3. The Basic Parts and Materials of the Cooker
- 4. The Mirror Base in Detail
- 4.1. The Mirror Base: the shape of the mirror
- 1) The following picture represents the curve for a parabola with F=50
- 2) The shape for F=30 is as in the following graph:
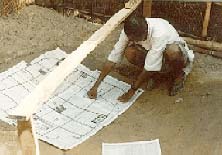
- 3) How to draw a parabolic curve without any knowledge of Mathematics:
- 4.2. Mirror base materials and construction ideas
- 4.3. Paper mass (papier mache), clay or concrete construction
- a1) Making the mold inside the ground
- a2) Making the mold on the ground
- 4.4. Other methods how to make the mirror base
- 4.5. Some further notes concerning the shape
- 4.1. The Mirror Base: the shape of the mirror
- 5. Hanging the mirror
- 6. The mirror holding system
- 7. The turning table
- 8. The adjusting rope
- 9. The direction indicator
- 10. The reflective surface
- The following picture will show in general the method how to make and fix the reflective pieces
- In many cases the reflective surface will be made of aluminum foil or of something rather similar
- You can use small mirror pieces as well
- 11. The mirror-holder/pot-holder
- 12. The pots and the hay-box
1. General Remarks
Due to the advance of knowledge gained by various independent designers it is basically easy to build Parabolic Solar Cookers, which can boil water, cook soup, make fried foods or even bake bread. What is needed is general work-man's skills like some carpenter's skills and/or some construction worker's skills, about 10-50 USD money to buy materials, (and possibly some elementary knowledge of mathematics and physics,) but mainly a lot of common sense!
2000-11-09
2. The General Principle: How Does it Work?
A focusing solar cooker works by reflecting solar radiation to a small area, where your cooking or baking pot is located. The cooking pot should be as black as possible to absorb the sun's radiation so that the energy is transformed into heat.
The principle is shown in the next picture: Under cloudless bright sky during day time the power of sun radiation is about 1 kW/1 square meter(!). That is more than the power of a normal gas stove or a normal electric hot plate. If all that energy could be reflected from the collector's surface and transformed into heat in a kettle holding 1 liter cold water, the water would boil in 5-10 minutes depending on the starting temperature of the water.
NOTE:
If a good reflective surface is used for the concentrator and it will be well made, the focus point will be very hot and more dangerous than a fire especially for eyes. So these instructions are made for experienced and cautious persons only. As a design principle it is best to keep the focus point inside 'the mirror cup' to avoid the danger of anything else besides your cooking pot of getting in touch with the hot spot.
In practice not all of the sun radiation is reflected from our 'Reflective Surface' and not all of the reflected energy is absorbed by our kettle or baked bread and transformed into heat and so the efficiency of our cooker is not 100% and we need in general more power and thus area for our mirror.
In general good focusing solar cookers have got about 1,5- 2 square m reflective area.
3. The Basic Parts and Materials of the Cooker
To build a cooker we need something to build: the mirror base for the reflective material, the reflective material itself, the adjusting and holding construction for the mirror the pot holder and the cooking pot.
In the next picture the parts are shown for a model cooker.
The mirror base can be made of various materials including paper mass, concrete, plywood, bamboo-clay, metal.
For the reflective surface small mirror pieces, aluminum foil, polished metal plates can be used.
The mirror holding and the pot-holding systems can be made of metal, wood, plywood, bamboo.
4. The Mirror Base in Detail
4.1. The Mirror Base: the shape of the mirror
Basically the perfect shape for our mirror is a parabolic shape. The mathematical formula for a parabola is
Y = (X*X)*(1/4F), (![]() ), where F is the distance of the focus point from the bottom.
), where F is the distance of the focus point from the bottom.
If in the formula F = 50 cm calculations become very easy and our mirror base will have quite satisfactory shape. We can count first points for each 10 cm distance from the center and then some points in between. It will be quite easy to get a satisfying curve drawn using a bent metallic or plastic ruler to interpolate all points in between. And the curve will look as follows and the points calculated are in the table.
1) The following picture represents the curve for a parabola with F=50
2) The shape for F=30 is as in the following graph
3) How to draw a parabolic curve without any knowledge of Mathematics
4.2. Mirror base materials and construction ideas
It is best to use materials, which are cheapest or easiest locally available.
The local traditional handicraft skills should be taken into the construction consideration as well! For example, if people are used to weave baskets of bamboo, it is probably easiest to make the mirror base(s) so that instead of using ferro-concrete you will use bamboo-clay. That means you will have a big nearly parabolic basket made and fill the inside with (mud) clay to make it really parabolic using the methods as shown below.
4.3. Paper mass (papier mache), clay or concrete construction
a1) Making the mold inside the ground
If you will use paper mass (mache), clay or concrete, it is best to make first a mold. That can be then used to make as many mirror bases as you want. The concrete mold can be made by casting inside the ground, if the ground is easy to dig and to make smooth. Using this method you will first make a steel mold as follows. The steel mold can be made of cheap steel. For construction you can use welding or bolts to join the parts.
Here are some pictures concerning how to make the concrete (or a clay) mold. You'll make first a parabolic hole using the steel mold, then you'll make an iron net. You have to put old newspapers under your casting.
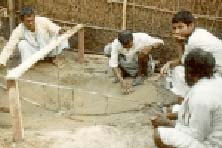
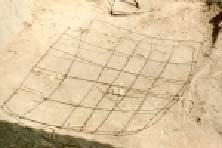
You can use an exactly similar mold to make your mirror base of clay as well (put inside a net made of bamboo for example) or of concrete (put inside an iron net)
You can use an exactly similar mold to make your mirror base of clay as well (put inside a net made of bamboo for example) or of concrete (put inside an iron net).
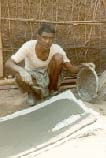
a2) Making the mold on the ground
You can often make the mold easier by building the mold on the ground.
 Click for bigger image
4.4. Other methods how to make the mirror base
The first construction below is for a blacksmith, the second for a carpenter. The second plan can be used to make the mirror base of cardboard as well:
 Click for bigger image
Note 1: If you are best with plywood or plywood is the material, which is easiest and cheapest available, it is probably best and easiest to use the above design ideas combined. Just make only two 'supporters' like in the picture above and use them as 'the X-bars' as in 'the steel construction'. Make 'the rings' (of 'the steel construction') as well of narrow strips of plywood. Fix the sectors on 'the rings' using for example thin rope through holes on sectors like in 'the steel construction' (to make them easily changeable as well).
Note 2: The sectors have no need to continue to the middle of the mirror base, because there will anyway be the shadow of the kettle. You can leave a hole in the middle.
Note 3: It is much easier to glue some kind of foil on the top of plywood than on the top of metal sectors or on the clay. If clay is used as the material for the mirror base, it is best to glue some paper in between the foil and the clay surface.
4.5. Some further notes concerning the shape
Some good cookers use long-distance focus to reflect all the sun rays to the bottom of the pot. This is a very effective design, because then very little of the reflected light is reflected out of the pot again. How well you ever will manage to make your pots blackened, some of the sun rays will be reflected out of the pot's sides, if they will hit the sides with small angles. A well-known example of this is the Chinese cooker, which is widely used in Tibet. See a picture for example: http://www.jyu.fi/~hvirtane/chin2.html in the Internet. Badly made reflectors using such focusing outside the 'mirror-cup' might be sometimes dangerous, however, so this kind of design is not being instructed here.
One further point to note is that in some cases your reflector will become big and awkward to handle, if you'll preserve the circular shape. To make the life easier, you can make cutouts from the sides, from suitable places to make cooking easier for example or to make it possible to turn the whole mirror around. The important things are to keep the total area of mirror for sunrays big enough (1,5 square meters - 2 square meters), and to keep all the reflective surface on the parabolic surface. See some pictures of the 'clay mirror' and 'metallic cooker' on pages starting http://www.jyu.fi/~hvirtane/chin1.html
5. Hanging the mirror
You need to fix the mirror to the mirror holding system such way that the mirror can be turned around the focus point, where the cooking pot is to be located. This adjustment is necessary to get the mirror facing directly to the sun according to 'the sun's height on the sky'. The whole mirror holder can be turned around on the horizontal plane to make the other necessary adjustments according the sun's movement on the sky.
The next picture shows a method how to get the mirror fixed to the mirror-holder / pot-holder.
6. The mirror holding system
The next picture is to show an easy way how to build the whole mirror holding system of various materials. The pot-holder must be located in the focus point of the mirror. To turn the mirror on the mirror-holder/pot-holder you can use a rope, which is fixed to the edge of the mirror and to the side-bar respectively.
7. The turning table
The next picture is to show how to build the system for turning the whole cooker around on the horizontal plane. Instead of putting the outside tube inside the ground you can make three legs for it so that the whole cooker can be moved easily to another location.
8. The adjusting rope
To adjust with the rope the mirror it is good to make a proper fixing for the other end of the rope. The other end can be permanently fixed.
9. The direction indicator
To see that the cooker is adjusted correctly you'll need some kind of indicator. Here is an easy method.
10. The reflective surface
If you will make the mirror base of paper mass (papier mache), you might want to use metallic reflectors to make the mirror strong. If you have got really good aluminum or stainless steel, you might use that on a clay or concrete mirror base as well.
• The following picture will show in general the method how to make and fix the reflective pieces.
The picture concerning making the reflective surface of foils shows another idea, which kind of plates to use.
• In many cases the reflective surface will be made of aluminum foil or of something rather similar.
• You can use small mirror pieces as well.
11. The mirror-holder/pot-holder
The mirror-holder, which is to be used as the grate for cooking pots is an easy piece.
12. The pots and the hay-box
There are some good ideas available to be combined with solar cooking. Often you will make such kind of food, which will prepare itself well, if you only make it boiling by using the cooker and then insert the pot inside a thermally insulated box for further preparing. You can make such a hay-box of almost any type of box by wrapping it inside by a thick cloth or hay or straw, or... just wrapping the pot outside by a thick cloth. Then the cooker is ready for another pot containing more of the same food or some other kind of food.
Back to Solar Cooker Resources on the Web