 Vegetable oils used to be one of those items you just HAD to buy.
Now here's how to make your own.
Vegetable oils used to be one of those items you just HAD to buy.By Jeff Cox
-- from Organic Gardening, April 1979, Rodale Press
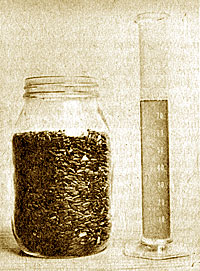
IN 2,500 SQUARE FEET, a family of four can grow each year enough sunflower seed to produce three gallons of homemade vegetable oil suitable for salads or cooking and 20 pounds of nutritious, dehulled seed -- with enough broken seeds left over to feed a winter's worth of birds.
The problem, heretofore, with sunflower seeds was the difficulty of dehulling them at home, and the lack of a device for expressing oil from the seeds. About six months ago, we decided to change all that. The job was to find out who makes a sunflower seed dehuller or to devise one if none were manufactured. And to either locate a home-scale oilseed press or devise one. No mean task.
Our researches took us from North Dakota -- hub of commercial sunflower activity in the nation -- to a search of the files in the U.S. Patent Office, with stops in between. We turned up a lot of big machinery, discovered how difficult it is to buy really pure, unrefined vegetable oils, but found no small-scale equipment to dehull sunflowers or press out their oil.
The key to success, however, was on our desk the whole time. In spring 1977, August Kormier had submitted a free-lance article describing how he used a Corona grain mill to dehull his sunflower seeds, and his vacuum cleaner exhaust hose to blow the hulls off the kernels. A second separation floated off the remaining hulls, leaving a clean product. We'd tried it, but because some kernels were cracked and the process involved drying, we hadn't been satisfied. Now we felt the best approach was to begin again with what we learned from Mr. Kormier and refine it.
A pound of oilseed produced just under three ounces of oil.
Staff Editor Diana Branch and Home Workplace Editor Jim Eldon worked with a number of hand- and electric-powered grain mills. While the Corona did a passable job, they got the best results with the C.S. Bell #60 hand mill and the Marathon Uni Mill, which is motor-driven. "I couldn't believe my eyes the first time I tried the Marathon," Diana says. "I opened the stones to 1/8th inch, and out came a bin full of whole kernels and hulls split right at the seams. What a thrill that was!"
She found that by starting at the widest setting,and gradually narrowing the opening, almost every seed was dehulled. The stones crack the hulls open, then rub them to encourage the seed away from the fibrous lining. The Bell hand mill worked almost as well. "As long as the stones open at least as wide as the widest unhulled seed, any mill will work," she says.
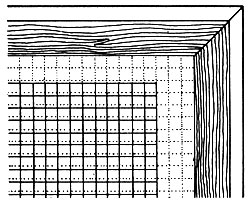
Because the seed slips through the mill on its flat side, grading is an important step to take before dehulling. We made three sizing boxes. The first is 1/4-inch hardware cloth [wire screen]. The second is two layers of 1/4-inch cloth, moved slightly apart to narrow the opening in one direction, and the third is two layers of screen adjusted to make a still-smaller opening. Since the smallest unhulled seeds are about the size of the largest hulled kernels, the grading step prevents these undersized seeds from passing through unhulled. Processed together at a closer setting, the smallest seeds hulled out.
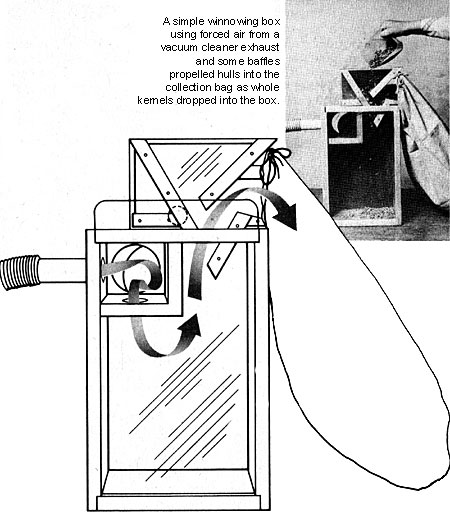
Jim Eldon's workshop is littered with strange-looking pieces of apparatus. They represent initial attempts to build a workable winnowing box, using Kormier's vacuum exhaust idea for a source of air. Jim, Fred Matlack and Diana finally made a box with a Plexiglas front, through which they could observe what was happening.
They cut a hole in the back of the box with a sliding cover to regulate the air pressure, and fiddled with various arrangements of baffles. The result was a stream of hulls exiting through one hole while the kernels fell to the bottom of the box. Now they were ready to try a five-pound sample of unhulled sunflower seeds to see how much they could recover.
The five pounds were graded and dehulled, then winnowed. We got about one hull for every ten kernels in the final, winnowed product. These are easily picked out. They usually contain kernels still held behind the fibrous strings of the hull. Their weight prevents them from blowing out with the empty hulls. We found that bug-eaten seeds do blow away with the chaff, which was a bonus for cleanliness of the final product. Toss the hulls to the birds, who will find broken seeds among them.
Starting with 80 ounces of unhulled seed, we ended up with 41-1/4 ounces of edible whole seeds, 1.8 ounces of damaged seeds suitable for animal feed, and 36.6 ounces of hulls. It took us about an hour. Not bad.
Sunflower seeds store perfectly in the hulls, but they deteriorate more rapidly when shelled out. The grain mill dehuller and winnowing box give the gardener a way to have the freshest possible seeds for eating at all times of the year. With the construction of one more piece of equipment -- the oil press -- he can have absolutely fresh, unrefined, polyunsaturated sunflower oil for salads, mayonnaise and cooking.
Most light, refined vegetable oils have been extracted using hexane, a form of naphtha. The oil is then heated to boil off the hexane. Lye is dumped into it. It's washed with steam, then heated to remove odors and taste before being laced with preservatives and stabilizers. It may feel oily in the mouth, but you might as well taste air. No so with fresh-made sunflower oil -- it's deliciously yet subtly nutty in flavor, adding unsurpassed flavor to salads.
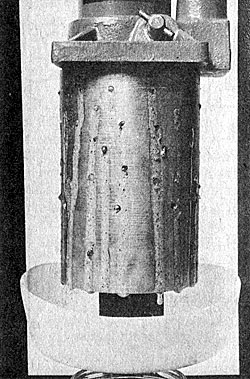
A little heat and the oil pours out of the pistonlike cylinder, then to be strained with a paint filter.
There's good reason to believe that sunflower oil may become the #1 vegetable oil in the U.S. in a few years. It's already #1 in health-conscious Europe. Corn oil has already caught on here for health reasons, and sunflower oil is so much better. Sunflower oil's 70 percent polyunsaturate is just under safflower, with corn oil bringing up the rear with 55 percent. And sunflowers yield 40 percent oil, soybeans only 20 percent.
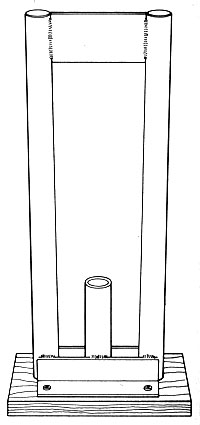
Our oil press is relatively simple, but it must be welded together. Check the construction directions for details. The press consists of a welded tubular frame which accepts a three-ton hydraulic jack. You may already have one. If not, it can be purchased at most auto and hardware stores for about $16. A metal canister with holes drilled in its sides and one end welded shut holds the mashed sunflower seeds. A piston is inserted in the canister and then inverted and slipped over a pedestal on the frame. The jack is set in place, and the pressure gradually increased over half an hour. The oil drips from the sides of the canister into a tray -- the bottom of a plastic jug slipped over the pedestal works fine -- which empties the oil into a cup. You can filter the oil with a coffee filter to remove pieces of seed and other fine particles that would burn if the oil were used for cooking. If it's for salads or mayonnaise, there's no need to filter it.
We first tried using "confectionary" sunflower seeds for oil. These are the regular eating kernels we're used to seeing. They give less than half as much oil as the oilseed types of sunflower. Although you can use confectionary types such as MAMMOTH RUS- SIAN for oil, don't expect to get more than an ounce and a half from a pound of seed. Oilseed produces three or more ounces of oil from a pound of seed and is well worth planting along with confectionary-type seeds. Oilseed has another big advantage -- to prepare it, you can put the whole, unhulled seed into a blender and whiz it until it forms a fine meal, while confectionary seeds must be dehulled first. The entire sequence of grading, dehulling and winnowing is avoided with oilseed.
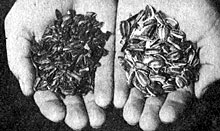
Two kinds of sunflower seeds -- oilseeds on the left, confectionary on the right.
Oil types produce about a tenth of a pound of seed per head in commercial production. Gardeners, with their better soil and care, invariably do better than that. Our conservative estimate is that 1,280 plants will be enough for three gallons of oil. Spaced one foot apart in rows two feet apart, 1,280 oilseed plants will take a space 40-by-56 feet, or 80-by-28 if you want a more rectangular patch to face south.
We worked in pound batches, since the canister just holds one pound of mash. After blending, we heated it to 170 degrees F. (77 deg C) by placing it in a 300-degree F. (149 deg C) oven and stirring it every five minutes for 20 minutes. Heating gets the oil flowing and doubles the yield of oil. In case you're wondering, "cold-pressed" oils sold commercially are also heated, and some are subjected to the entire chemical process. The term has no firm meaning within the industry, according to the literature we've surveyed.
Heating does not change the structure of fats. It will not turn polyunsaturated fats into saturated fats. In fact, Dr. Donald R. Germann in his book, "The Anti-Cancer Diet", says that "... an unsaturated fat must be heated to high temperatures -- above 425 degrees F. or 200 degrees C. -- at least 8 or 10 times before any shift toward saturation occurs..." Dean C. Fletcher, Ph.D., of the American Medical Association Department of Foods and Nutrition in Chicago, says, "It's true that either high temperature or repeated heating does change the nature of some of the unsaturated oil molecules. (But) the flavor of the oil changes as these chemical changes occur, spoiling its taste. This effect is probably more profound than any of the physiological changes the altered oil might produce within the body."
From 500 gm. of heated mash, we pressed 89 gm. of oil, 89 percent of the entire amount available and twice as much as we could press from unheated oil! The decision is up to you whether or not to heat the mash, but that extra 50 percent seems like an awful lot, especially when the whole technique is so labor intensive. The oil should be stored in the refrigerator, and it's probably best to use it within a month, since it has no preservatives. Mayonnaise made with such fresh oils should be kept refrigerated and used within two weeks. The leftover cake, still containing 50 percent of its oil, is a nutritious addition to your dishes, and makes excellent feed for animals or winter birds. Store the pressed cake in the freezer.
We're talking then about a sunflower patch with two kinds of plants -- confectionary such as MAMMOTH RUSSIAN and oilseed such as PEREDOVIK. The oilseed plants should be grown 12 inches apart in rows two feet apart. Four average confectionary heads yield about a pound of unhulled seed. You'll need about 35 pounds of unhulled seed, or 140 plants-worth, to yield 20 pounds of hulled kernels, about what a family of four will use in a year. That many plants can be grown in an area 26-by-10 feet. That's 260 square feet. Put that together with the 2,240 square feet for the oilseed sunflowers, and you need a patch about 2,500 square feet -- 25 100-foot rows -- to keep yourself supplied year-round with super nutrition and unsurpassable taste.
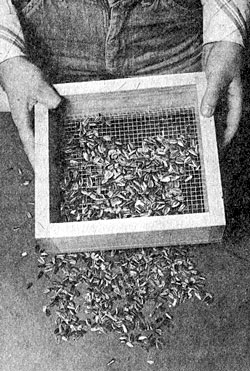
The winnowing machine operates on the age-old principle of blowing the chaff away from the heavy grain with a controlled current of air.
The unit uses a household or shop-type vacuum cleaner for its air supply. A vacuum cleaner was used as a power source because it can supply a large volume of air over an extended period of time, and most homes and farms have a vacuum cleaner.
A cloth bag has been attached to the chaff chute to catch the chaff as it is separated from the seed. The bag allows the hulls to be collected and greatly reduces the amount of waste material normally blown into the air by conventional systems.
The unit has been constructed in such a way that the cloth bag and cleaner box can be placed inside the seed box, making a compact package for storage.
Tools Required
1. Table Saw
2. Drill Press
3. Band Saw
4. Saber SawProcedure (cleaner box)
I . Cut out the two sides of the cleaner box from 1/4-inch plywood.
2. Cut out the six interior pieces of the cleaner box from 3/4 x 3-1/2-inch select pine.
3. Assemble the cleaner box elements with glue and nails.
4. Cut four 1/4-inch square strips of pine four inches long.
5. Glue the strips around the end of the chaff chute.
6. Sand all surfaces and edges.
7. Finish with clear lacquer finish.Procedure (seed box)
1. Cut two pieces of pine /34" x 5 /12 x 15 inches for the sides.
2. Cut two pieces of pine 3/4 x 5-1/2 x inches for the top and bottom.
3. Plow a /14 x 1/4 groove for the front and back panels in all four pieces.
4. Rip the top board to 5 inches so that the front panel can slide into the grooves in the side boards.
5. Rabbet both ends of each 15-inch side piece to accept the top and bottom boards.
6. Drill a hole in the left side board 2-1/2 inches from the top. The size of the hole is determined by the vacuum cleaner hose fitting.
7. Cut a 3-1/4 x 4 inch hole in the top 1/2 inch from the right end. This hole will accept the cleaner box.
8. Cut two pieces of pine for the baffle.
9. Drill two 1-inch holes in the bottom of the baffle box.
10. Cut a piece of 1/4 x 8-1/2 x 14 inch plywood for the back panel.
11. Cut a 3-inch hole, centered 1-7/8 inches from the top and left sides of the plywood back.
12. Assemble the sides, baffles, top, bottom, and back panel with glue and nails.
13. Cut an 8-7/16 x 15-3/4-inch piece of Plexiglas for the front.
14. Cut a one-inch radius on the top corners of the front.and sand the edges.
15. Drill a one-inch thumb hole centered 7/8 inch from the top edge.
16. Cut a 3-1/2-inch disk of 1/4-inch plywood for the vent cover.
17. Drill a 3/16-inch hole 3/8 inch from the edge of the disk.
18. Mount the disk over the vent with a #10 x 1-inch screw.
19. Sand all surfaces and edges of the, box.
20. Finish with clear lacquer finish.Materials
Cleaner Box
2 -- 7-3/4 x 7-1/2 x 3/4" plywood (sides)
6 -- 3/4 x 3-1/2 x 24" for all members (baffles)
4 -- 1/4 x 1/4 x 4" pine (chute cleats)
22 -- 1" x 18 ga. headed nails
White vinyl glue
Clear lacquer finishSeed Box
2 -- 3/4' x 5-1/2 x 15" select pine (sides)
2 -- 3/4 x 5-1/2 x 8-1/2" select pine (top and bottom)
1 -- 3/4 x 3-1/2 x 4-1/2" select pine (baffle)
1 -- 3/4 x 4-1/2 x 4-1/2" select pine (baffle)
1 -- 1/4 x 8-1/2 x 14" plywood (back)
1 -- 1/4 x 3-1/2" dia. plywood (control valve)
1 -- 1/4' x 8-7/16 x 15-1/4" Plexiglas (front)
1 - #10 x 1" flat head screw
18 - 4d finish nails
White vinyl glue
Clear lacquer finish
1 -- 17 x 31" cloth laundry bag
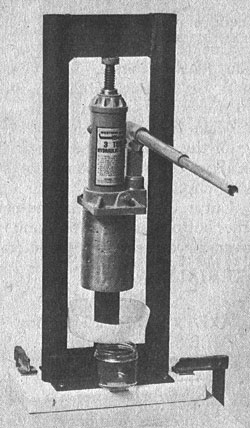 A welded frame offers the necessary support for pressing with a 3-ton hydraulic jack. |
The press was designed so that homesteaders can produce sunflower oil from their own seeds. The oil can be pressed as is or heated to 170 degrees F., which doubles oil yield.
Both methods require the seed to be ground to fine powder. If you are pressing the oil seed variety, a meat grinder or electric blender will do an excellent job of grinding the seed. The confectionary type of seed will require the seed to be hulled and winnowed before it is ground. A food mill with the stones set at the coarse setting can be used to accomplish this step.
The ground kernels are placed in the cylinder with the piston closing the bottom portion of the cylinder.
The cylinder is mounted in the press frame and a three-ton hydraulic jack is used to supply the pressure.
Because of the great pressures created by the hydraulic jack, it is important that the frame be properly constructed and firmly mounted to the work surface before the pressing operation begins. The following instructions can be given to a welder.Tools Required
1. Power Hacksaw
2. Metal Band Saw
3. Metal Lathe
4. Drill Press
5. Belt or Disk Grinder
6. Arc Welder
7. Hand Clamps
Procedure (Frame)
Secure welds on all parts are needed because of the high pressures exerted to squeeze the oil from the seeds.
1. Cut two pieces of 1-3/4" O.D. x 1-3/8" I.D. x 24-1/2 inch long tubing for the uprights.
2. Cut one piece of 1-3/4" O.D. x 1-3/8" I.D. x 6-1/2 inch long tubing for the center tube.
3. Cut one 3/4" x 2-3/4 x 5-1/2 inch steel bar for the top cross member.
4. Cut two pieces of 1-3/4 x 1-3/4 x 8 inch angle iron for the base members.
5. Drill two 9/32-inch holes in each base member 1/2 inch from the outer edges.
6. Weld the base members, tubes and cross member together as per the drawing.
7. Grind all edges to remove any burrs.
8. Paint the frame.
9. If a mounting board is desired, cut a piece of pine 1-1/4 x 6-1/2 x 12 inches long.
10. Center the frame on the board and mark the location of the four mounting holes.
11. Drill four 7/8-inch holes 1/4-inch deep to accept the T-nuts.
12. Drill four 5/16-inch holes through the mounting board using the same centers created by the 7/8-inch holes.
13. Round the edges of the base and sand all surfaces.
14. Install four 1/4-20 T-nuts.
15. Finish the base with clear lacquer finish.
16. Assemble the base to the frame using four 1/4-20 x 1-1/4-inch round head bolts.
Procedure (Cylinder)
1. Cut a piece of 3-1/2" O.D. x 3-1/4" I.D. tubing 5-3/8 inches long.
2. Face both ends on the lathe.
3. Cut out a 3-1/2-inch round disk from 1/4-inch plate steel.
4. Weld the disk to one end of the tube.
5. Drill a series of 3/32-inch holes around the side of the tube on 1/2-inch centers.
6. Remove all burrs on the inside and outside of the tube.Procedure (Piston)
1. Cut out a 3-3/8-inch disk of 1/4-inch plate steel.
2. Cut a 1-3/8" O.D. x 1-1/8" I.D. piece of tubing 1-1/8 inches long.
3. Face both ends of the tube.
4. Weld the tube in the center of the 3-3/8-inch disk. All welds should be made on the inside of the tube.
5. Mount the piston in the lathe and turn the disk to fit the inside diameter of the cylinder. This will be about 3-15/64 inches in diameter.
6. Remove any sharp edges.
Procedure (Collector Ring)
1. Cut the bottom out of a one-gallon plastic bottle. The cut line should be approximately 1-1/2 inches from the bottom of the bottle.
2. Make a 1/8 x 1 inch slot at one edge of the bottom outside ring. This will allow the oil to pour into a receiving cup.
3. Cut a 1-3/4-inch hole in the center of the bottom, so that the unit will fit over the center tube in the frame.Materials
Frame
2 -- 1-3/4 O.D. x 1-3/8 I.D. x 24-1/2" long H.R.S. (frame tubes)
1 -- 1-3/4 O.D. x 1-3/8 I.D. x 6-1/2 inch long H.R.S. (center tube)
1 -- 3/4 x 2-3/4 x 5-1/2" flat bar H.R.S. (top cross member)
2 -- 1-3/4 x 1-3/4 x 8" angle iron H.R.S. (base members)
1 -- 1-1/4 x 6-1/2 x 12" #2 white pine (wood base)
4 -- 1/4-20 x 1-1/4 R.H. mounting bolts
4 -- 1/4-20 T-nuts
Black enamel for frame (finishing material)
Clear lacquer finish for wood base
3 -- 1/8" dia. welding rodsCylinder
1 -- 1/4 x 3-1/2" dia. C.R.S. disk (top)
1 -- 3-1/2 O.D. x 3-1/4 I.D. C.R.S. tube (cylinder)
1 -- 1/8 dia. welding rodPiston
1 -- 1/4 x 3-3/8 D.A. C.R.S. disk (piston top)
1 -- 1-1/4 O.D. x 1 I.D. x 1" long H.R.S. (piston tube)
1 -- 1/8 dia. welding rodCollector Ring
1 -- Bottom from a one-gallon plastic bottle (oil collector ring)
Back to Biofuels Library
Biofuels
Biofuels Library
Biofuels supplies and suppliers
Biodiesel
Make your own biodiesel
Mike Pelly's recipe
Two-stage biodiesel process
FOOLPROOF biodiesel process
Biodiesel processors
Biodiesel in Hong Kong
Nitrogen Oxide emissions
Glycerine
Biodiesel resources on the Web
Do diesels have a future?
Vegetable oil yields and characteristics
Washing
Biodiesel and your vehicle
Food or fuel?
Straight vegetable oil as diesel fuel
Ethanol
Ethanol resources on the Web
Is ethanol energy-efficient?

Community development | Rural development
City farms | Organic gardening | Composting | Small farms | Biofuel | Solar box cookers
Trees, soil and water | Seeds of the world | Appropriate technology | Project vehicles
Home | What people are saying about us | About Handmade Projects
Projects | Internet | Schools projects | Sitemap | Site Search | Donations | Contact us
Decrease your exam stress by using our latest network+ certification and best quality gmat sample questions and ccnp voice. We provide with 100% pass guarantee along with 352-001 and 650-378.