Convert Your Car to Alcohol
by Keat B. Drane
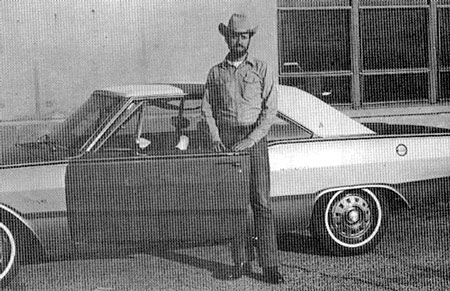
Fig 1-1 This is the test car, a 1969 Dodge Dart
© 1980 by Keat B. Drane
Library of Congress Catalog Card No: 80-81750
ISBN 0-915216-54-X
Published by Love Street Books
Louisville, Kentucky 40258 USA
Out of printScanned by Stan Hartley
Chapter 1 -- Alternative Fuel Source
The Test Vehicle
Chapter 2 -- Types of Alcohol Fuel
Home Distillation
Buying alcohol
Chapter 3 -- Preparing Your Car for Conversion
Chapter 4 -- Modification of the Fuel Line
Chapter 5 -- The Carburetor
Types of Carburetors
How They Work
Chapter 6 -- Altering the Carburetor
Remove and Disassemble the Carburetor
Enlarging the Metering Jets
The Float -- Two Possible Alterations
Bending The Float Linkage
Adding Weight To The Float
Chapter 7 -- Altering the Ignition System
Spark Plugs Can Make a Difference
Chapter 8 -- Firing Up the Engine
Chapter 9 -- Cold Weather Starting Problems
How To Cure Them
Starting the Engine on Gasoline
Using Gasoline as a Primer
Preheating the Alcohol
Manual Choke
Chapter 10 -- Vital Statistics
My Experience is in Your BallparkChapter 1
Alternative Fuel SourceAre you as tired of the "gasoline shortage" as I am? Long lines at the pump, shorter service station hours and higher prices are here to stay. Rationing has affected various areas of the nation. Unstable, international politics threaten our continued dependence on foreign crude oil. Politicians and oil executives predict the situation to worsen.
Faced with these grim facts, I began to search for an alternative energy source. I wasn't looking for a solution to the entire country's energy problems. I simple wanted to insure that my family and I would have the fuel to power our vehicles when and where necessary, without interference or restriction from Uncle Sam's energy "experts" or the whims of a greedy oil sheik in the Middle East.
Alcohol fuel is the little man's best hope for relief from gas "pains". The all-but-untapped, domestic resource has many advantages. The following is a list of the ones I feel are most significant:
- Almost any gasoline-powered engine can be made to run well on alcohol.
- Only minor and inexpensive modifications to the engine are required.
- Anyone with reasonable, mechanical skill and common handtools can make the modifications once they've learned the procedure.
- Alcohol can be produced from a variety of organic materials and is a natural substance.
- Distilling can be done a small scale by individuals or on a very large scale by local companies.
- And profit generated by production of domestic alcohol fuels will stay in America and will pay American farmers.
With these thoughts in mind, I decided to undertake a test project. The first goal was to successfully convert a vehicle fuel rather than "gasohol". The vehicle was then to be driven daily to determine was practical for use under normal everyday conditions.
The Test Vehicle
The test vehicle was a 1969 Dodge Dart. It had 80,000 miles on the motor at the time of conversion and was stock in every aspect. The Dart was equipped with a 318 cubic inch engine, automatic transmission, power brakes and steering and air conditioning.
The Dart was donated for testing purposes by friends who shared my interest in finding a practical alternative to gasoline.
The conversion and test were a great success. I now feel secure in the knowledge that I'll never have to park my car for lack of fuel. I want to share my good fortune and results with you. The following pages outline the theory, mechanics, cost and materials which you should follow in converting your car.
Let me give you a word of caution. Please read this entire book before starting to modify your car. There are several variations discussed, and you will want to be sure which will reward you with success, You will have achieved personal independence from the gas pump and freedom from anxiety about shortages.
Good luck and happy motoring!Chapter 2
Types of Alcohol FuelYou probably have questions in your mind about using alcohol as a motor fuel. We'll look briefly into the history and types of alcohol fuels.
In the early days of automotive industry several manufacturers produced motors designed to run on alcohol, instead of the relatively new and scarce product called gasoline. The Ford Model T was originally designed to burn alcohol, gasoline or a combination of both. However, Ford and other manufactures soon bowed to the intense pressure exerted by the emerging oil monopolies of the time and began designing motors with gasoline as the only intended fuel.
Several makers of farm tractors have continued production of alcohol engines. They are for export only, and you will probably never see a factory-engineered alcohol tractor in this country in this country at this time.
There are several different types of alcohol. Each type is derived by a slightly different method or from a different raw material. We are interested in two types - methanol and ethanol.
Methanol may be familiar to you as the fuel used in Indy-type racecars. At one time, it was distilled from wood and commonly known as wood alcohol. Petroleum is the source of most methanol today. It is very toxic and poisoning can result from ingestion. Methanol is one possible source for fuel for your car, although it yields less energy than ethanol.
Ethanol is the best choice to run your car. It is formed by the fermentation of sugars from a number of types of organic materials. Wheat, corn, rice, beets and cane are examples of materials with a high sugar content. They give a high yield when fermented and distilled. All types of liquors contain ethyl alcohol also known as grain alcohol.Home Distillation
The most economical way to obtain alcohol is to build a still and distill it yourself. You can legally distill alcohol fuel (but not alcohol to drink) by obtaining a permit from the Bureau of Alcohol, Tobacco & Firearms.
Homemade alcohol can be distilled for as low as 40¢ per gallon depending on the size of the still, the fuel used to power it and the cost of the grain. An increasing number of enterprising individuals, particularly farmers, are cutting their fuel bills by distilling their homegrown crops.
If distilling sounds attractive to you, there are several publications available on the topic. A good, basic primer on distillation is Forget The Gas Pumps -- Make Your Own Fuel written by Jim Wortham and Barbara Whitener. It provides diagrams of small stills, step-by-step directions on how to make alcohol and the information necessary to obtain a permit. A model application is also included.
Buying alcohol
Industrial ethanol can be obtained from a wholesale chemical supply company. The price per gallon varies widely according to the quantity purchased, I purchased a 55-gallon drum of 200-proof ethanol for $124 or about $2.25 per gallon. Bulk quantities are more economical, but you must have a tank or other provisions for storage. Also, you must buy a large quantity to achieve the best price.
Check out all possible suppliers in your area, as there seems to be a wide variation in price from company to company. Comparison shopping may save you money.
Any alcohol you may purchase commercially has been denatured. Denaturing is a process required by the government to render the alcohol unfit for consumption. Treat denatured alcohol as you would gasoline or any poisonous substance.
Chapter 3
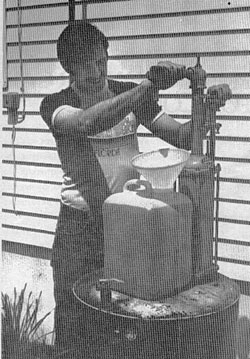
Figure 2-1 - Here's how I "fill 'er up" with alcohol. If my tank had not been portable, a hose would have reached my car.
Preparing Your Car for ConversionLet's assume you have decided to convert "Old Betsy" to alcohol power. Maybe that old clunker in the yard-the one that barely runs, is undependable and isn't worth trading in. A second car not necessary for daily use is a dandy choice for initial conversion. You won't be without transportation during the workweek and working on an older car may ease those fears about how alcohol may adversely affect the engine of your later model car.
Just keep this one fact in mind; if it won't run on gasoline you're defeated before you started. Alcohol will not magically cure a sick engine.
Take a realistic look at the condition of your engine. My test vehicle required replacement of a bad starter, old spark plugs and cracked spark plug wires. If you intend to keep to keep the car for any length of time, the expense of major repairs will be justified.
When your car is running reasonable well on gasoline, it is ready to be converted.Chapter 4
Modification of the Fuel LineA decision will have to be made at this point. Is the conversion going to be a permanent one; or do you want to use gasoline when readily available to reserve your car's new capability to burn alcohol for possible fuel shortages?
In a permanent conversion, the gasoline tank will become an alcohol tank. This involves running the tank completely dry and replacing the gasoline with alcohol. It is undesirable to mix alcohol with gasoline. They will not mix unless the alcohol contains almost no water.
I decided to install a dual-fuel system since the car would be run primarily on gasoline when returned to the owners.
The alcohol tank was constructed from a 5-gallon heavy-walled Nalgene plastic container. This container was obtained from a laboratory at no charge. Since it was small enough to be portable, I did not permanently mount it. The level of liquid could be seen at a glance since the plastic is translucent. A metal container would have served the purpose, but would not have been quite as handy.
A larger alcohol tank could be mounted on the trunk or roof of the car. The choice will depend on what you have to work with and you individual preference. By all means, pick a container that is sturdy, leakproof and clean.
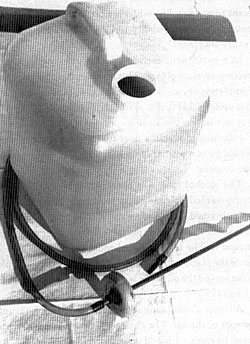
Figure 4-1 - This is my homemade 5-gallon fuel tank and pickup tube. Everything shown was scrounged up at no cost whatsoever.
Install a pickup tube of the same outside diameter as you existing fuel lines. The tube should reach to approximately 1/16" from the bottom of the tank and protrude from the top approximately 1". Also install a vent tube to allow air to replace the liquid as it is consumed. Without the vent vacuum will collapse the tank. Make suitable holed in the tank for the vent and fuel lines epoxy or braze them into place. I brazed my pickup tube to a pipe plug. The exact method will depend on what material you use.
Next, mount the tank in the selected location on your car. A large tank should be fastened or strapped securely to prevent shifting or overturning. My small tank was wedged in between the back seats and could not move at all. I don't recommend that you mount the tank in an enclosed space, however.
With the tank securely mounted, some provision must be made for connecting into the existing fuel line. For this purpose, I used a "T" valve. This device can be purchased at any recreational vehicle supply house. The price will range from about $5 for a simple, manual valve to $40 or more for an electric valve remotely controlled from the dash.
My "T" valve was donated by a neighbor who had removed it from his truck. He had replaced it with a more costly electric valve. This particular model had three inlets. Only two inlets were required, and I plugged the third one.
I mounted the valve on the inner fender well, as close to the fuel pump as was practical. It could also be mounted under the floorboard so the handle could be operated from within the car. This arrangement would eliminate the need to raise the hood in order to change from one fuel to the other.
I used standard black fuel hose for all necessary rerouting of the fuel lines. Standard barb fittings were used to connect the hose to the "T" valve. Teflon tape was used on all threaded connections to prevent leaks.
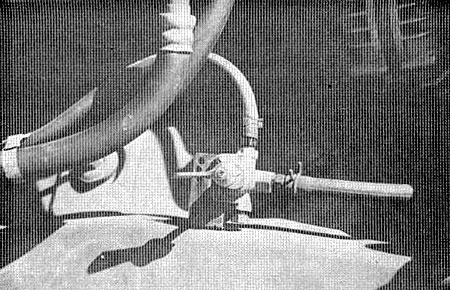
Figure 4-2 - I mounted my "T" valve on the inner fender. The line on top is the alcohol inlet. The right is the gasoline inlet.
Here's how to install your "T" valve and change the fuel lines.
- Mount the "T" valve in the location you prefer.
- Install barb fittings, if required.
- Connect the alcohol to one inlet of the "T" valve using black fuel hose of the correct size.
- Locate the inlet side of the fuel pump and remove the short piece of hose between the pump and the metal, fuel line from the gasoline tank.
- Connect the metal fuel line to the remaining inlet on the "T" valve with black, fuel hose.
- Connect the outlet of the "T" valve to the inlet side of the fuel pump with a third length of black fuel hose.
- Make certain the lines you have added are secure, leakproof and do not interfere with any moving parts.
You now have a dual-fuel system, interchangeable at the flick of a valve.
Bigger image
Figure 4-3 - The above diagram describes how I arranged the fuel line on the Dart.
Chapter 5
The CarburetorTypes of Carburetors
The carburetor is to your car's engine what your heart is to your body. Its job is to feed fuel and air to the cylinders in the correct amounts.
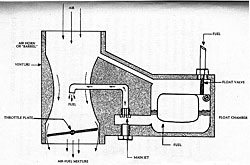
Figure 5-1 is a simple diagram of a carburetor. It has one bore of barrel for air and fuel to pass into the intake manifold and one main metering jet to measure out fuel. This type works on engine with a single bank of cylinders, such as a straight six-cylinder engine.
A"two-barrel" carburetor has two bored and two main metering jets. Each barrel is responsible for the cylinders on one side of a V-type engine such as a V-8. A better distribution of fuel is obtained with this arrangement.
Large displacement engines require more fuel, under some conditions, than a two-barrel carburetor can provide. If the "two-barrel" were large enough to meet peak demand, it would waste fuel under a light load. The "four-barrel" carburetor has two small primary and metering jets, plus two additional secondary barrels and jets. The larger secondaries remain closed until the engine needs the extra boost they provide.
Bigger image
Figure 5-1 - A simple carburetor.
How They Work
Whichever type your car may have, the operation is similar.
Fuel is pumped through the line and enter the carburetor's float bowl. A needle valve admits fuel to the bowl and closes off the flow when the bowl is filled. The valve is opened and closed by a float which rises and falls with the fuel level in the bowl. The fuel level is very critical and must be kept within the close limits by the float and needle valve.
Air enters the carburetor through the air horn. It is drawn down past the venturi, where the passage narrows. This restriction causes an increase in air velocity and results in the creation of a vacuum below the venturi.
This vacuum sucks fuel from the bowl through the metering jets. The jets are carefully sized to give the correct ratio of fuel to a given volume of air. Metering rods may be used to partly close the main jets at idle.
The metered fuel passes into the venturi and is misted into the barrel. Here it is mixed with air and distributed to the cylinders by the way of the intake manifold.
A smaller idle passage is equipped with an adjustable jet. The smoothest idle can be obtained by screwing the stem of this jet in or out.
A third fuel passage leads from the accelerator pump, located next to the float bowl. This passage provides an extra shot of fuel only when the accelerator pedal is pressed down. The extra fuel balances the excess air which is sucked in as the throttle plate is suddenly opened during acceleration. The accelerator pump is inactive at idle or when the accelerator pedal is held at a steady position.
The choke valve is located in the air horn above the venturi. It's purpose is to restrict the amount of air entering the carburetor while the engine is cold. Fuel will not vaporize well in a cold engine and less air flow is desirable. An automatic chock will open and admit more air as the engine heats up. It is necessary to open a manual choke by hand.
A gasoline engine runs best with an air/fuel ration of about 14/1. The jets in the carburetor are sized to provide this ratio.
Alcohol burns most efficiently with a ration of around 9/1. The next chapter will outline the procedure for removing, modifying and replacing the carburetor to attain this ration.Chapter 6
Altering the CarburetorYou may want to obtain a second carburetor to convert and keep your present one for gasoline use. I obtained a used one for $10 from a salvage yard. Rebuilt carburetors are available from your auto parts dealer. In either case, make sure the one you purchase is compatible with the engine you plan to use it on. You parts dealer will be helpful in determining the most efficient.
Next, get a carburetor overhaul kit. Be sure the kit is for your particular model carburetor. The model will be cast into the body or on a metal tag attached to it. The kit contains new gaskets, check valves, an accelerator pump plunger and the necessary parts to make an old carburetor perform like new. Best of all, it has detailed instructions and an exploded view of all the parts. Each part is numbered and named for reference. This will a real aid for reassembly.Remove and Disassemble the Carburetor
Take a good look at you engine before removing the carburetor. Notice how each linkage or hose is attached. Remember - everything must go back on correctly, so be alert. Unbolt the carburetor and put any small fasteners away where they won't get lost.
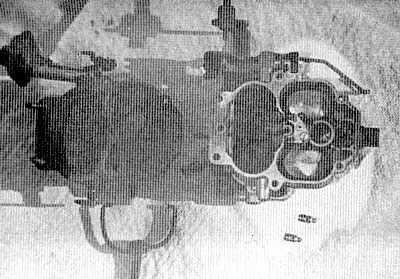
Figure 6-1 - This is the carburetor with the air horn and float chamber cover removed. The jets are lying just below the carburetor body.
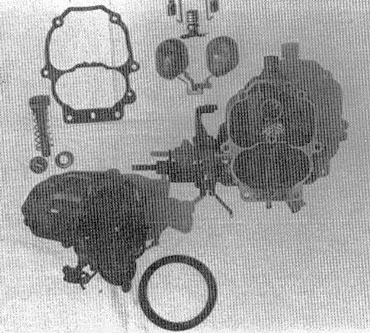
Figure 6-2 - Here's the carburetor disassembled a step further. The jets, metering rods and float have been removed. Be sure you know where each part goes before you remove it from your carburetor.
Enlarging the Metering Jets
Try to find a clean, uncluttered table or counter to work on. Use the exploded view as a guide and disassemble the carburetor far enough to remove the main, metering jets. The jets are more accessible in some models than others.
Carefully determine the hole size of the metering jets. This can be done by actually measuring the jet or looking in a shop manual. If you have no way of determining the hole size, take the jets to an automotive machine shop. They have the tools to measure and enlarge the jets.
Determine the proper jet size by the following example. This is the calculation I used from the Dodge.
Original Jet Diameter Increase Jet Diameter By 40% For Alcohol
248Correct Jet Diameter For Alcohol
.0868
NOTE: The 40% figure used here will assure a rich enough mixture to prevent burning the valves due to an over-lean mixture.
After testing the car, you may find the jets are too large and the mixture is very rich. If this is the case, install new jets enlarged 35% or even smaller as your car requires. Just decrease the size in increments of 5% over stock size to be safe.
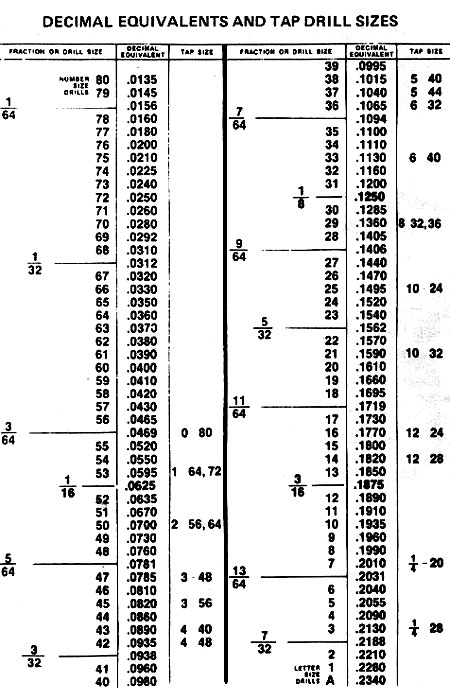
Figure 6-3 - A standard machinist's drill chart.
Next I looked up .0860 in a standard drill size chart. This chart can be found in most auto repair manuals or machinists handbooks. The closest drill size is a #44 which is .0860.
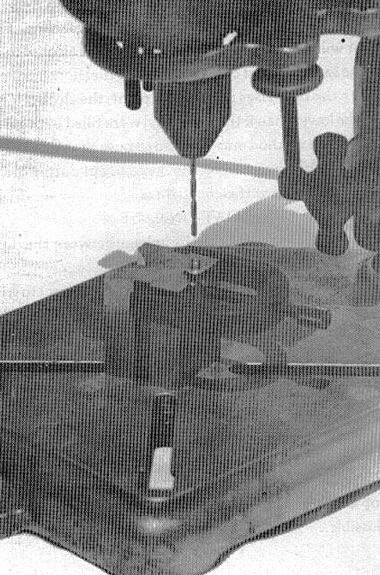
Once you have determined the proper drill size, use it to carefully enlarge each jet. A drill press is best for this job, but a hand drill can be used if caution is exercised. Do not attempt to drill the jets without removing them from the carburetor. The shavings will fall into tiny passages and create problems.
You may be able to avoid drilling. Auto parts dealers stock jets in various sizes for many types of carburetors.
They are inexpensive and if you can find one in the proper size, it will save time and labor.
I opted for the drilling method.
Figure 6-4 - This is a typical set up to drill the jets on a small drill press. The "V" block hold the jet parallel with the drill bit.
The Float -- Two Possible Alterations
Alcohol is heavier and more dense than gasoline. The float will ride higher in a given amount of alcohol than in the same amount of gasoline. Since fuel flow is cut off when the float rises to a specific point, the alcohol level will be lower than if the float bowl were filled with gasoline. Some method must be used to raise the fuel level to normal. Otherwise, the engine will cut out during turns due to lack of sufficient fuel.
Bending The Float Linkage
One way is to simply bend the linkage between the float and the inlet valve.
The exact amount to bend the linkage is subject to trial and error. Several settings may be required to find the correct float height.Adding Weight To The Float
A difficult but more accurate method is to add weight to the float. Carefully weigh the whole float assembly on a balance (a powder scale will do an excellent job). Weigh a piece of solder or epoxy glue equal to 10% of the total weight of the float assembly. Fasten this to the top of the float, distributing the weight as evenly as possible.
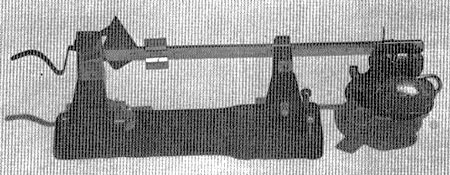
Figure 6-5 - A powder scale is just the thing for weighing the float. My float weighed 253 grains.
I tried both methods. The bending method was tedious and involved disassemble of the carburetor several times before the correct setting was found. Also, some float bowls don't have enough clearance above the float to allow it to be bent enough to do any good.
The weight method worked just fine. It is preferable because you can set the float just as the instructions in the overhaul kit call for.
Reassemble the carburetor. Follow the kit guidelines for reassembly and adjustment.
Got any leftover parts? Hopefully, your answer will be no! Now replace the carburetor on the engine and connect everything back up.Chapter 7
Altering the Ignition SystemOnce the fuel system mixes the proper ration of air to fuel and delivers the mixture to the individual cylinders, its function is completer.
The actual firing and production of usable power is controlled by the ignition system. Its task is to ignites the fuel/air mixture at a precise instant in relation to the movement of the piston. If the mixture fires too early, pre-ignition pinging will occur and may damage the engine. If the mixture ignites too late, power will be lost and fuel wasted.
A gasoline engine is timed to fire just as the piston reaches the top of it's stroke or just an instant before. Gasoline ignites and burns so rapidly that the result is more like an explosion than a burning.
Alcohol burns at a much more even rate. It is harder to ignite and requires more time to completely vaporize and burn. To allow for this extra time, it is necessary to "advance" (cause to fire earlier) the timing of the engine. This is done by loosening the distributor and turning it in the opposite direction from the direction the rotor in it turns.
If you aren't sure which way the rotor in your engine turns, take the distributor cap off and have an assistant crank the engine. Whichever way the rotor turns, you must turn the distributor body the opposite way to advance the timing.
A timing light will make this job a snap, if you have access to one. The engine can be timed by ear, if you develop the knack for it.
Here's how to do it:
- Loosen the bolt at the base of the distributor until the whole unit can be turned.
- Initially advance the timing by turning the distributor about 1/16 of a turn. Snug the hold-down bolt so the distributor won't turn itself (but you can still move it with a little effort).
- Start the engine and run any gasoline remaining out of the fuel line. Now advance it still more until you get a faster idle, but still a smooth idle.
- Check the timing by driving. If you hear "pinging" in the engine during acceleration, the timing must be "retarded". The correct setting will be just below the point where the pinging disappears.
I initially time the Dart by ear and made several changes in timing before I was completely satisfied. After several days of driving, I checked the timing with a light. The original setting had been 0º TDC (top dead center). After converting it to alcohol, the optimum setting had become 24º BTDC (before top dead center).
Your car may not require exactly 24º of advancement. This is a ballpark figure. The exact amount will depend on your particular engine.Spark Plugs Can Make a Difference
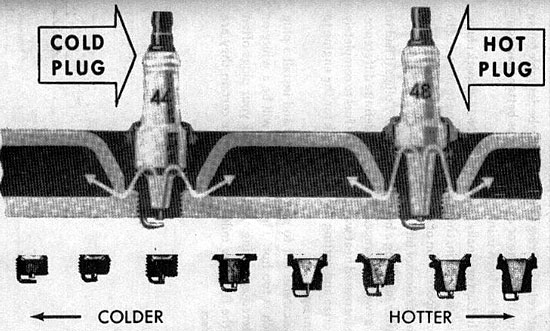
Let's discuss spark plugs briefly. As you may already know, each type of spark plug is made in three or four heat ranges. The only difference between two plugs of the same type but different heat ranges is the rate at which they dissipate heat. The plug with the higher number will hold heat longer and is referred to as a hotter plug.
Figure 7-1 - Spark plug heat range system. The lower number denotes a colder plug.
Alcohol fuels, as I mentioned before, don't ignite as easily or burn as quickly as gasoline. To increase the temperature in the firing chamber, it may be desirable to use a plug that is one or even two ranges hotter than your engine has been using.
The Dart originally had Champion N-14-y spark plugs. After conversion, the engine was prone to miss due to poor vaporization of the fuel. More heat was needed to turn the alcohol into a combustible gas.
After installing a hotter set of N-16-y plugs (I had to go up two heat ranges), I could tell a definite difference. The increased heat was getting more fuel to completely vaporize and cutting the time it took for the engine to warm up.
Be careful not to go to extremes and install a plug that is too hot. The telltale sign will be a white or blistered-appearing electrode. Check your plugs often for the first few miles until you are certain they are correct.Chapter 8
Firing Up the EngineAt this point point, you should be ready to start up. The carburetor is modified and back in position. Timing should be advance to the first tentative setting. Any necessary fuel line changes have been completed.
Prime the carburetor with a few drops of gasoline, fill the alcohol tank and crank the engine. You may have to "feather" the gas pedal to keep it running once the alcohol begins to reach the engine. (The idle mixture is still set for gasoline at this point.)
Let the engine warm up before you set the idle. Then slowly back the idle adjusting screws out 1/4th turn at a time until a smooth idle is obtained. If there are two idle screws, move both the same amount each time.
Get in the car and test drive it. Notice any symptoms which seem irregular. The chart I have provided lists some symptoms I have encountered the possible causes and alterations.
Symptom Possible Cause Alteration Engine cuts out under acceleration 1. Low float level
2. Accelerator pump not at a full stroke1. Raise float or add more weight
2. Adjust accelerator pump for a longer strokeEngine dies when turning a corner Low float level Raise float or add more weight Pinging under hard acceleration Timing set too advanced Retard timing until symptoms stop Engine dies at idle 1. Carburetor improperly adjusted
2. Spark plugs incorrect heat range: if wet - too cold, if white - too hot1. Adjust as advised in alcohol kit and this text
2. Change plugs to proper heat rangeEngine will not start when cold Poor fuel vaporization qualities 1. Read the next chapter for solution
2. Proof of alcohol may be too low. Use 160-proof or better.Chapter 9
Cold Weather Starting ProblemsHow To Cure Them
Alcohol does not readily vaporize below about 70º F. Unless you live in a tropical climate, some provision will have to be made for starting the engine in cold weather.
Starting the Engine on Gasoline
If you installed the "T" valve type fuel system, you can start the car on gasoline. I used this system on the Dart and had no significant starting problems. Each time I parked the car for an extended period, I would switch the "T" valve to gasoline just a minute or so before shutting the engine off. The gasoline burned very rich, but would burn. In the morning, I would start the car and switch back to alcohol in a minute or so. A gallon of gas would last a week or so with this type or starting method. (Mind you I said a gallon of gas - not a tank.)
In practical use, the smaller tank could be one gallon or less in size and alcohol could go directly into the regular tank. Alcohol will clean any old gunk out of the regular tank. You may have to change the fuel filter several times until the tank had been cleaned by the alcohol.Using Gasoline as a Primer
Gasoline is also used in another method. This method involves installing a surplus windshield washer pump and reservoir. The pump has a hose leading to a tube or spray nozzle brazed into the air cleaner lid. The reservoir is then filled with gasoline.
A few squirts of gasoline will fire up the cold engine. Once the engine has generated a little heat, it will run well on alcohol.Preheating the Alcohol
Several solutions involving preheating of the fuel have been found. Most involve applying an external source of heat to the carburetor or the fuel line. Any method of raising the fuel temperature above 70º F will be most helpful.
Your ingenuity can get a workout in this area. Don't be afraid to experiment with any ideas you may have which will hold in engine heat and ease starting.Manual Choke
Another aid which I found helpful is the good old-fashioned hand choke. These are available at auto parts stores and will replace your automatic choke. The hand choke will allow "pampering" of a "finicky" cold engine. It will also allow you to open the choke wide to take advantage of the window-washer method of priming.
Chapter 10
Vital Statistics
Materials and Cost of Dart Conversion Used Carburetor Manual Choke Kit Eight (8) Feet of Fuel Hose "T" Valve (free) Five (5) Gallon Tank (free) Three (3) Barb Fittings for Fuel Hose Eight (8) N-16-y Champion Spark Plugs One (1) Roll Teflon Tape (for fittings) Overhaul Kit for Carburetor Total Parts Cost Ky. 5% Sales Tax Labor Supplied by Writer Grand Total
Automobile tested Mileage at time of conversion Engine type Carburetor type Fuels tested Best proof (Determined by test) Miles per gallon - 180 proof Miles per gallon - Gasoline Price per gallon - 200 proof Price per gallon - 180 proof (diluted) Percentage of fuel cost for imported oil Writer's Satisfaction My Experience is in Your Ballpark
This guide is based on my own experience with an older model car. I performed all modifications as described in this text. Your results may be much improved over mine and you might hit upon a better idea for easier starting and increasing mileage.
Many other gasoline-powered implements can be converted to alcohol. Some of these include:
- Motorcycles
- Boats
- Lawnmowers
- Emergency Generators
- Farm Implements
I plan to continue to experiment, and hopefully, convert these also as the opportunity comes about.
Drop me a note and let me know how your experiences with alcohol fuel turn out.I will try to answer any questions you may have and will be interested to hear of your successes in conversion to alcohol fuel.
Back to the Biofuels Library
Biofuels
Biofuels Library
Biofuels supplies and suppliers
Biodiesel
Make your own biodiesel
Mike Pelly's recipe
Two-stage biodiesel process
FOOLPROOF biodiesel process
Biodiesel processors
Biodiesel in Hong Kong
Nitrogen Oxide emissions
Glycerine
Biodiesel resources on the Web
Do diesels have a future?
Vegetable oil yields and characteristics
Washing
Biodiesel and your vehicle
Food or fuel?
Straight vegetable oil as diesel fuel
Ethanol
Ethanol resources on the Web
Is ethanol energy-efficient?